

Without proper organization, inventory management will quickly become simply unmanageable. Luckily, it’s quite easy to keep your inventory organized with the right tools. You simply need to find — or make — the right tools first.
Your inventory management tool should give you visibility into your inventory levels, and the ability to monitor stock movements in real time from any device, from any location. It should help you record sales, track reorders, add items, and update quantities in as few clicks as possible. It should also free you from manual data entry, allowing you to do all these tasks faster and more easily than before.
While there is a wide variety of inventory management software available, they may not precisely fit your needs. They also come with bulky and expensive extra features that just complicate your work. Your inventory management software should help you easily manage your inventory day-to-day — not require you to manage your software while simultaneously trying to wrangle your inventory.
Often, the best way forward is just to build a solution yourself that fits your exact needs. You can build a custom inventory management solution yourself (or ask your IT team to build it for you) with no code and low code tools. It’s easier than you might think.
Start with a basic inventory management software template
The easiest way to begin building a new app is to start with a template. This pre-built inventory management template has the essential core features you need from an inventory management app.
- Preview on your desktop: Click preview from the template page to see the app in your desktop browser. You can toggle between the desktop and mobile views from the “Try Template” button at the top. Follow along to see the app in action.
- Preview on your mobile device: Alternatively, you can scan the QR code below from your tablet or smartphone to see what your app will look like on mobile.
This is what the app will look like when your team is using it. For now, it contains dummy data that you can replace with your existing business data once you begin customizing the template. The interface is user-friendly and straightforward and makes it easy for everyone on your team to quickly understand how to use the app.
Navigating the template screens
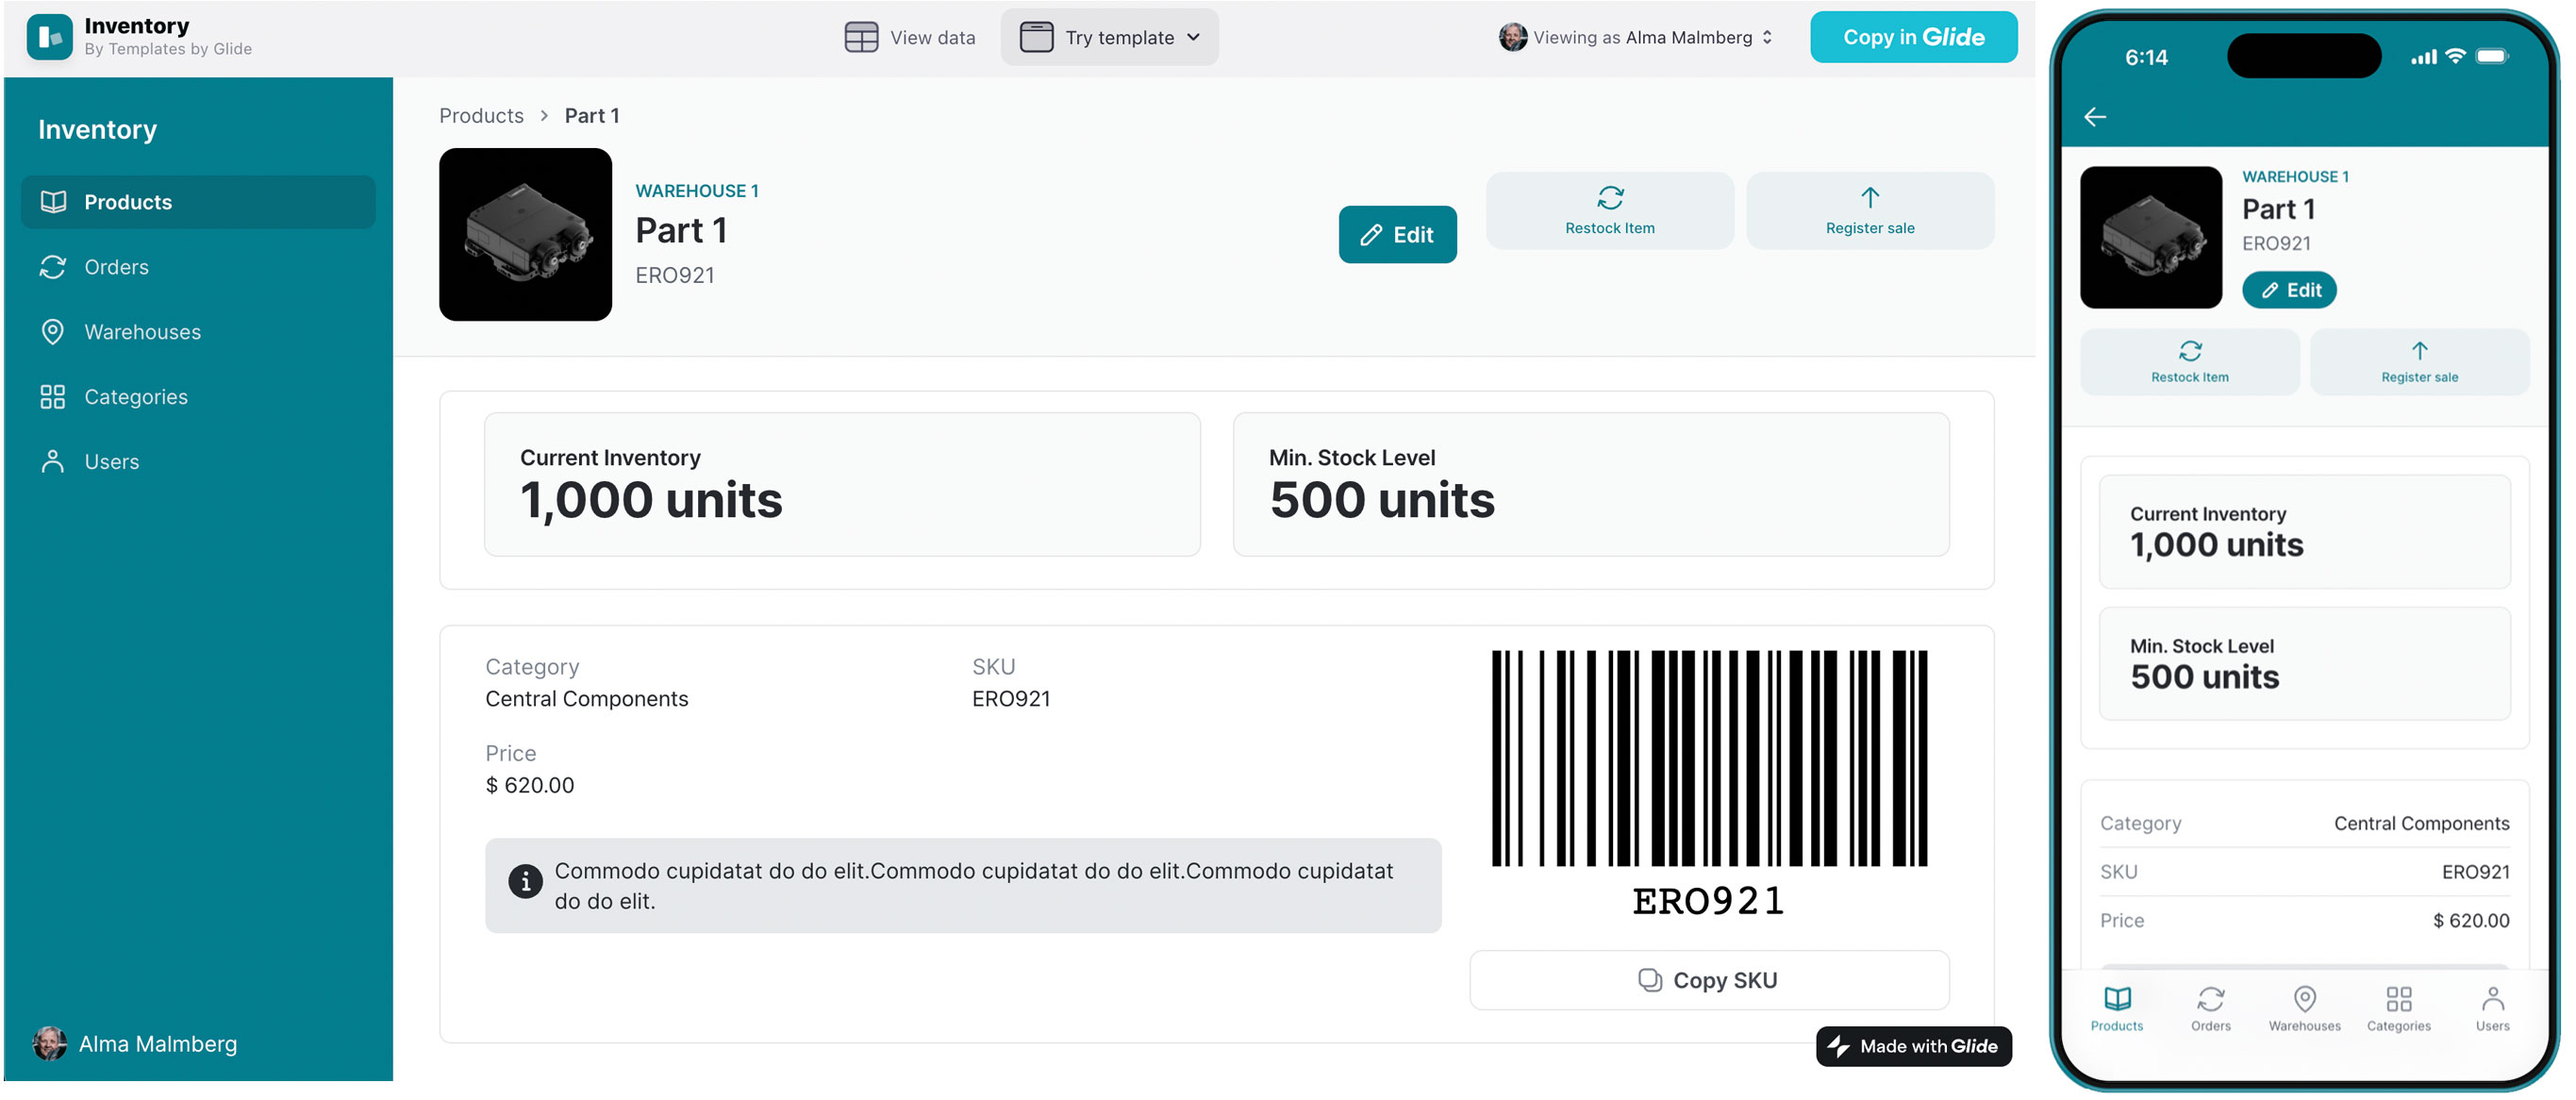
The first section is a product gallery, sorted by categories. Click on a product to see a detailed product page. From here, users can see information like images of your products, stock levels, inventory types, prices, and even a record of historic product orders. They can also reorder stock and register new sales, which will get recorded in your product database automatically (more on data later).
You also have a unique SKU and barcode or QR code. With this feature, you can connect your app to a barcode scanner so you can more rapidly track inventory, maintain accurate stock levels, and increase speed and accuracy at the point of sale.
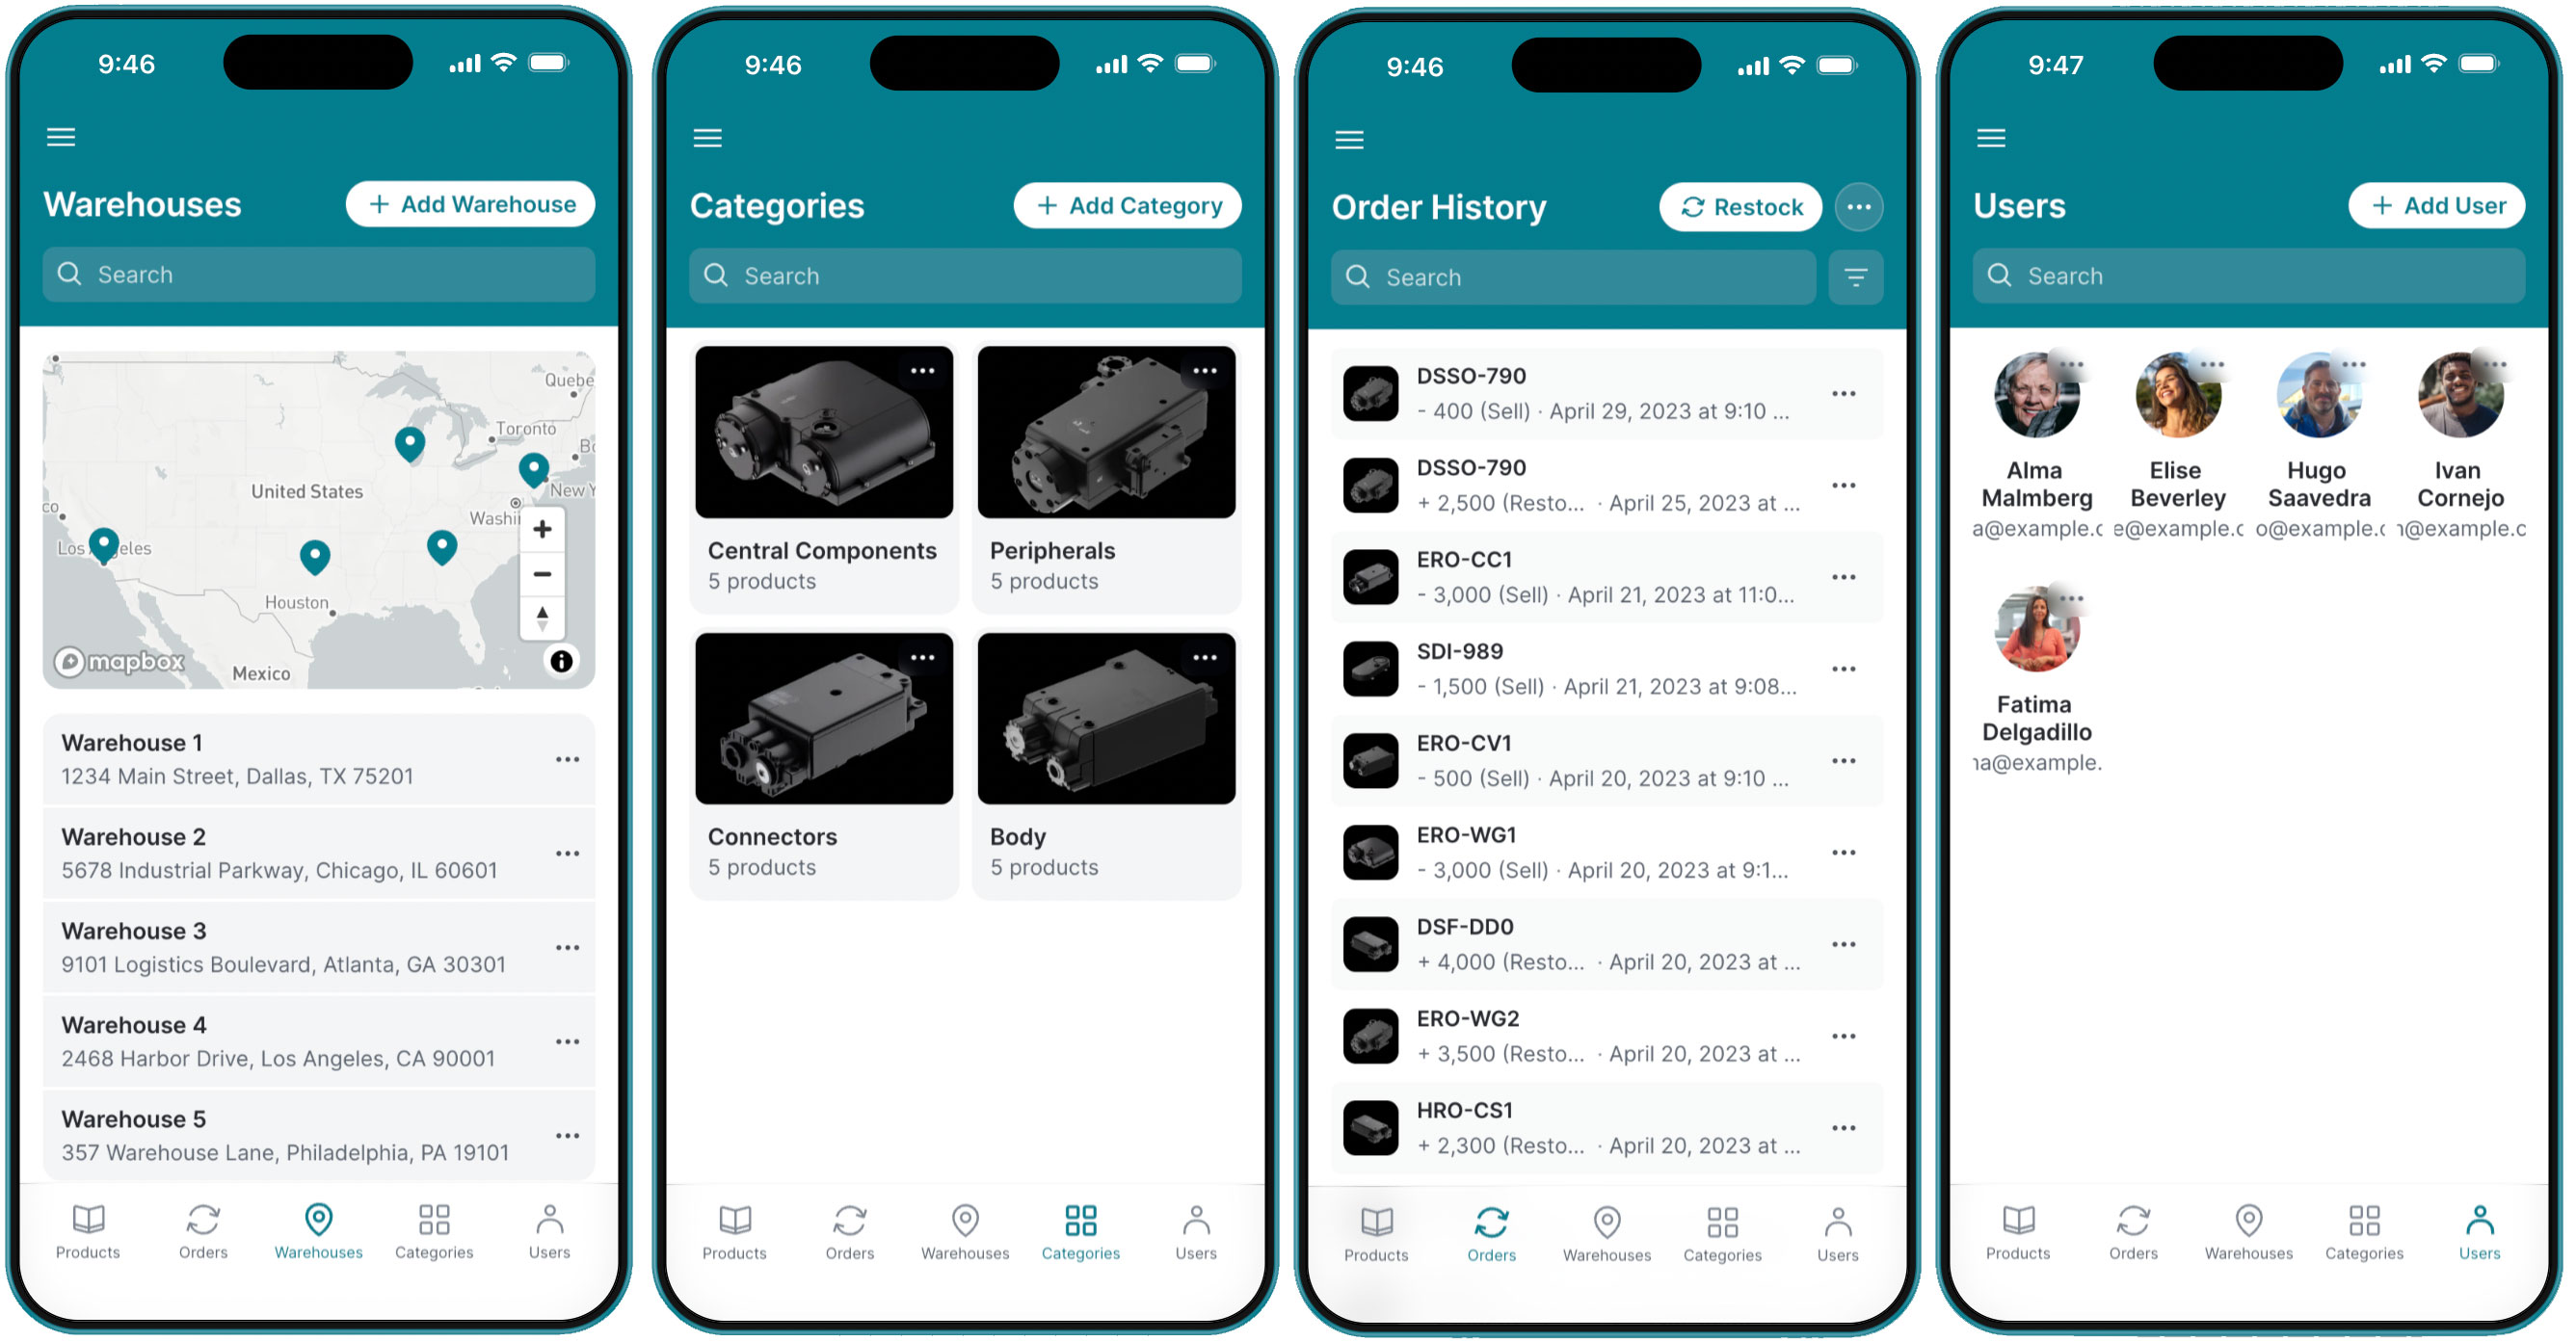
From the orders screen, users can see all past sales and restock orders. The warehouses screen provides location information on stock. This doesn’t necessarily need to be warehouses in your final app — it could just as easily track backstock, inventory by store, or depot locations.
The final nav section is a users gallery. This view lets users see their coworkers or fellow technicians. Since users need to be logged in to access the app, you can also create custom permissions and track sales to individual workers.
Customize your app to suit your unique needs
From this basic template, you can customize the form and function of your inventory management software in a myriad of ways to fit your business’s needs.
To do this, you’ll want to open the template up within the Glide workspace by clicking “Copy in Glide” so you can edit it yourself. From this screen, you can change the function and appearance of your app with the data, layout, and actions tabs up top.
Add inventory data sources
Your first step is to add your data sources. You can connect your app to Google Sheets, Airtable, Excel files, or BigQuery. Alternatively, you can store your data directly in Glide Tables instead of using an outside data connection. Data syncs automatically across your app and tables, keeping your inventory information consistently up to date.
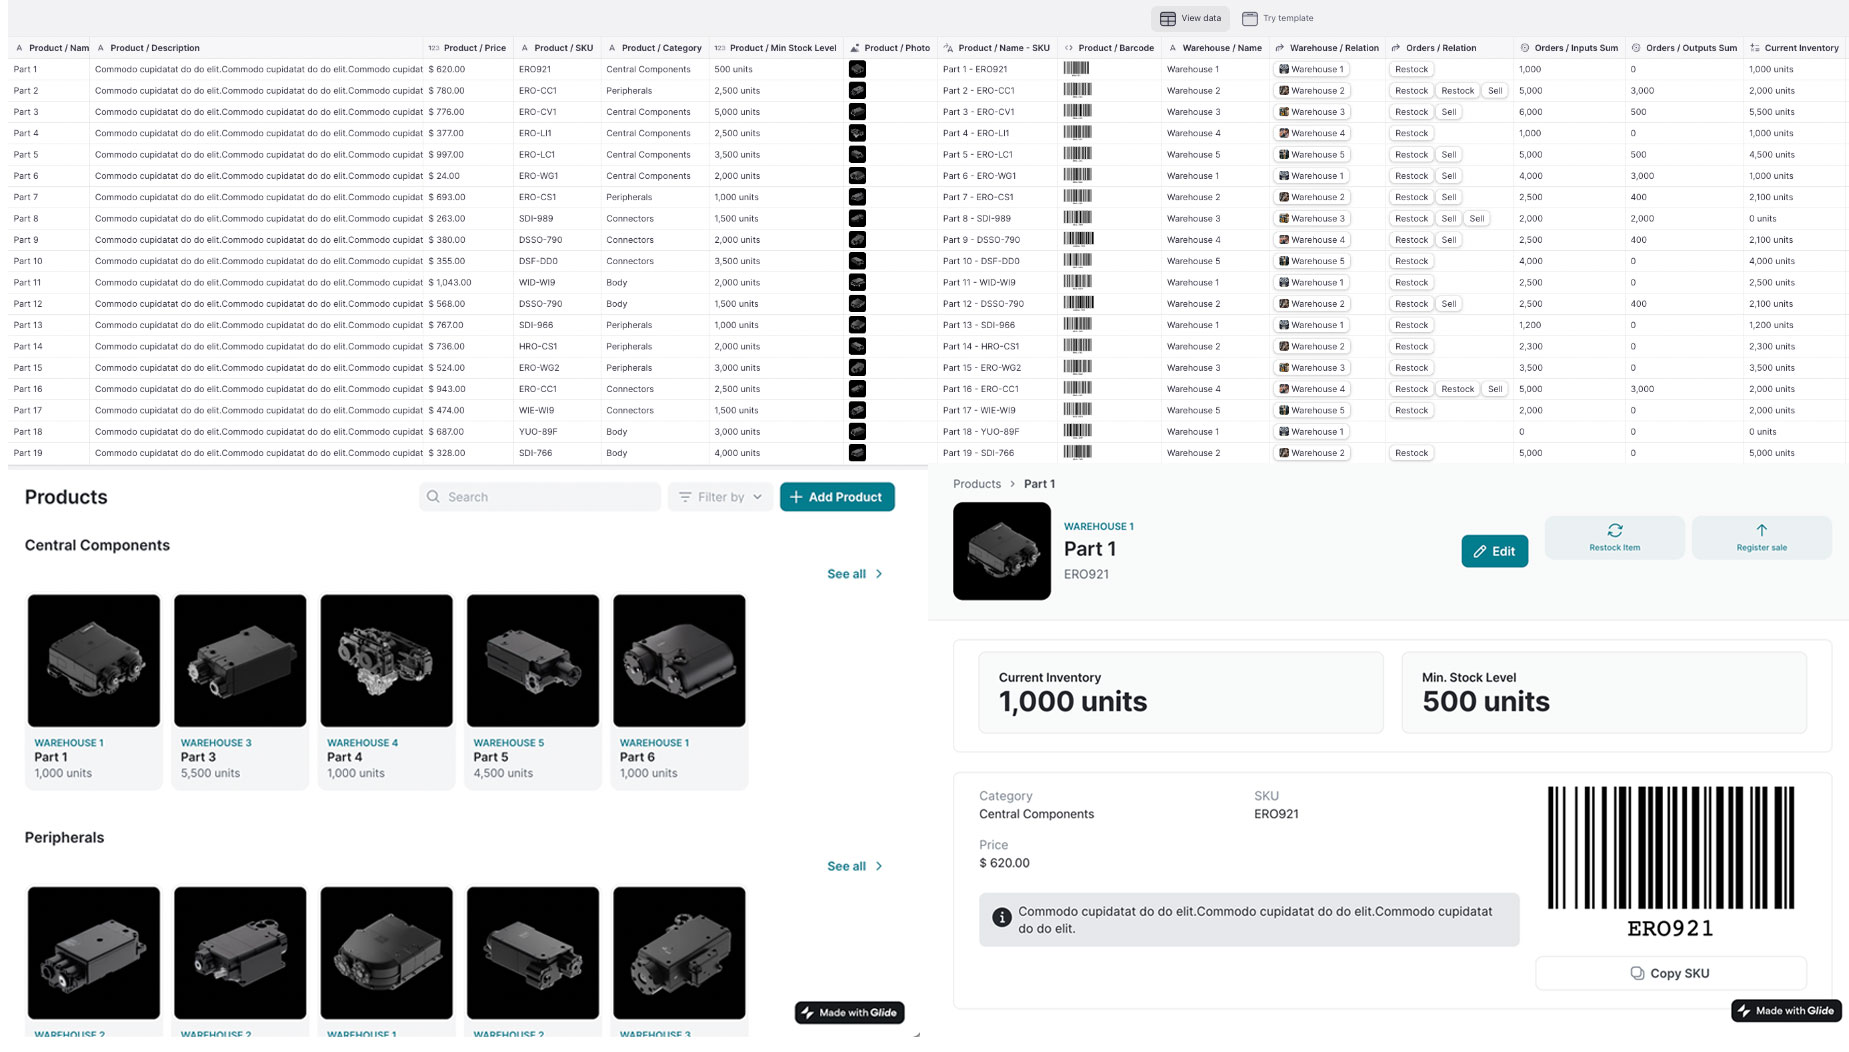
To see how impactful building an app on top of your data sources can be, all you need to do is compare how the exact same collection of information appears in a table (top) versus in the app (the two images below). The app gives the user all the same information but in a much more consumable and easy-to-understand way.
They can search their dataset, expand information to see a single product, or collapse it to see your inventory selection as a whole. As a result, your business data is easier to understand, it can be used to more effectively inform decisions, and you can control your inventory more efficiently.
Customize the information available to your team
Once your data is in place, you can customize your user interface to display that data in the way that best works for your business. You can change the product page to display additional information or add new navigation sections to the menu.
A business with a field team could link component manuals and instructions so they can sell a part to a customer, install it for them, and then reorder a replacement, all from the same screen. A retail operation (like a wine distributor) could include detailed tasting notes to help their employees more eloquently describe their selections to potential buyers.
Incorporate features to help your team’s work
Identify what additional features you want to add to your app. A QR and barcode scanner is an obvious first step, as it allows your team to use their phone or tablet camera to scan product codes and upload their information directly to your database.
Push notifications can also be a helpful feature to add if you want to create tailored notifications and custom alerts for low or high stock levels and status changes. Incorporate charts and graphs that help to visualize order trends, track sales patterns, and identify top-performing products.
Add AI features to your software
New AI app-building workflows allow you to create even more powerful features within your app. You can use AI to scan photos of receipts and automatically record the information from them, or extract key data from manuals so it’s more easily available in-app.
Marco Volpato used AI in some really creative ways to make his custom inventory manager more effective for his business. He set up an AI feature to create short, useful descriptions of his available wines that his team could use to drive sales. He also added a feature so that they could ask the app questions and get AI-generated answers based on his actual inventory data.
Use integrations to connect to the rest of your business tools
Your finished software can easily integrate with your other business tools.
Connect your inventory management app to your project management app to help daily work run more smoothly. Or connect it to your email platform or team chat app so that it’s easier to keep everyone informed. If you need to send receipts or purchase orders, integrate Stripe or Docusign into your app to help your team do that quickly from their device.
Personalize your app’s appearance
Update the appearance and branding of your app to make it feel like a more integrated part of your business. To do this, click on the app settings icon in the top right corner to access design controls. Here, you can add your company logo and adjust colors to suit your branding. With a business plan, you can even create a branded login screen to add security and give your app a more proprietary look.
Set permissions and security controls
The security of your software and company data is obviously paramount. You can add important features and guardrails to your app to keep it compliant with your business’s security standards.
Add SSO to ensure secure access to your app. If only certain team members need access to information or features, you can adjust visibility settings or set multi-level permissions. It’s easy to restrict settings so that team members can’t inadvertently delete inventory items or change important details.
What will you build next?
As you can see, with no code, you can build software that’s as simple — or as complex — as you need, all without having to write your own code. After customizing this template, you should have a better idea of how easy it is to build apps, and how vast the scope of what you are able to build could be.
Your business now has its own inventory app, but what else could it benefit from? Do you need a customer portal? A knowledge management system? Does your IT department need better tools for tracking help desk tickets or managing what devices your team is using in their offices or on the sales floor?
Put no code technology into the hands of your IT team, and they can build an entire ecosystem of interconnected apps that are custom-tailored to your needs.


