
Barcodes, QR codes, and the scanners that read them are ubiquitous today. They can be found everywhere, from coordinating enterprise-level logistics, checking out customers in shops, and pulling up a menu when someone sits at a restaurant.
There’s a good reason they’ve become so common — a barcode or QR code reader is a powerful yet simple tool for converting something physical (marked with barcode labels) into a piece of digital data. That data can then be processed, communicated, stored, and analyzed easily to perform all sorts of essential business functions.
Building a QR and barcode scanner app gives you an interface to easily record and track physical objects in a database. This allows you to track inventory or supplies, record sales, or even keep track of equipment or devices for your team.
Whatever you’re building, you can add barcode scanning ability to a new or existing app with just a few easy steps.
Why create custom barcode scanning software
Building your own app is easy, and it ensures you have software that fits your business needs better than any off-the-shelf software ever could. Here are a few reasons to consider it.
Existing software is old and outdated
Many different kinds of barcode scanning software are available on the market, but they are often heavily outdated, expensive, and loaded with excess features. While these types of software may be essential for extremely large logistics operations or huge retailers, they are not a workable scanning solution for a small business.
When you make your own app, you don’t have to pay for the bloatware that comes bundled with the typical barcode scanning software. Your app will be faster and much more user-friendly since you won’t have to deal with a complicated and confusing user interface.
Anyone can build apps with no code
With a no code platform, it’s possible to build your own barcode scanning app without coding any of it yourself or hiring expensive developers. You can quickly, easily, and affordably assemble a custom app and share it with your team.
Your app fits your workflows perfectly
Glide barcode and QR code scanner apps are built on top of your existing business software. You can design them to fit your workflows instead of shaping your work to fit the available software. Adding barcode scanning to your spreadsheets via an app eliminates the need for manual data entry. Your data will be more accurate, and your team will be more productive.
Access easily on mobile devices
Work happens in all sorts of places other than a desk. Putting a barcode scanning app into workers' hands helps them instantly pull up needed information or record important data right from their phone, tablet, or mobile computer, helping them work more efficiently. It essentially turns any employee's phone into a wireless barcode scanner, giving them better access to the data they need for their jobs. A lot of legacy software is inflexible and is really only usable on a computer. When you build a web app with Glide it’s automatically mobile adaptive without any extra work on your end. This means it is intuitive to use from any device - whether it’s an Android phone, iPhone, iPad, iOS laptop, or Windows desktop, and whether you have access to wifi or not.
How a barcode scanner app can be used at work
Creating your own app helps to unite the business data in your databases with your physical environment at work. Track products or access related digital information, then use your app to perform tasks using that data - like inventory replenishment or taking notes in the field.
Rotha Ksa from Champion Industries built an app for their appliance repair techs. It enabled them to scan a barcode on an appliance and automatically pull up the relevant checklists, registration, and warranty information for that specific model, saving a ton of time and hassle in the field.
Technicians can go and complete a checklist. Then our warranty system, the registration, and everything behind it can happen. Our third-party field technicians can get paid a lot sooner just by getting everything a lot more streamlined.” - Rotha Ksa
Build custom barcode scanner software for applications like:
- Repair techs - Reference important materials like product manuals or warranty details without having to hunt for model information, search for the right PDF, or dig through paper records.
- Field teams - Scan products in the field to pull up servicing notes, serial numbers, or other logistical information for sold products, rental equipment, or materials that need replenishment on site.
- IT asset tracking - Check equipment or devices in and out and stay more organized by creating an asset tracking app and barcode system.
- Retail - Scan a product’s UPC at the point of sale (POS) to make checkout faster or on the sales floor to pull up product information to go over with customers.
- Logistics - Read barcodes on boxes to track shipments and check merchandise levels from an office, store, or warehouse.
- Inventory management - View inventory levels, record sales, and monitor stock movements in real-time from any device, whether in the warehouse or the office. Track inventory levels by scanning on-hand merchandise or supplies. Reorder instantly by scanning barcodes on shelves or on products.
- Event and conference apps - Create an app to log attendees using barcodes on their tickets or phones or have attendees scan a QR code to download event info like TEDxLisboa did for their latest conference.
- Healthcare - Quickly access schedules, room assignments, or product replenishments from an app.
How barcode scanning works in Glide
Glide incorporates Dynamsoft Barcode Reader (DBR) tech to make it easy to add a high-performance barcode scanner to your apps without complicated licensing or manual setup.
The Dynamsoft reader is ideal because it is fast (at just 0.12 seconds per scan), reliable, accurate, and scalable. Crucially, it performs well in challenging low-light conditions, making it usable in even in industrial environments.
This barcode scanner uses your mobile device camera to scan almost any type of barcode, including linear barcode formats (like zebra codes) and 2D barcode symbologies (more commonly known as a QR code or data matrix).
If you choose, you can connect a Bluetooth barcode scanner to your device if it’s preferable for your team to use a laser barcode scanner instead of a phone camera. Connect a corded scanner that users can operate hands-free with a permanent stand or cradle (at a POS for example) or a cordless handheld barcode scanner they can use more freely.
The scanned values are recorded in real-time to a spreadsheet or database, like SQL, Google Sheets, or Excel. There, you can use them as records or to trigger other actions or automations. You can even use Glide AI to analyze, summarize, or produce insight from your scanned data.
Barcode and QR code scanning is available for users on the Business and Enterprise plans. Each scan will use updates, so you’ll also need a plan that has enough updates for all the scans you want to do.
How to create a custom barcode scanner
It is incredibly simple to add a Barcode and QR code scanning function to your Glide app — simply select barcode scanning as a component (camera stays on) or an action (single shot):
- Adding a Scanner component is best if you need to scan many barcodes in succession since it keeps the user’s camera on and ready to scan.
- Incorporating the Scan Barcode or QR Code action into your app turns the user's camera on only when the action is triggered, usually with a button.
NOTE: The Scanner component and Scan Barcode or QR Code action are replacing Glide’s legacy scanner that you might have known as Scan Linear Barcode or Barcode Scanning with Airtable.
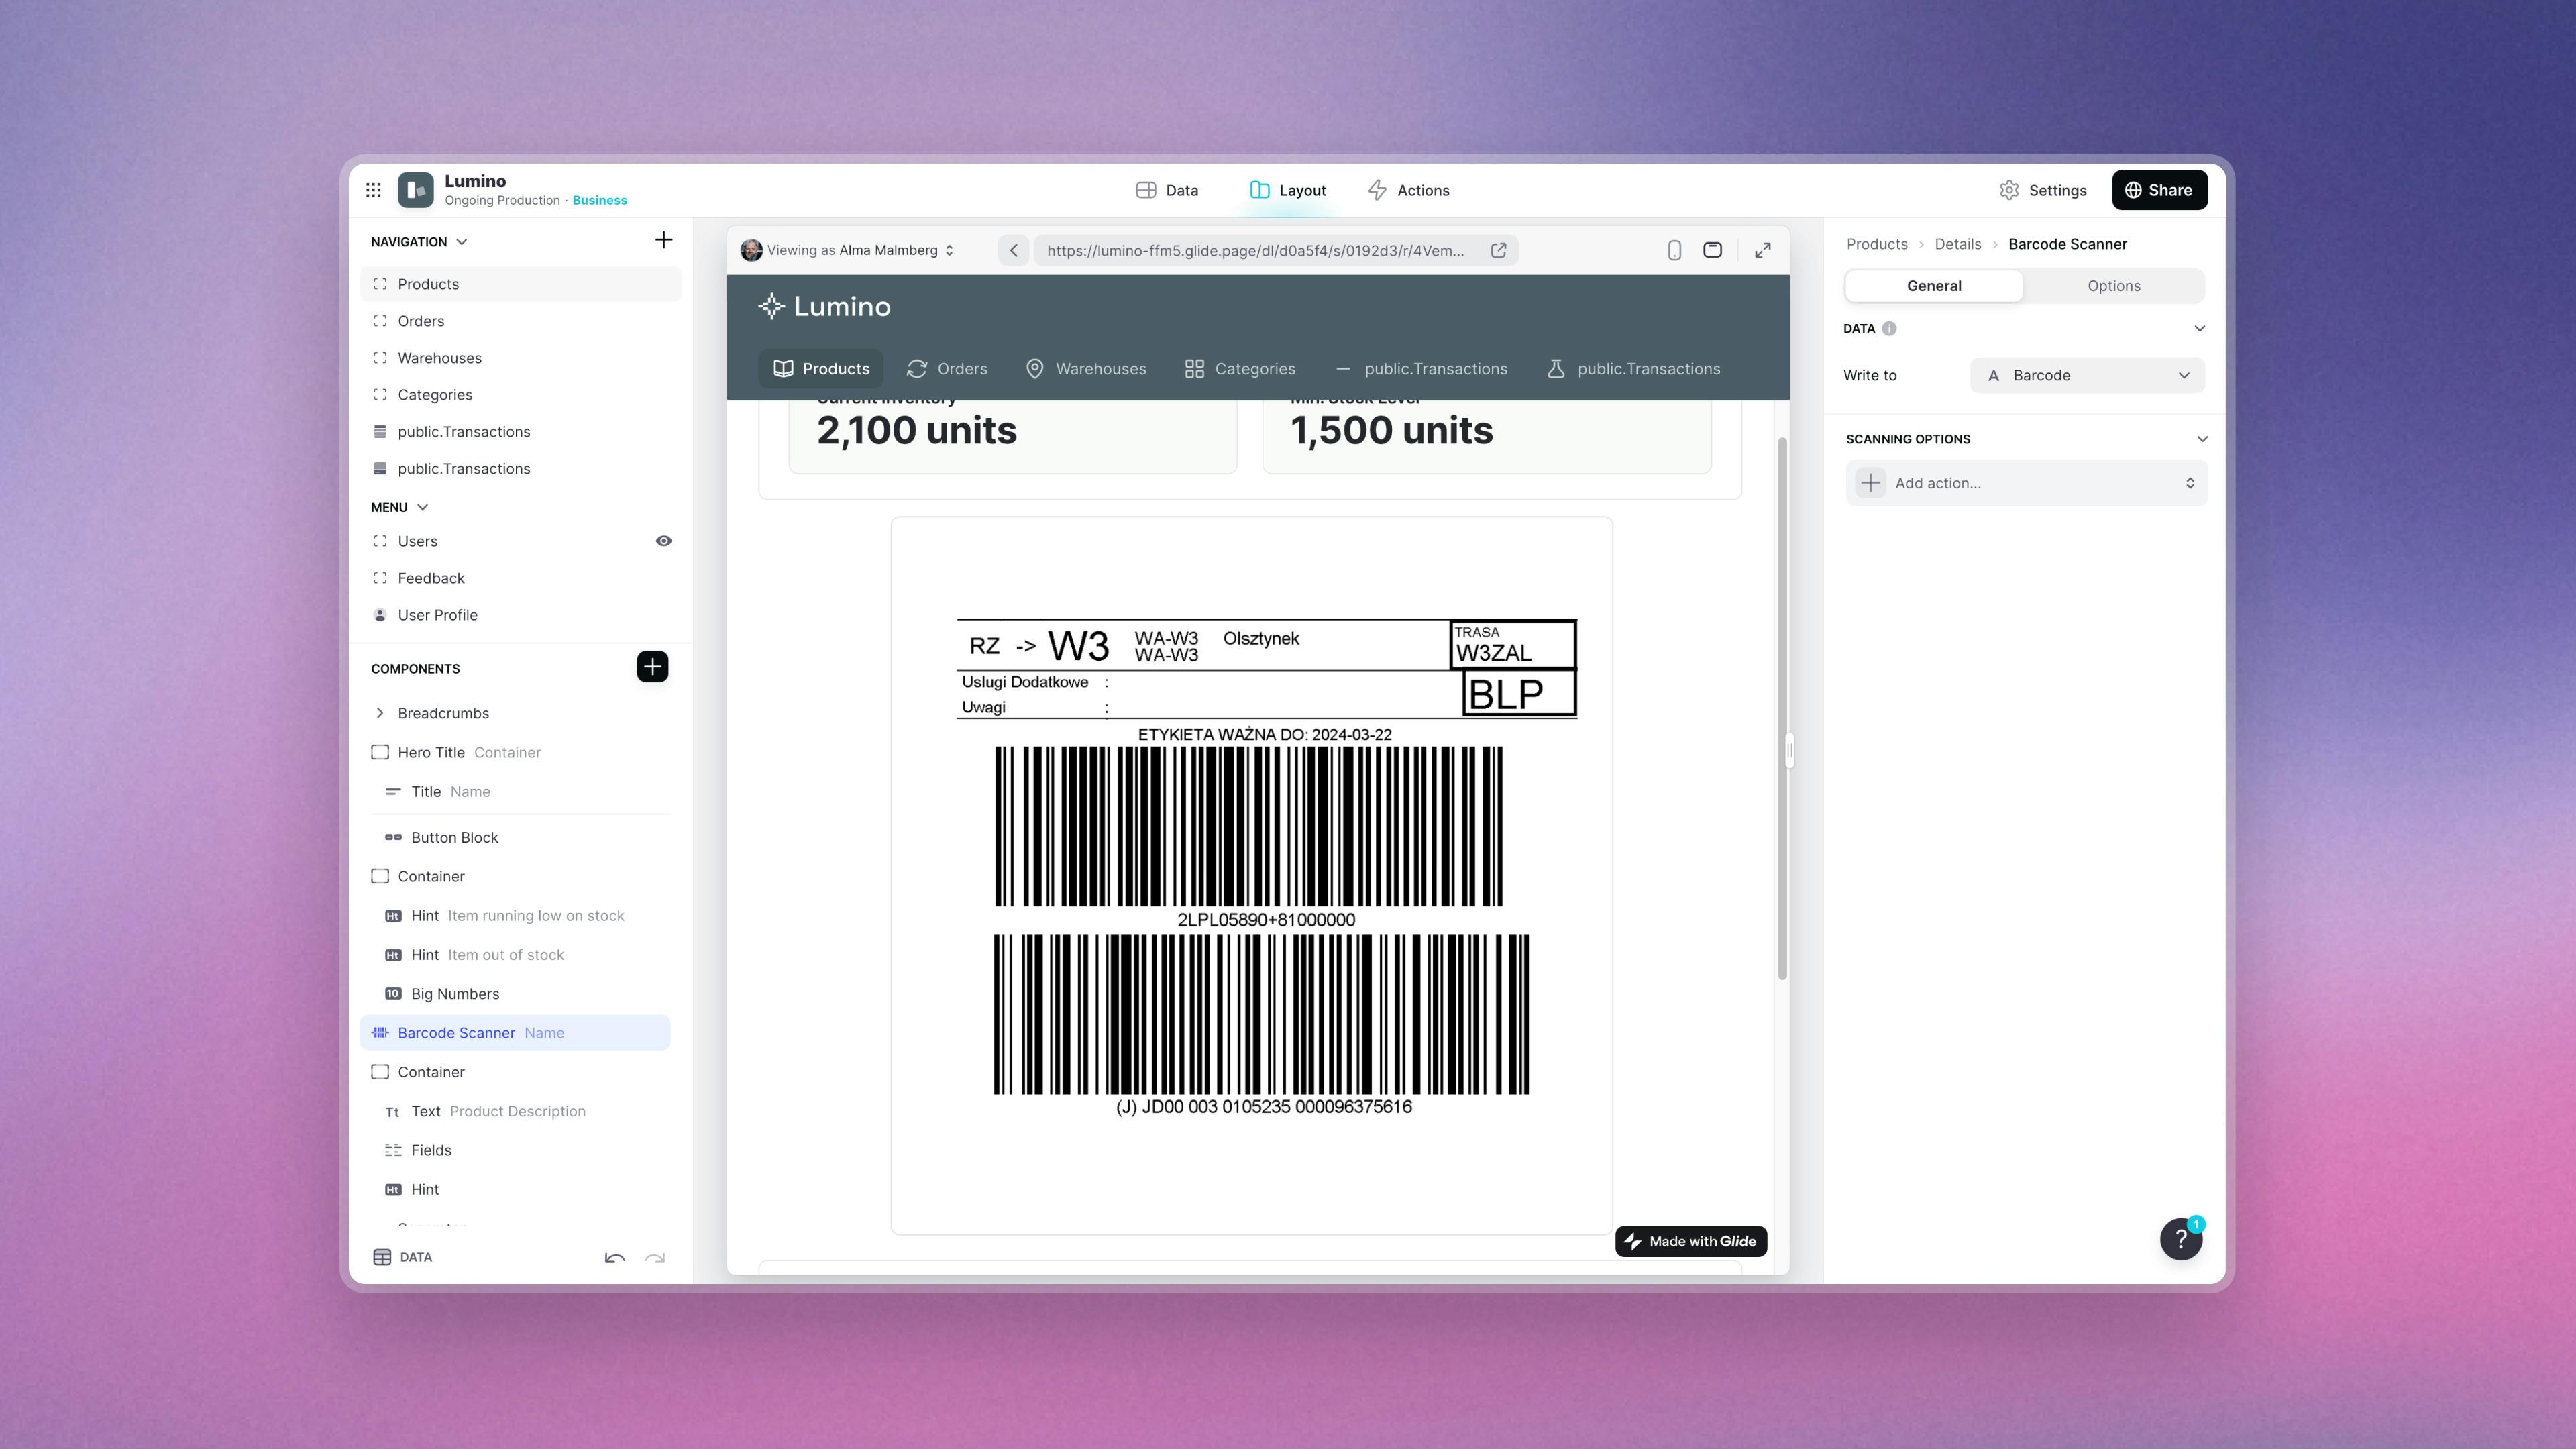
Add a Scanner component to your app

Check out the Scanner page in Glide Docs for more detailed information.
- If you do not already have a column where you will store the data from barcodes or QR codes, open the Data Editor and create the column where you will store the scanned barcodes.
- In the Layout Editor, select the tab you want to edit.
- Click on the plus symbol in the Components panel.
- Select the Scanner component.
- Drag the component where you want it to appear in your app.
- Under Data, select the column where you want to store the data from barcodes or QR codes.
- In the Column field, choose the column you created to store the scanned barcodes.
- Under Scanning Options, you can configure an action to trigger on each scan. This will use additional updates depending on which action you choose.
Add the Scan Barcode or QR Code action to your app
Check out the Scan Barcode or QR Code page in Glide Docs for more detailed information.
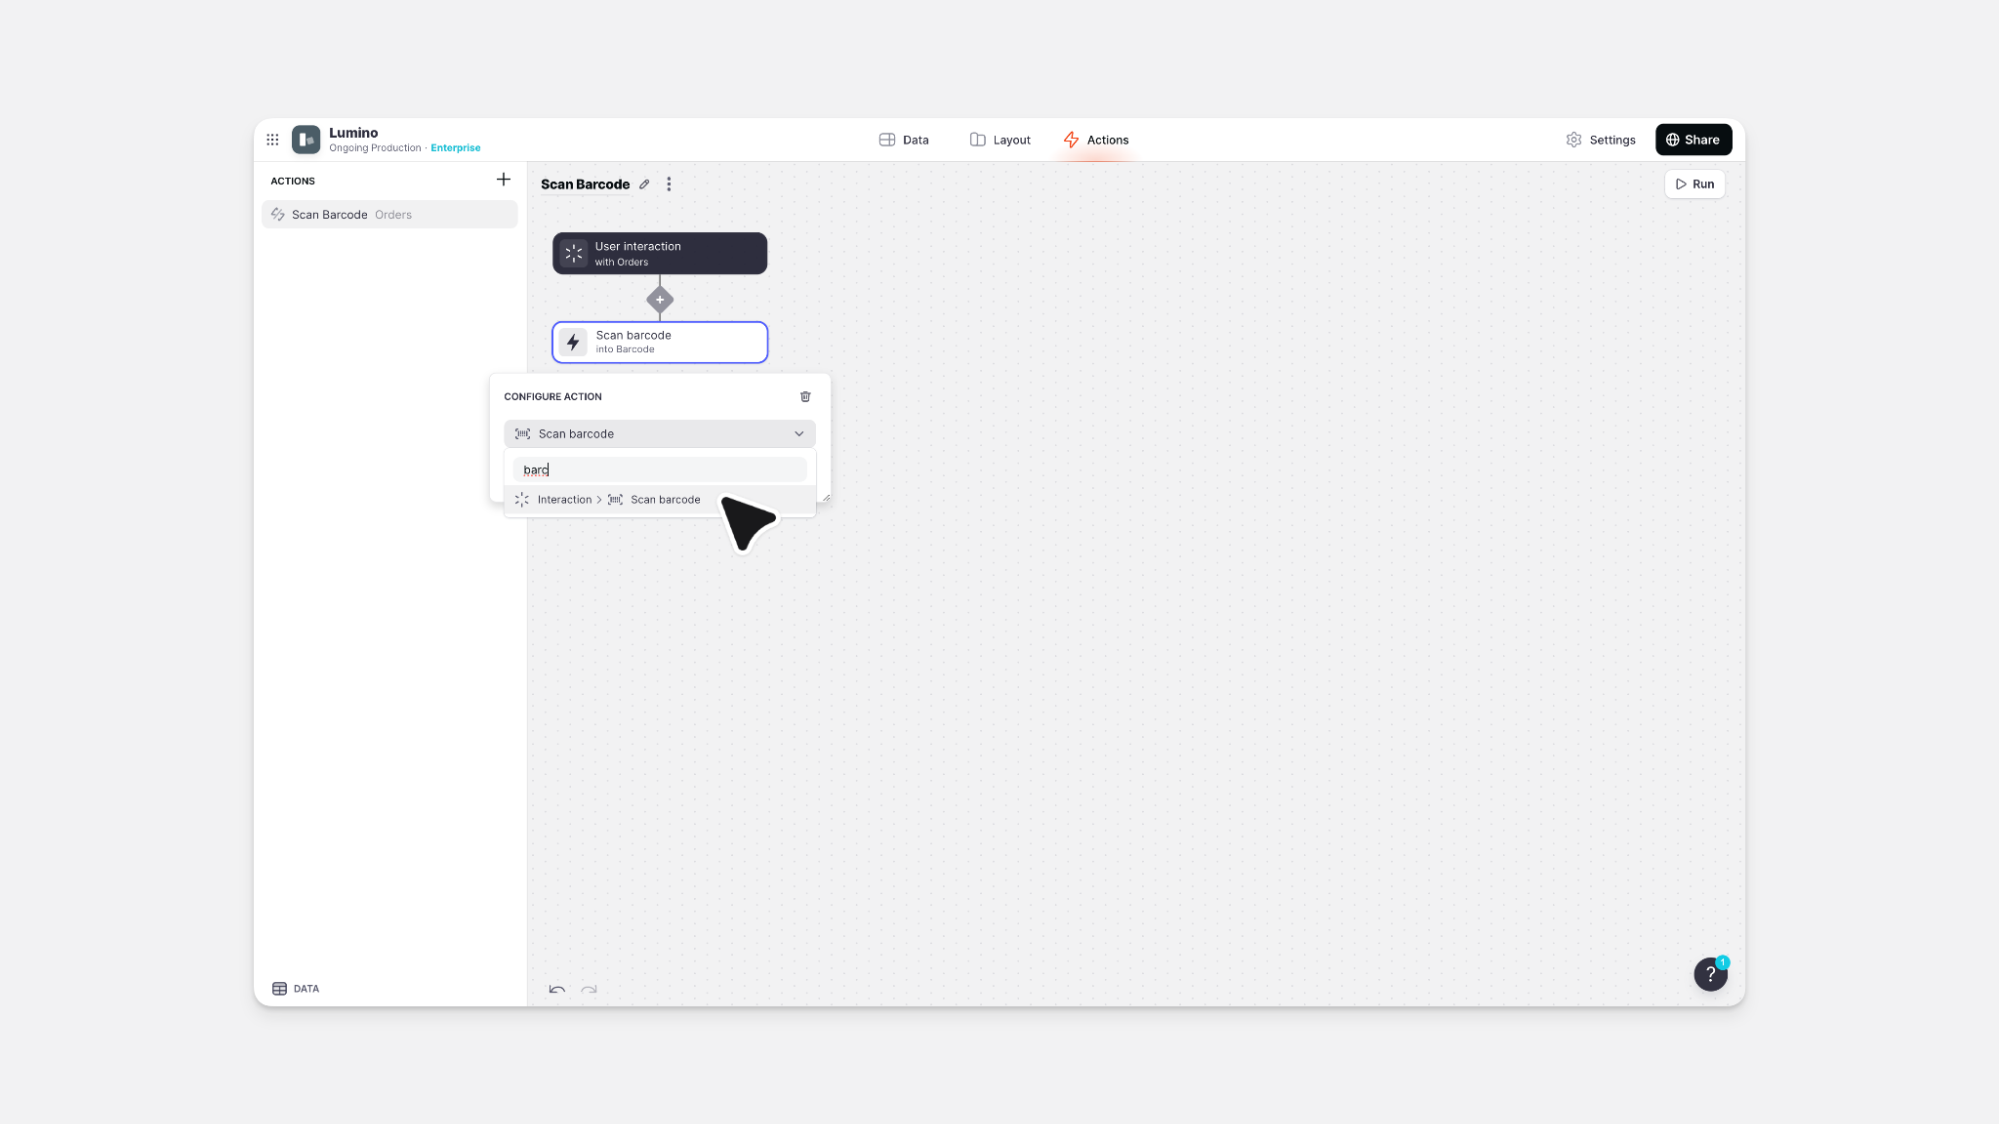
In the Layout Editor:
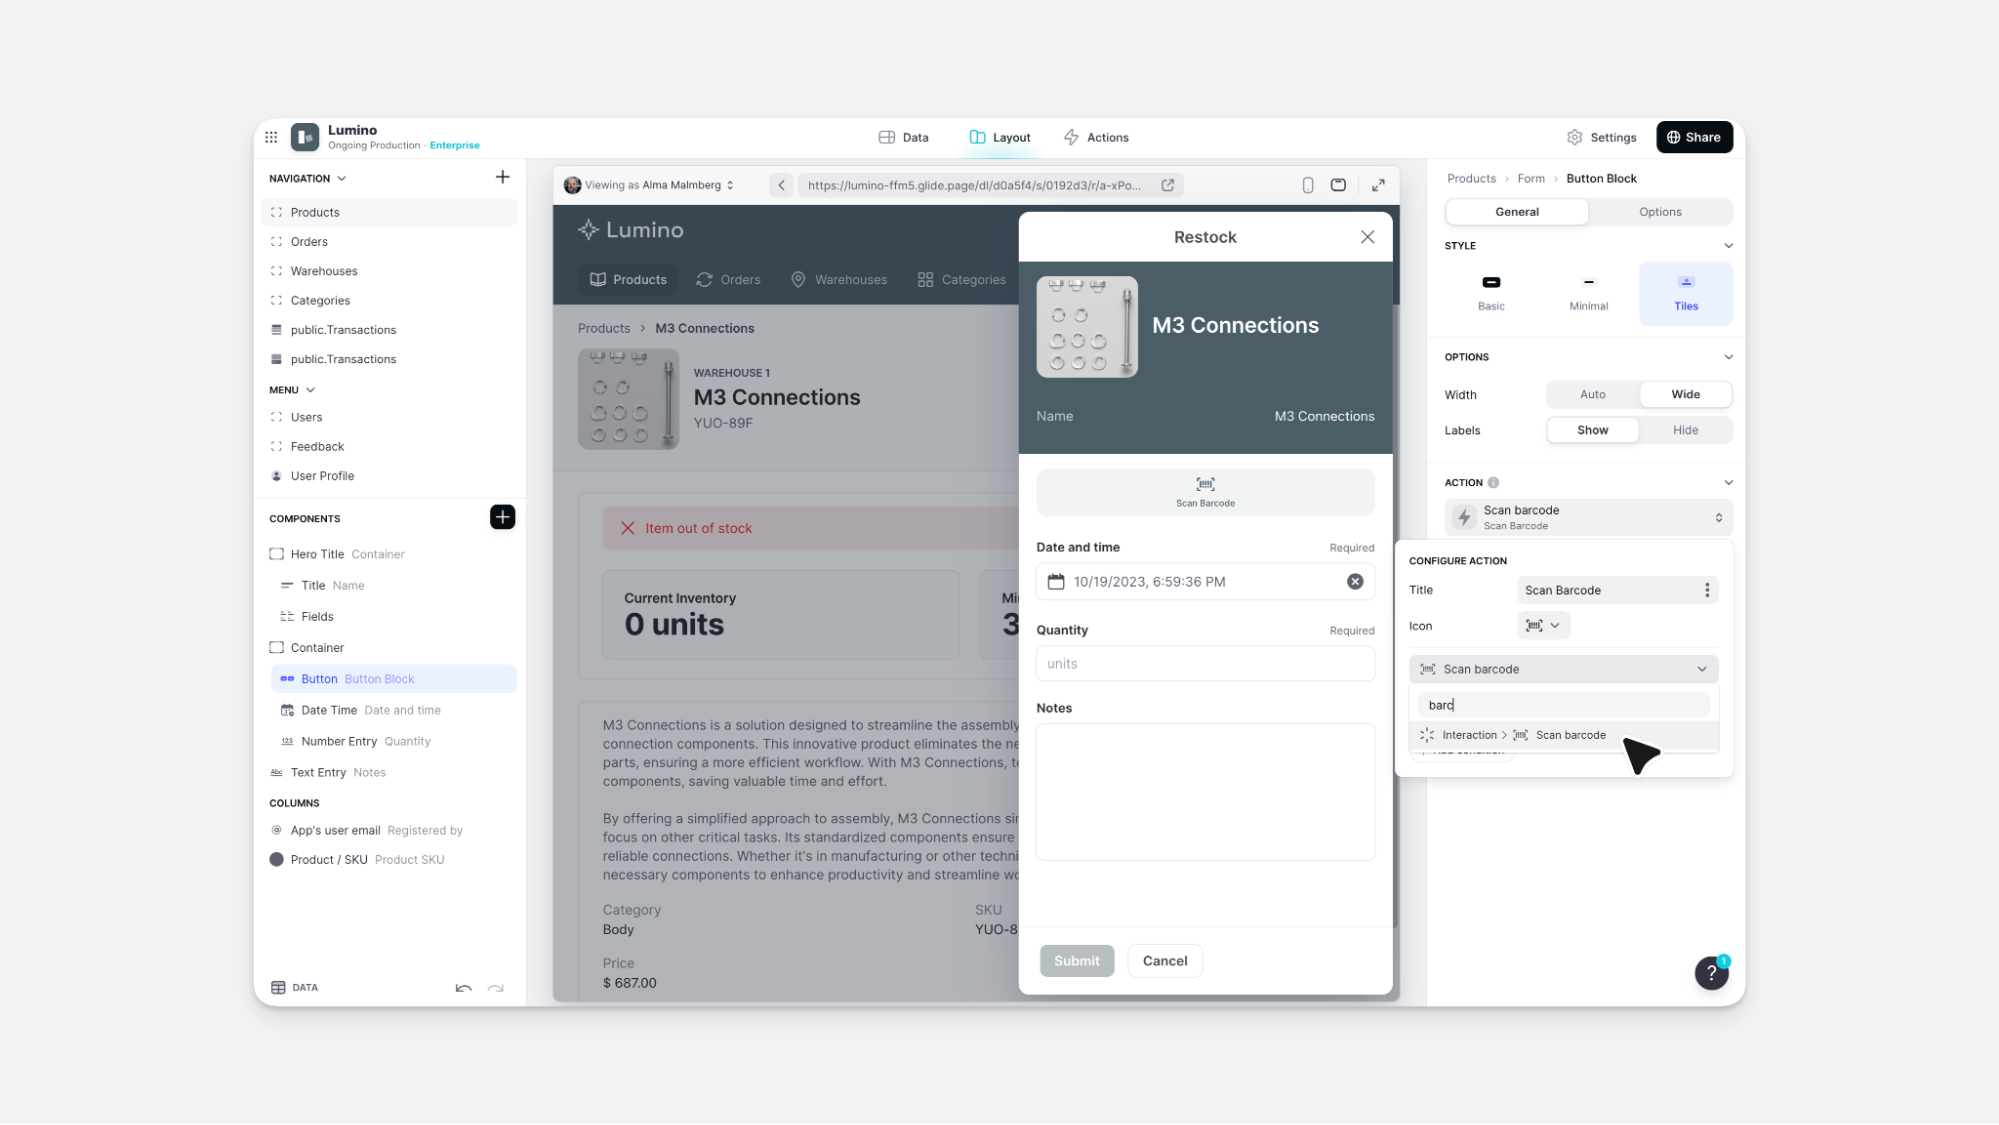
- If you haven’t yet made a column in your data to store the scanned barcode values, make that column in the data editor. We recommend using a text column, or a URL column if you’re scanning URL values.
- Click on the plus (+) sign in the Components panel and select the Component you want to trigger the action.
- In the General tab on the right side of the Layout Editor, navigate to the Actions section and search for the Scan Barcode or QR Code action.
- Select the icon and descriptive text to use in your app.
- Select which column you want to save the scanned values to.
In the Action Editor:
- If you haven’t yet made a column in your data to store the scanned barcode values, make that column in the data editor. We recommend using a text column, or a URL column if you’re scanning URL values.
- Select the + New Action button. If you have existing actions, click on the plus (+) sign in the left panel.
- To add new actions to an existing flow, hover just underneath an existing action and click the plus button.
- Select the data source for your action.
- Search for Scan barcode or QR Code.
- Select which column you want to save the scanned values to.
Barcode-scanning apps fit right into your workflow
These barcode-scanning features enable you to build sophisticated and useful tech for your business, all without having to write complex code or invest in any specialized hardware or software.
“It's easy to kind of fall into what has been working. When you look outside the box and catch these kinds of applications, you realize how much it can help your company.” - Rotha Ksa, Data Applications Engineer at Champion Industries
Your users stay light on their feet, scanning codes right from a tablet or smartphone. The end result is that your business data works harder for you, with less effort required from you.
Start building a barcode scanner today
Sign upFAQ
What is the difference between a web app and a Native app?
A native app is an app that users download onto their smartphones via a marketplace like Google Play or the Apple App Store. A web app is accessed through the user’s web browser. A web app can be much more flexible than a native app, since the exact same app can be used on any device - Apple iOS or Android devices, tablets, and any desktop or laptop computer.
What types of barcodes can the app scan?
The app can scan QR codes and barcodes of various kinds, including EAN, Code 128, Code 39, or PDF417.
What other key features can you add to your barcode scanner app?
Glide apps integrate with many of the other apps you use at work and allow you to add different actions to extend the utility of your barcode scanner app. Bridge the communication gap by creating tailored notifications and custom alerts for low or high stock levels or scheduled shipments. Add push notifications, connect to an email host, or send SMS messages directly to team member’s phone numbers. Add a map to track shipments or list warehouse locations or downloadable PDFs to access product information or invoices.
How do you get barcodes or QR codes to scan?
If you’re working with products or parts purchased from elsewhere, your app can use existing product barcodes to create records. If you need to make custom barcodes or QR codes, use a free barcode generator tool to quickly create your own QR codes for whatever document, object, or product you want linked to your phone.

Leading Glide’s content, including The Column and Video Content, Wren’s expertise lies in no code technology, business tools, and software marketing. She is a writer, artist, and documentary photographer based in NYC.


