

Building an app empowers you to take control of your business and operations. But, making your own cross-platform app from scratch is no small feat. The development process—from planning, to coding, to designing, to testing—can take anywhere from six months up to years of hard work.
At least, that’s how long it would take if you didn’t have access to a no code app-building platform.
These days, you don’t need a degree in computer science, a development team, or a massive budget to make your own web or mobile app.
In fact, with the right no code app builder, you can bring your app idea to life in under an hour.
In this article, we’ll show you how to make an app with powerful functionality, that delivers a delightful user experience.
But first, let’s cover some groundwork.
What's an app builder?
In a nutshell, they are app development platforms—software that enables users to create mobile applications with little to no coding knowledge.
Typically designed with a user-friendly interface, app builders enable users to develop applications through drag-and-drop functionality or by selecting features from a list. These builders are equipped with a wide variety of pre-designed templates, plugins, and interactive features that allow users to customize their apps according to their specific needs and the needs and expectations of their target audience.
No code app builders often provide frameworks for both the design and functionality of app creation, including layout design, color scheme selection, feature integration, database management, and more. They cater to users who want to create a variety of apps, including e-commerce, educational, fitness, business management, and others.
Glide is an example of an app builder that leverages your existing business data to make an app.
Benefits of App Builders
1. Very Little Coding Required: One of the primary benefits of app builders is that they require little to no coding. This means even those without technical programming skills can create functional and attractive apps. This democratizes the app development process and makes it accessible to anyone.
2. Time and Cost Efficient: Building an app from scratch can be time-consuming and expensive, especially if you need to hire a developer. App builders, on the other hand, significantly reduce development time and costs.
3. Customizability: App builders come with a range of templates and customization options, allowing users to create unique, tailored apps that suit their specific business needs and aesthetic preferences.
4. Scalability: As your business grows, your app needs to grow too. App builders often offer scalable solutions, meaning features and capacity can be added as your business expands.
5. Easy Maintenance and Updates: With an app builder, maintaining and updating any type of app is often straightforward. You can easily tweak features, fix bugs, and add updates as needed.
6. Integrated Functionality: App builders often come with a suite of integrated functionalities, such as push notifications, social media integration, e-commerce features, and more. This saves you from the hassle of building these components individually.
App builders like Glide are powerful tools that can turn your app ideas into reality without the need for significant coding skills or a hefty software development budget. They provide an accessible, affordable, and efficient route to joining the mobile revolution.
Android apps, iOS apps, or web apps?
Depending on the type of app you’re looking to create, there is a no code app builder tailored to your needs. Before you get started, the first question to ask yourself is: “What type of app do I need?”
If you’re looking to create native apps that are downloadable through the Apple app store or the Google Play store—like an iPhone app—then you might consider an app builder like Flutterflow. Their software development platform provides you the ability to leverage no code for Android development and iOS development, so you won’t need languages like Java or objective c. This way, you can launch your app on a mobile-native app store, which enables monetization, in-app purchases, and more.
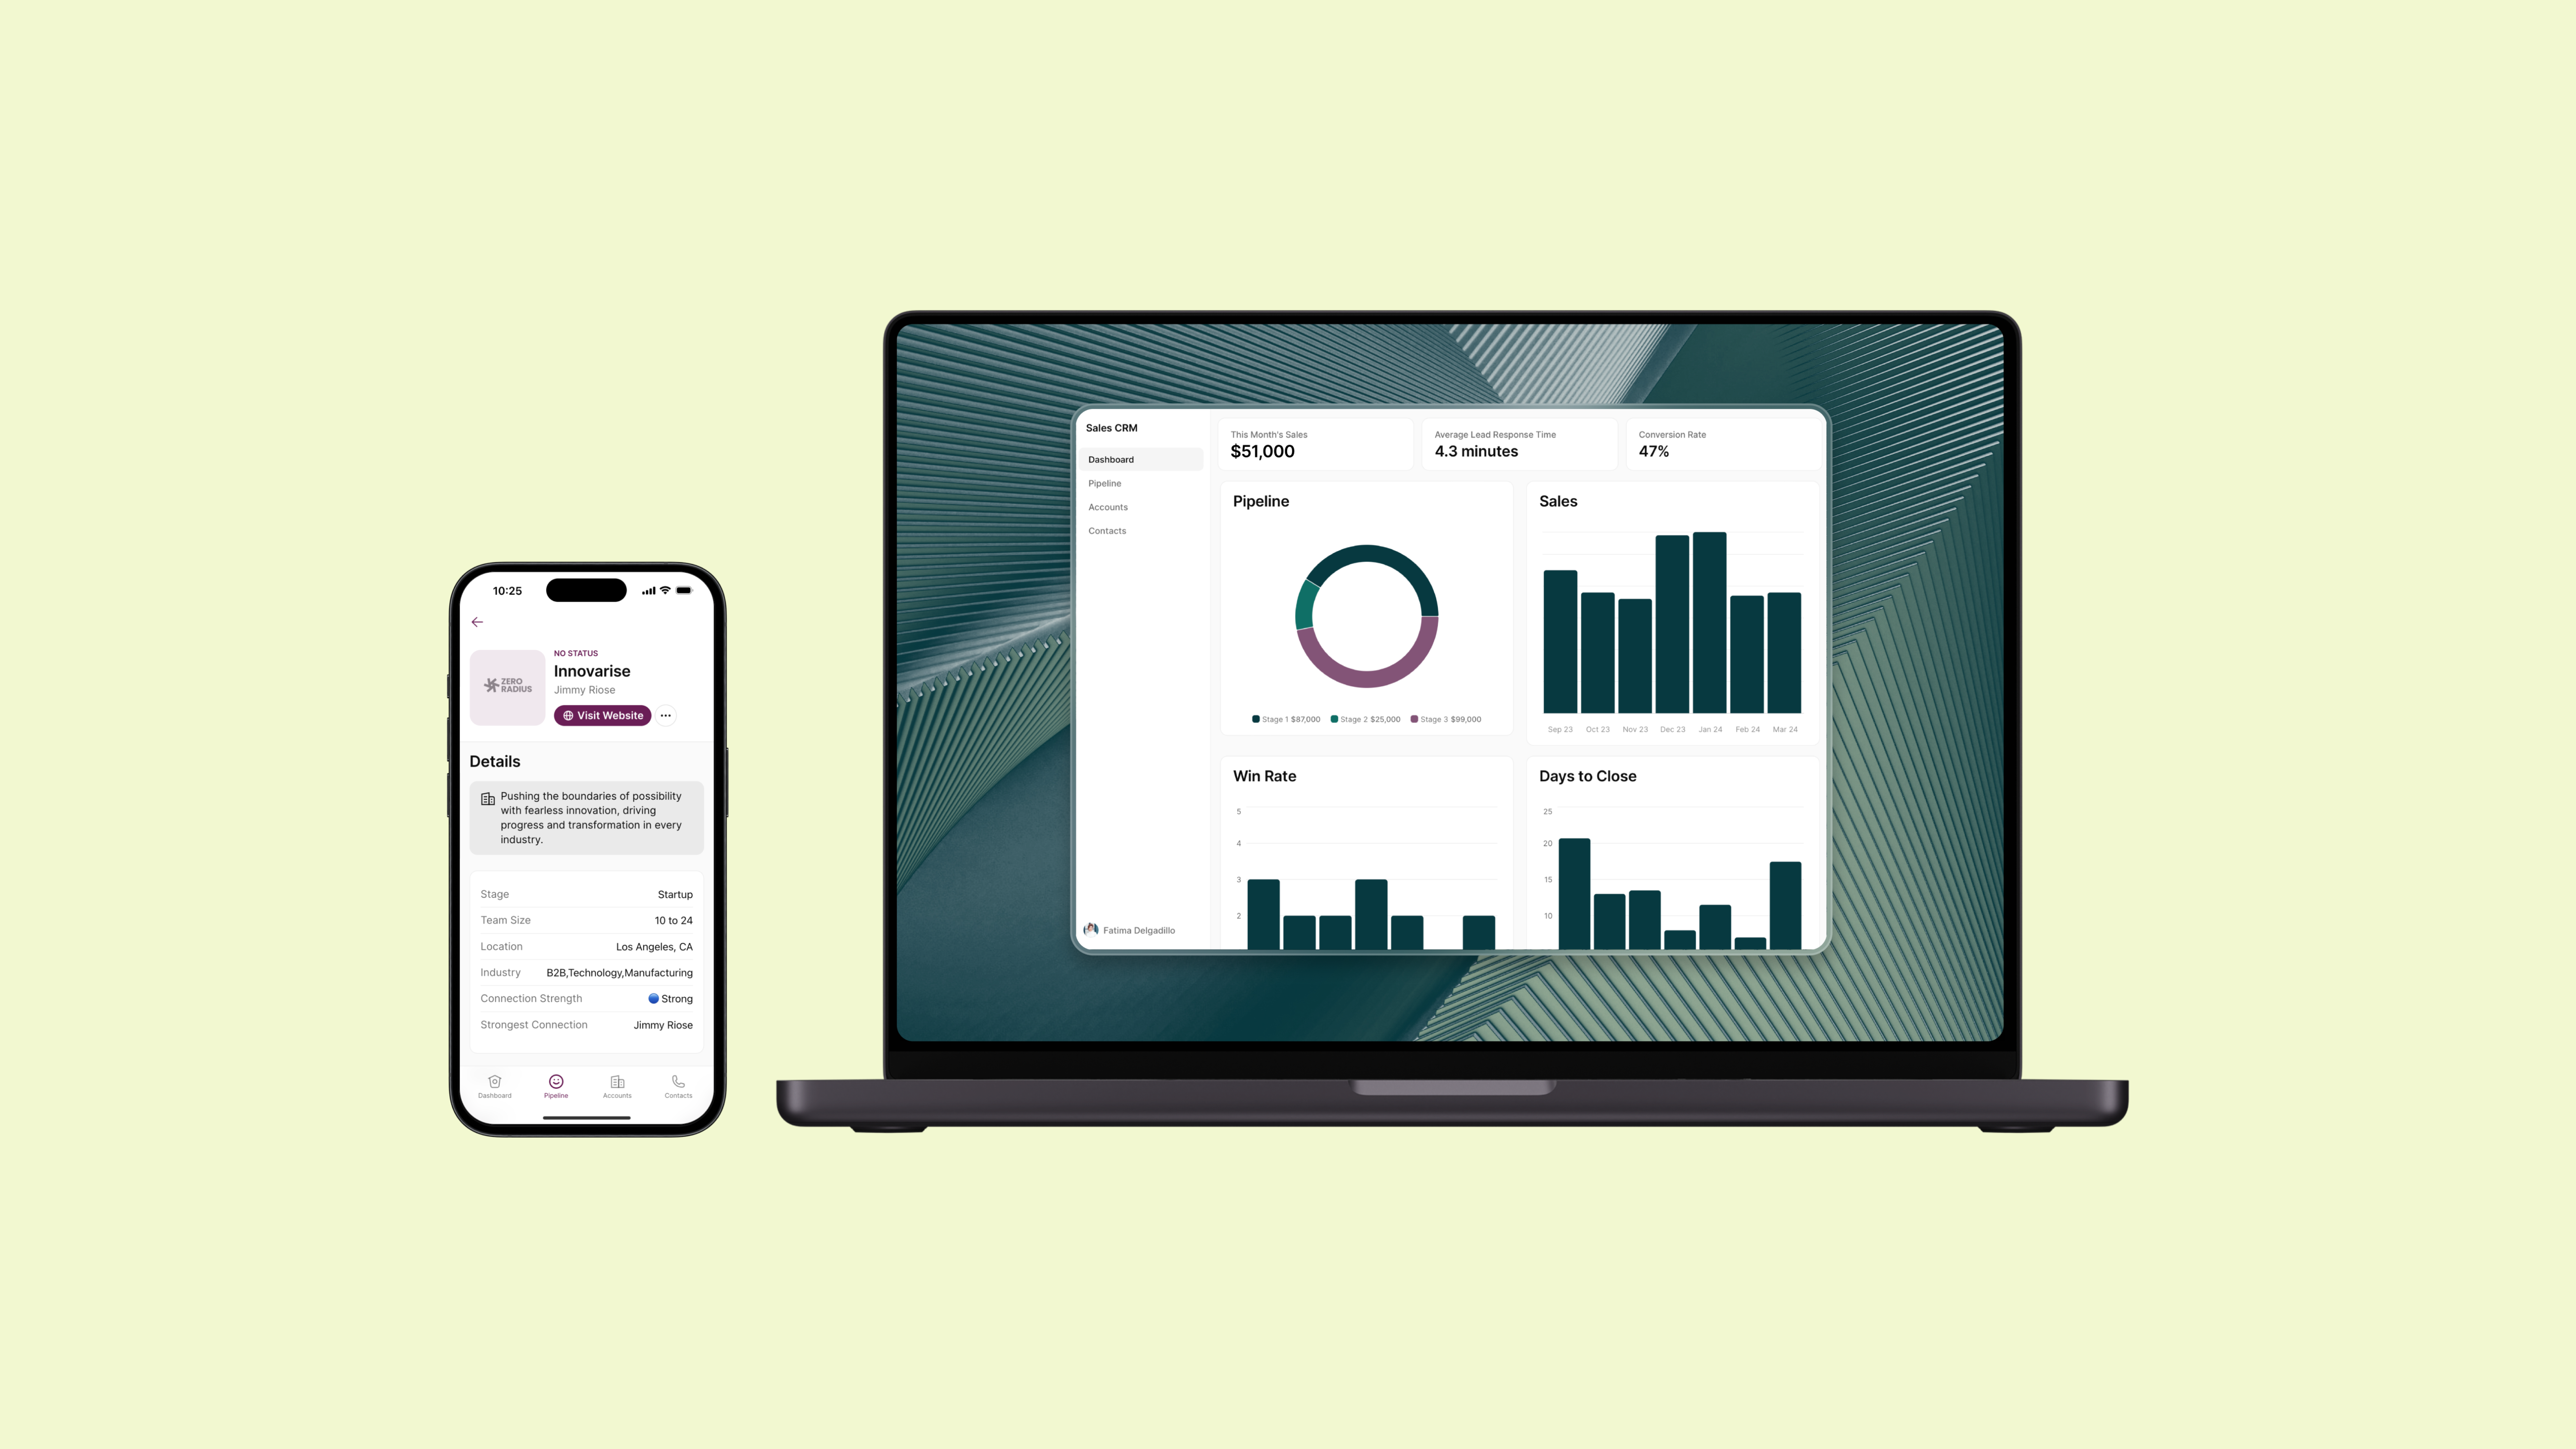
If, on the other hand, you’re looking to build powerful internal tools for your business, then you’d consider a platform like Glide. Our app builder will help you replace messy spreadsheets with a beautiful, user-friendly interface that your team enjoys using. If your business relies on a variety of data sources to operate, Glide enables you to unify all of that data into one app or a suite of apps; effectively giving your organization the access it needs to interact and manipulate that data without needing to understand complex syntax.
With a web app platform like Glide, another benefit is you’re no longer just building for mobile. You can build a hybrid app that functions and looks great on both mobile and desktop platforms. So your team in the office and field teams can communicate through the same software on a variety of devices.
So again, ask yourself, “What type of app do I need?” If you’re looking to launch an app for your startup and get into the business of app marketing, you’d go one route. If you’re looking to optimize your existing business functions, you’d go another.
How to Make an App: The Step-By-Step Guide
Now that we’ve laid the groundwork, it’s time to roll up our sleeves and dive into the no code app development process.
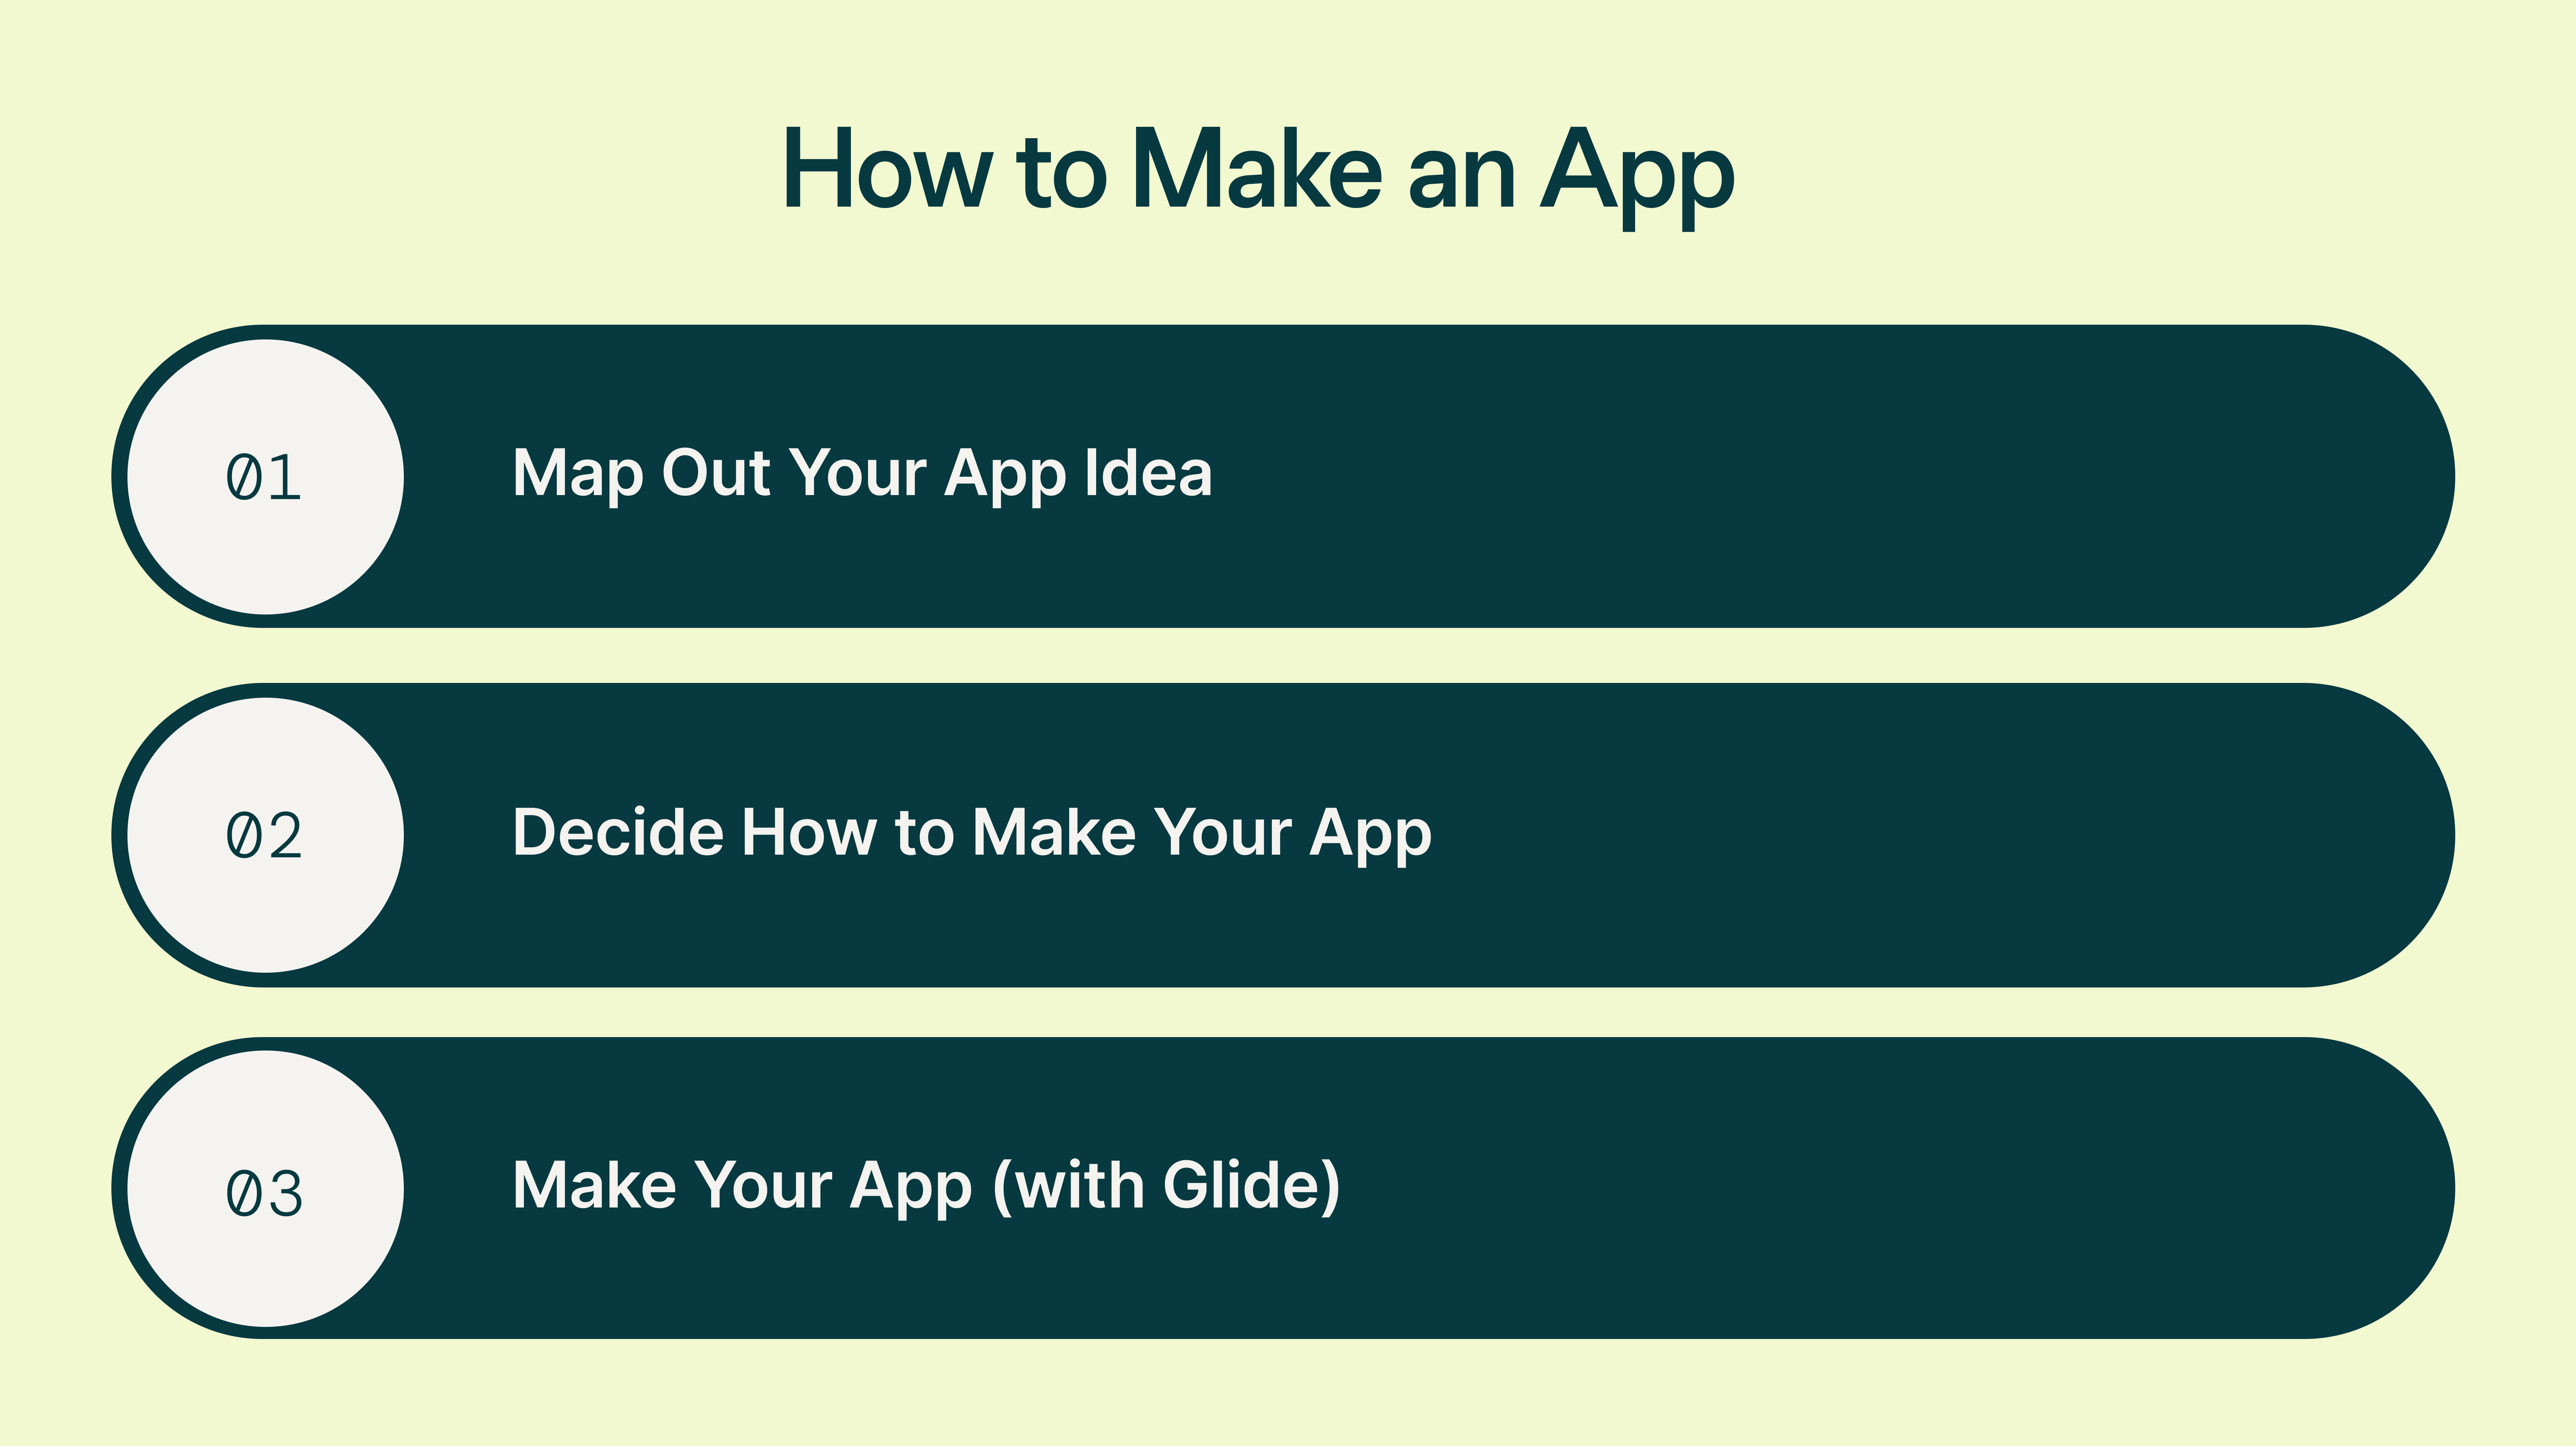
Step 1: Map Out Your App Idea
Define Your Minimum Viable Product
Before you can begin building your app, you should decide exactly what you want it to do. In other words, clarify what problem your app will solve (or what process it will make easier, faster, etc.).
If you’re not sure where to start, reflect on your motivation for making an app. What inspired you to build an app in the first place? Was it market research? A specific marketing strategy?
What’s the core function you want your app to serve? Who is going to use it? What’s the user journey? This will help you understand the most basic feature or functionality your app needs to offer to be useful. This is known as the minimum viable product (MVP).
You might find it helpful to make a list of any core features your app needs to offer. You may even go so far as to collect user feedback prior to actually beginning your build. If you’re having trouble narrowing down your ideas, create a secondary list of aspirational app features that you’d like to add in the future if possible.
Consider the Perspective of Your End-Users
When designing a new app for your small business, it’s important to consider your end users. After all, they're the ones you’re making your app for.
What do you hope your users can achieve by using your app? Are you designing an app for internal use (perhaps inventory management software or a CRM app for your sales team), or will your app be client-facing (like a messaging app for customer support or an ecommerce app for shoppers)?
Will your users need to access the app on a computer or mobile device? Will they need to access the app offline at times? How tech-savvy are your app users likely to be? This ties back into the core functionality and your primary purpose in creating an app.
These answers will impact everything from your design choices and the content of your app to how you share it with your users (e.g., Do you need your app to be publicly available or accessible only by a private link?).
Plan Out Your App Content
Now that you have a clear understanding of what core features your app will include and who you are designing it for, you should start thinking about your in-app content. What will the app experience look like? What information will your users have access to?
Depending on the complexity of your app idea, this step can involve market research, wireframes, design mockups, screenshots, mapping user journeys, and more.
For example, if you’re creating an app to help your delivery team with route optimization, you might start by defining the steps a driver would follow to access relevant information within your app. Where do they tap to find their next drop-off location? How can they access and interact with the route map? Where can they log their gas mileage?
Additionally, you’ll need to create or optimize a database (or spreadsheet) from which your app can pull its data. Whatever database you connect to your app, it’s vital to keep it organized and updated so you have everything you need to power it.
Step 2: Decide How to Make Your App
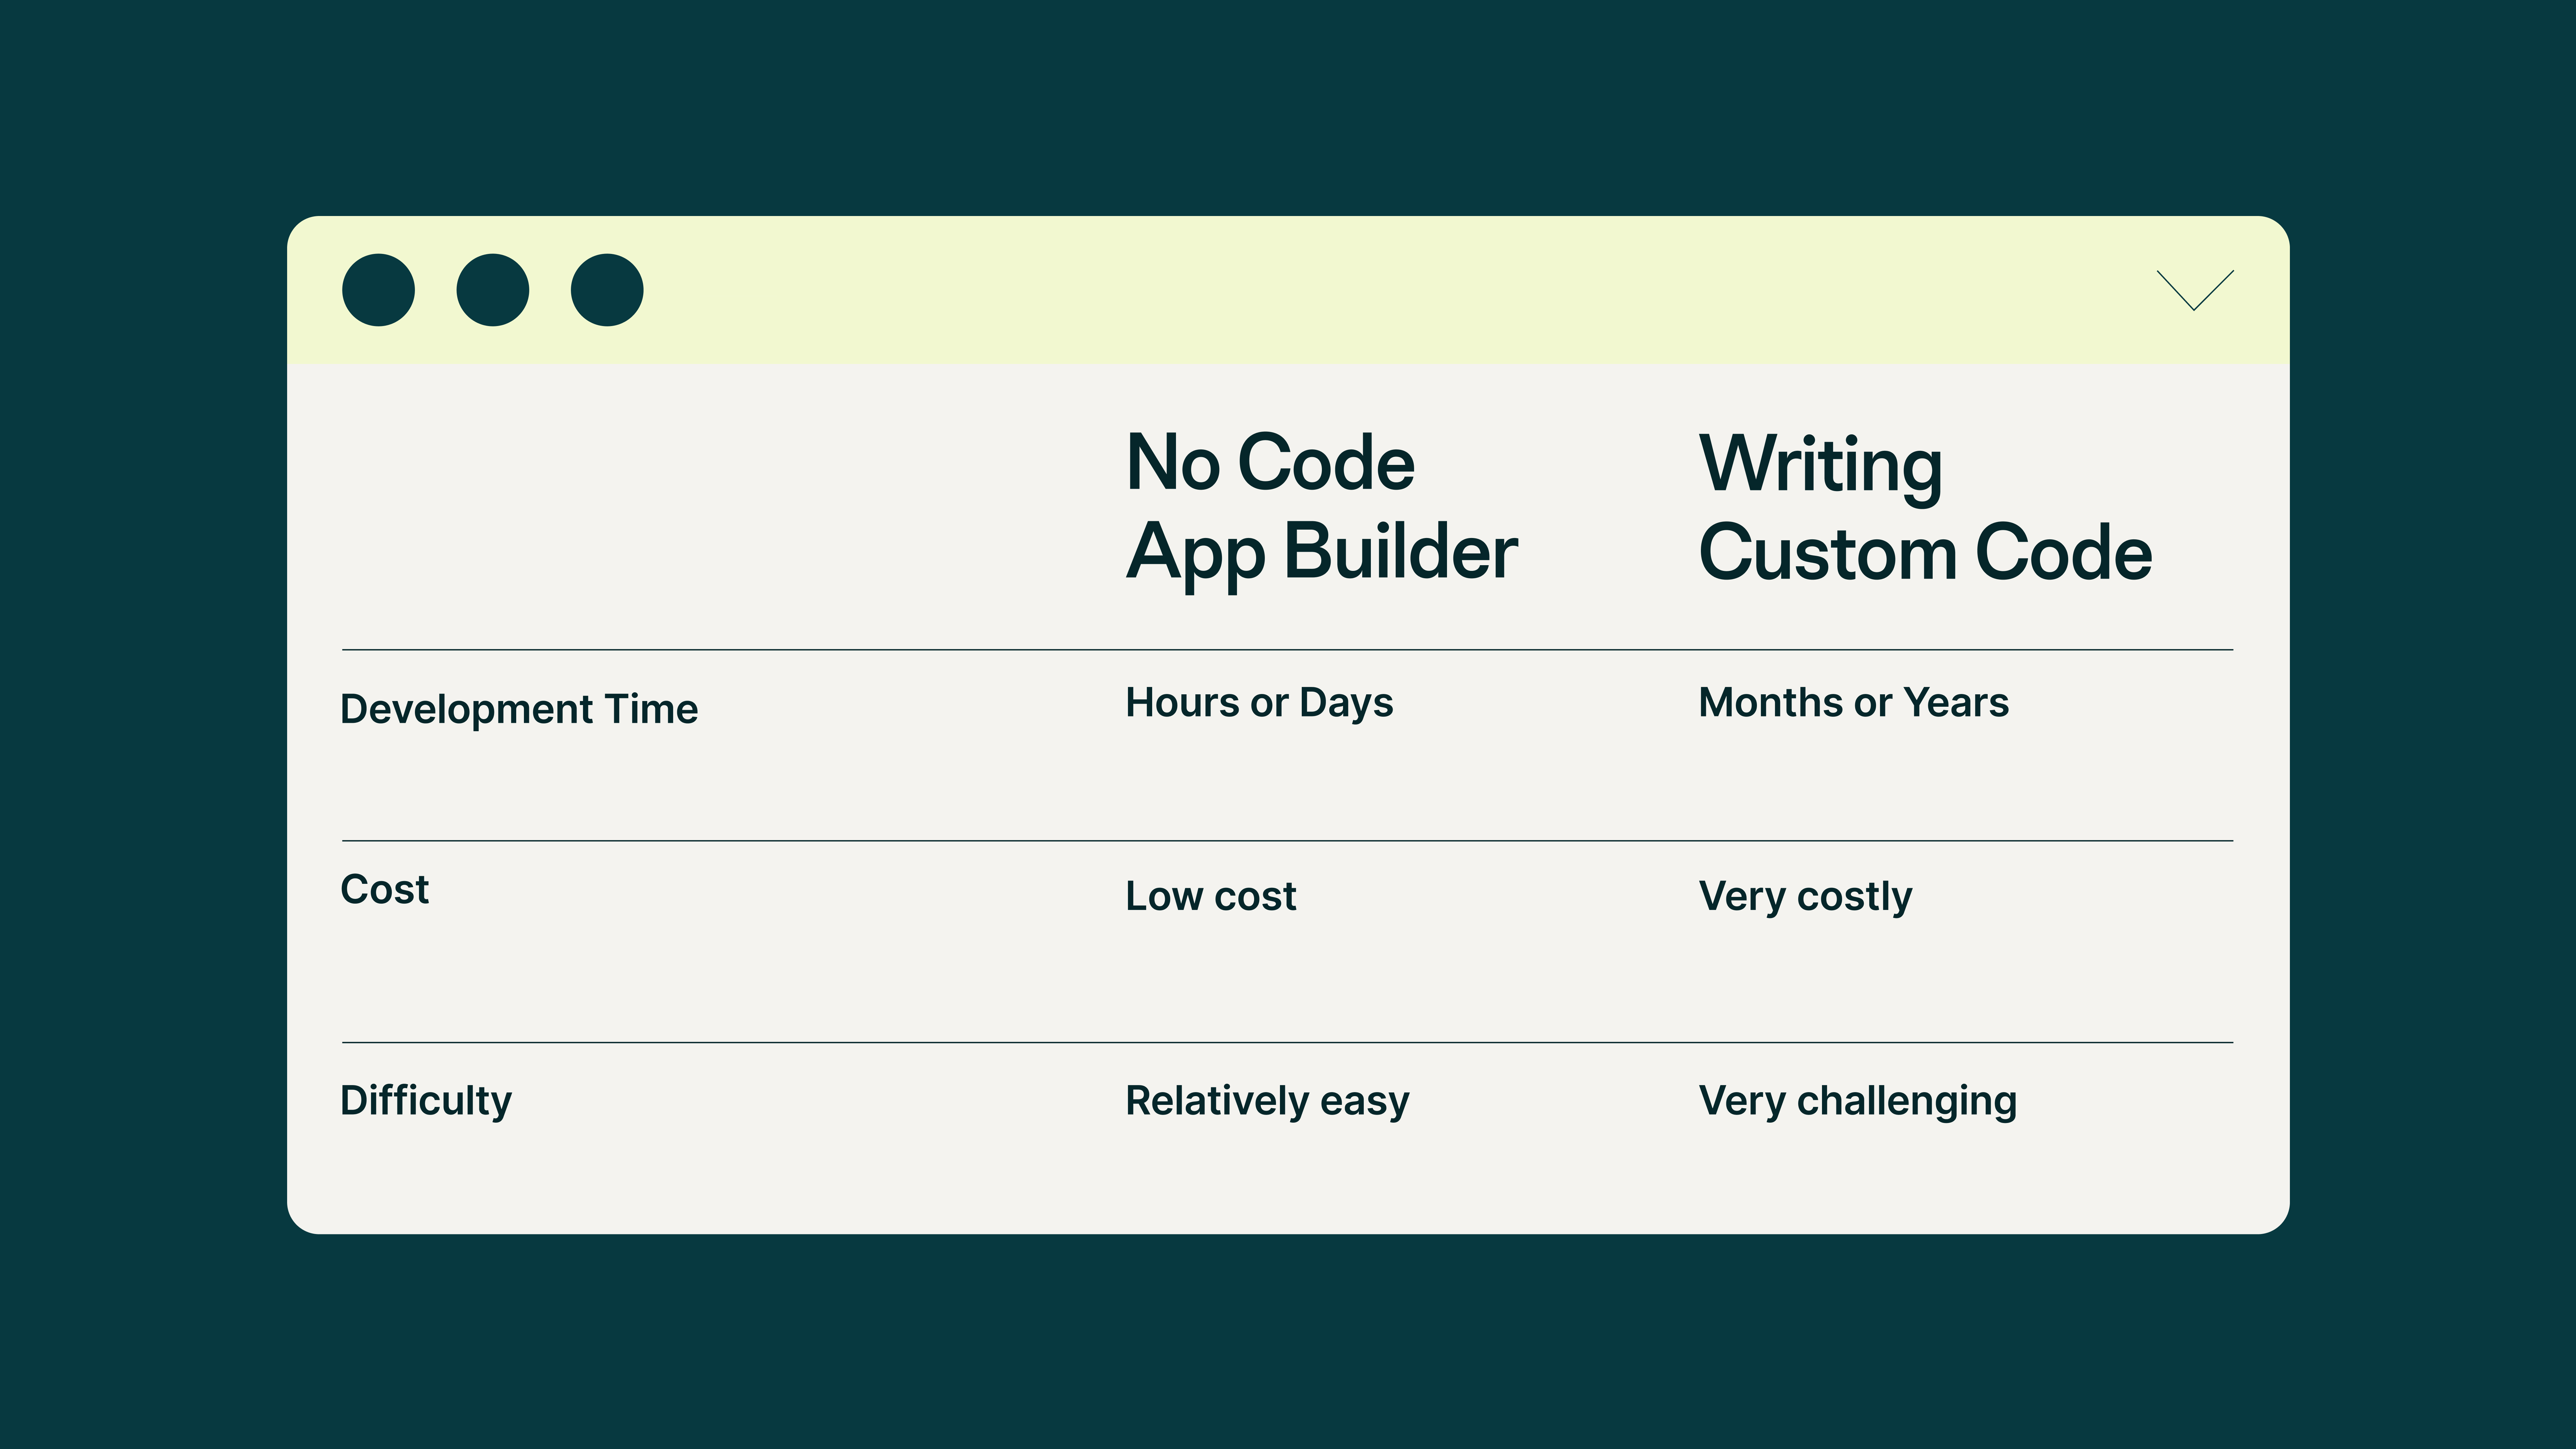
There’s more than one way to make an app—but not all of the best options are free or accessible to builders without a technical background or coding skills.
Perhaps the most obvious (or at least traditional) path to building an app is to hire a development company or freelancer. Unfortunately, working with a development team is both time— and resource-intensive.
Another potential solution would be to go with a low-code online platform (think WordPress) that can be mostly customized to your needs. This is generally much cheaper than hiring a developer but still requires some technical skills and design sense. Since we’re focusing on how to make an app, we’re going to skip over this option for now.
So, what choices are you left with?
When it comes to making an app, your two basic options are to code it yourself or use a no code app maker. If you’re choosing between these solutions, be realistic about the amount of time and effort you’re willing and able to dedicate to building your app.
Think hard about the level of commitment you can make to this project.
For example, if you want to teach yourself how to code so you can build your own app from scratch, you’ll have a steep learning curve to overcome before you can get building. Not only does it take weeks or months of practice to learn a programming language and hone your coding skills, but software development for even a basic product can stretch into months and years.
Since you’re looking into how to make an app to solve an existing problem or improve a work process, you likely can’t afford to wait that long—especially if you want to save time.
Fortunately, app creation has never been easier for non-programmers. Using a no code app development platform like Glide allows you to quickly turn your data and ideas into a fully functional tool for your business. So, if you’re looking into no code platforms that can support your goals for your app, consider factors like:
- What capabilities does the platform offer?
- Can I customize my designs and layout?
- How long will it take me to deploy my app using this platform?
- How easily can I collaborate on designs and share the finished product?
- What level of support does the platform offer?
- Will I launch on the Google Play Store or Apple App Store, or can this be a Web App?
- Is it possible to connect with third-party tools and APIs?
- Can I test, edit, and redeploy my app on the fly if needed?
- Can it build apps compatible with multiple operating systems?
Ideally, the app builder you choose should also provide quick and easy onboarding, along with resources and tutorials to help you create the best app possible. Since Glide’s no-code app maker ticks all of these boxes and more, we’re going to showcase how to complete the third step using Glide’s free app maker.
Step 3: Make Your App (with Glide)
Now that you’ve identified and answered important foundational questions about your app, it’s time to begin designing. We’re going to guide you through the process with Glide, our no code solution for app makers, but at this point, you may realize that you’ll need a guide from another no code platform.
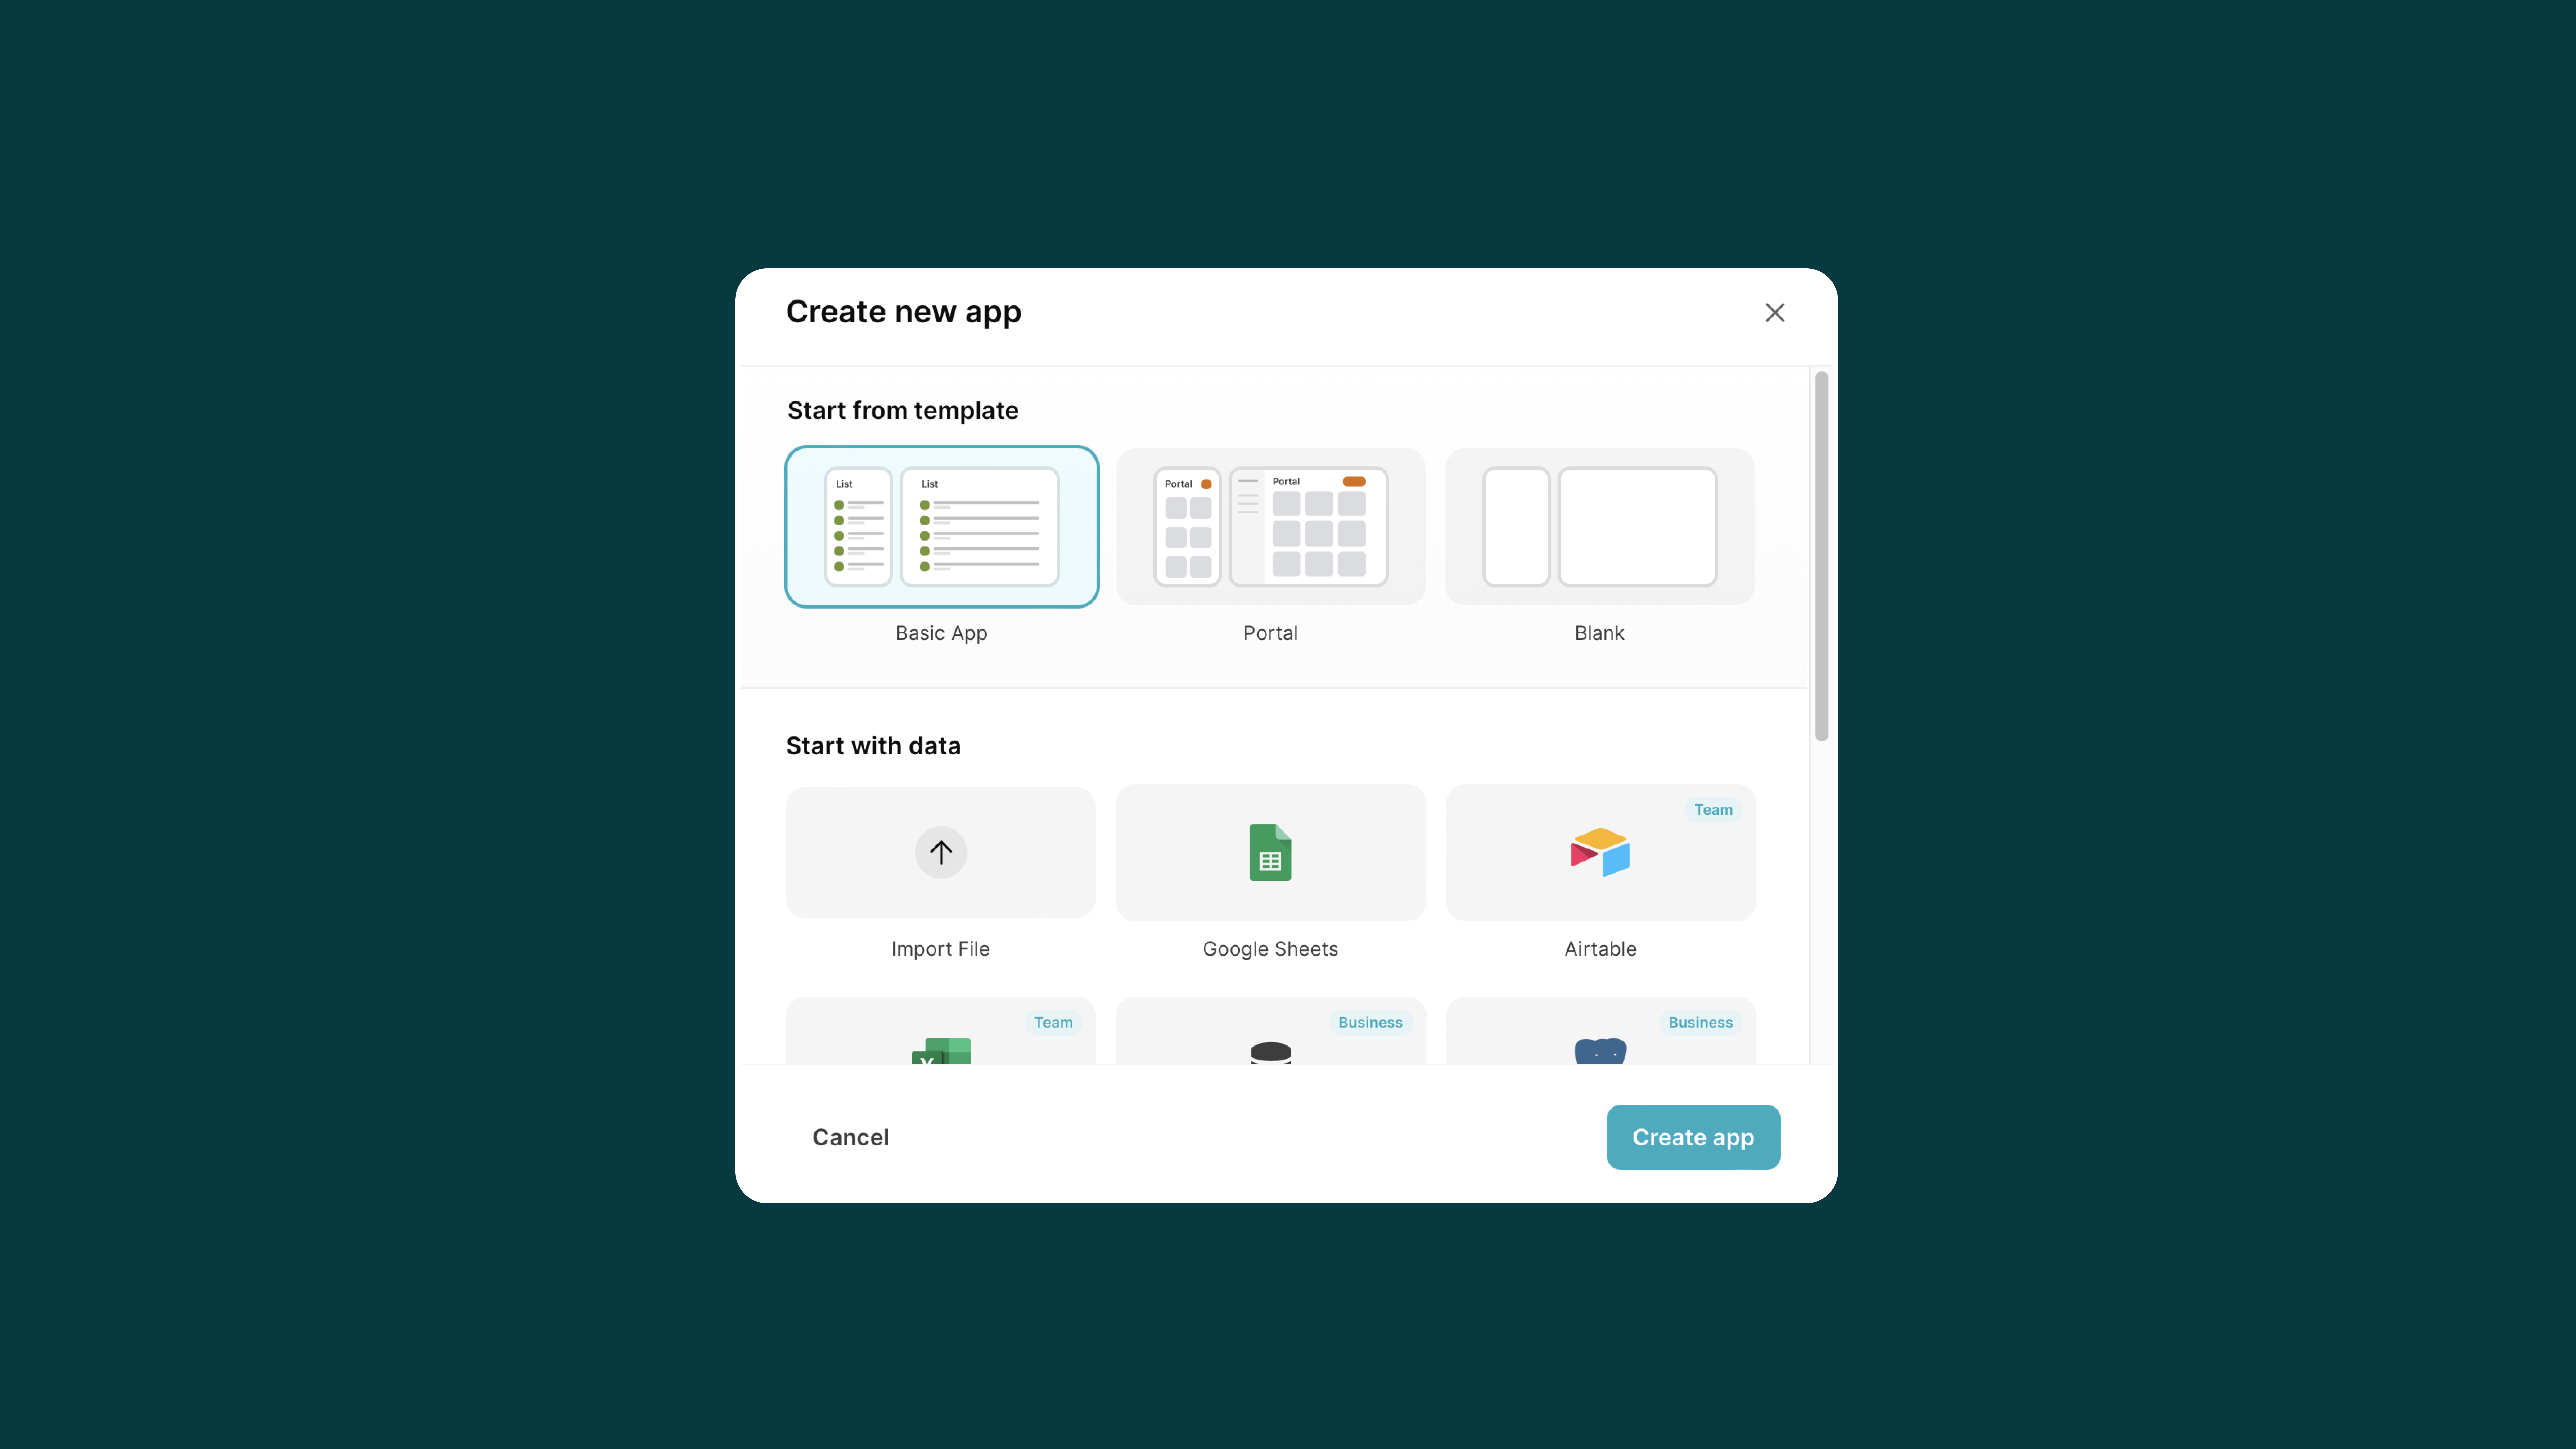
If you’re moving forward with Glide, you have two options: either choose a template to jump-start your build or import your databases into Glide to automatically generate your basic app.
Here’s an overview of the steps you can follow to turn a spreadsheet or database into your very own app:
Create New Project
Sign up for Glide, and once you’re logged in, head to the dashboard and click “New app” to begin building.
Connect Your Data Source
Whether your data lives in Excel, Google Sheets, Airtable, BigQuery, or SQL, follow the prompts to connect to the data source. Alternatively, select one of the options under “Start from a template” if you want to input your data into Glide’s Data Editor directly or don’t have any data to import just yet.
After you connect your spreadsheet or database, Glide will automatically use that data to build the backend of your fully functional, customizable application. The whole process only takes a couple of moments.
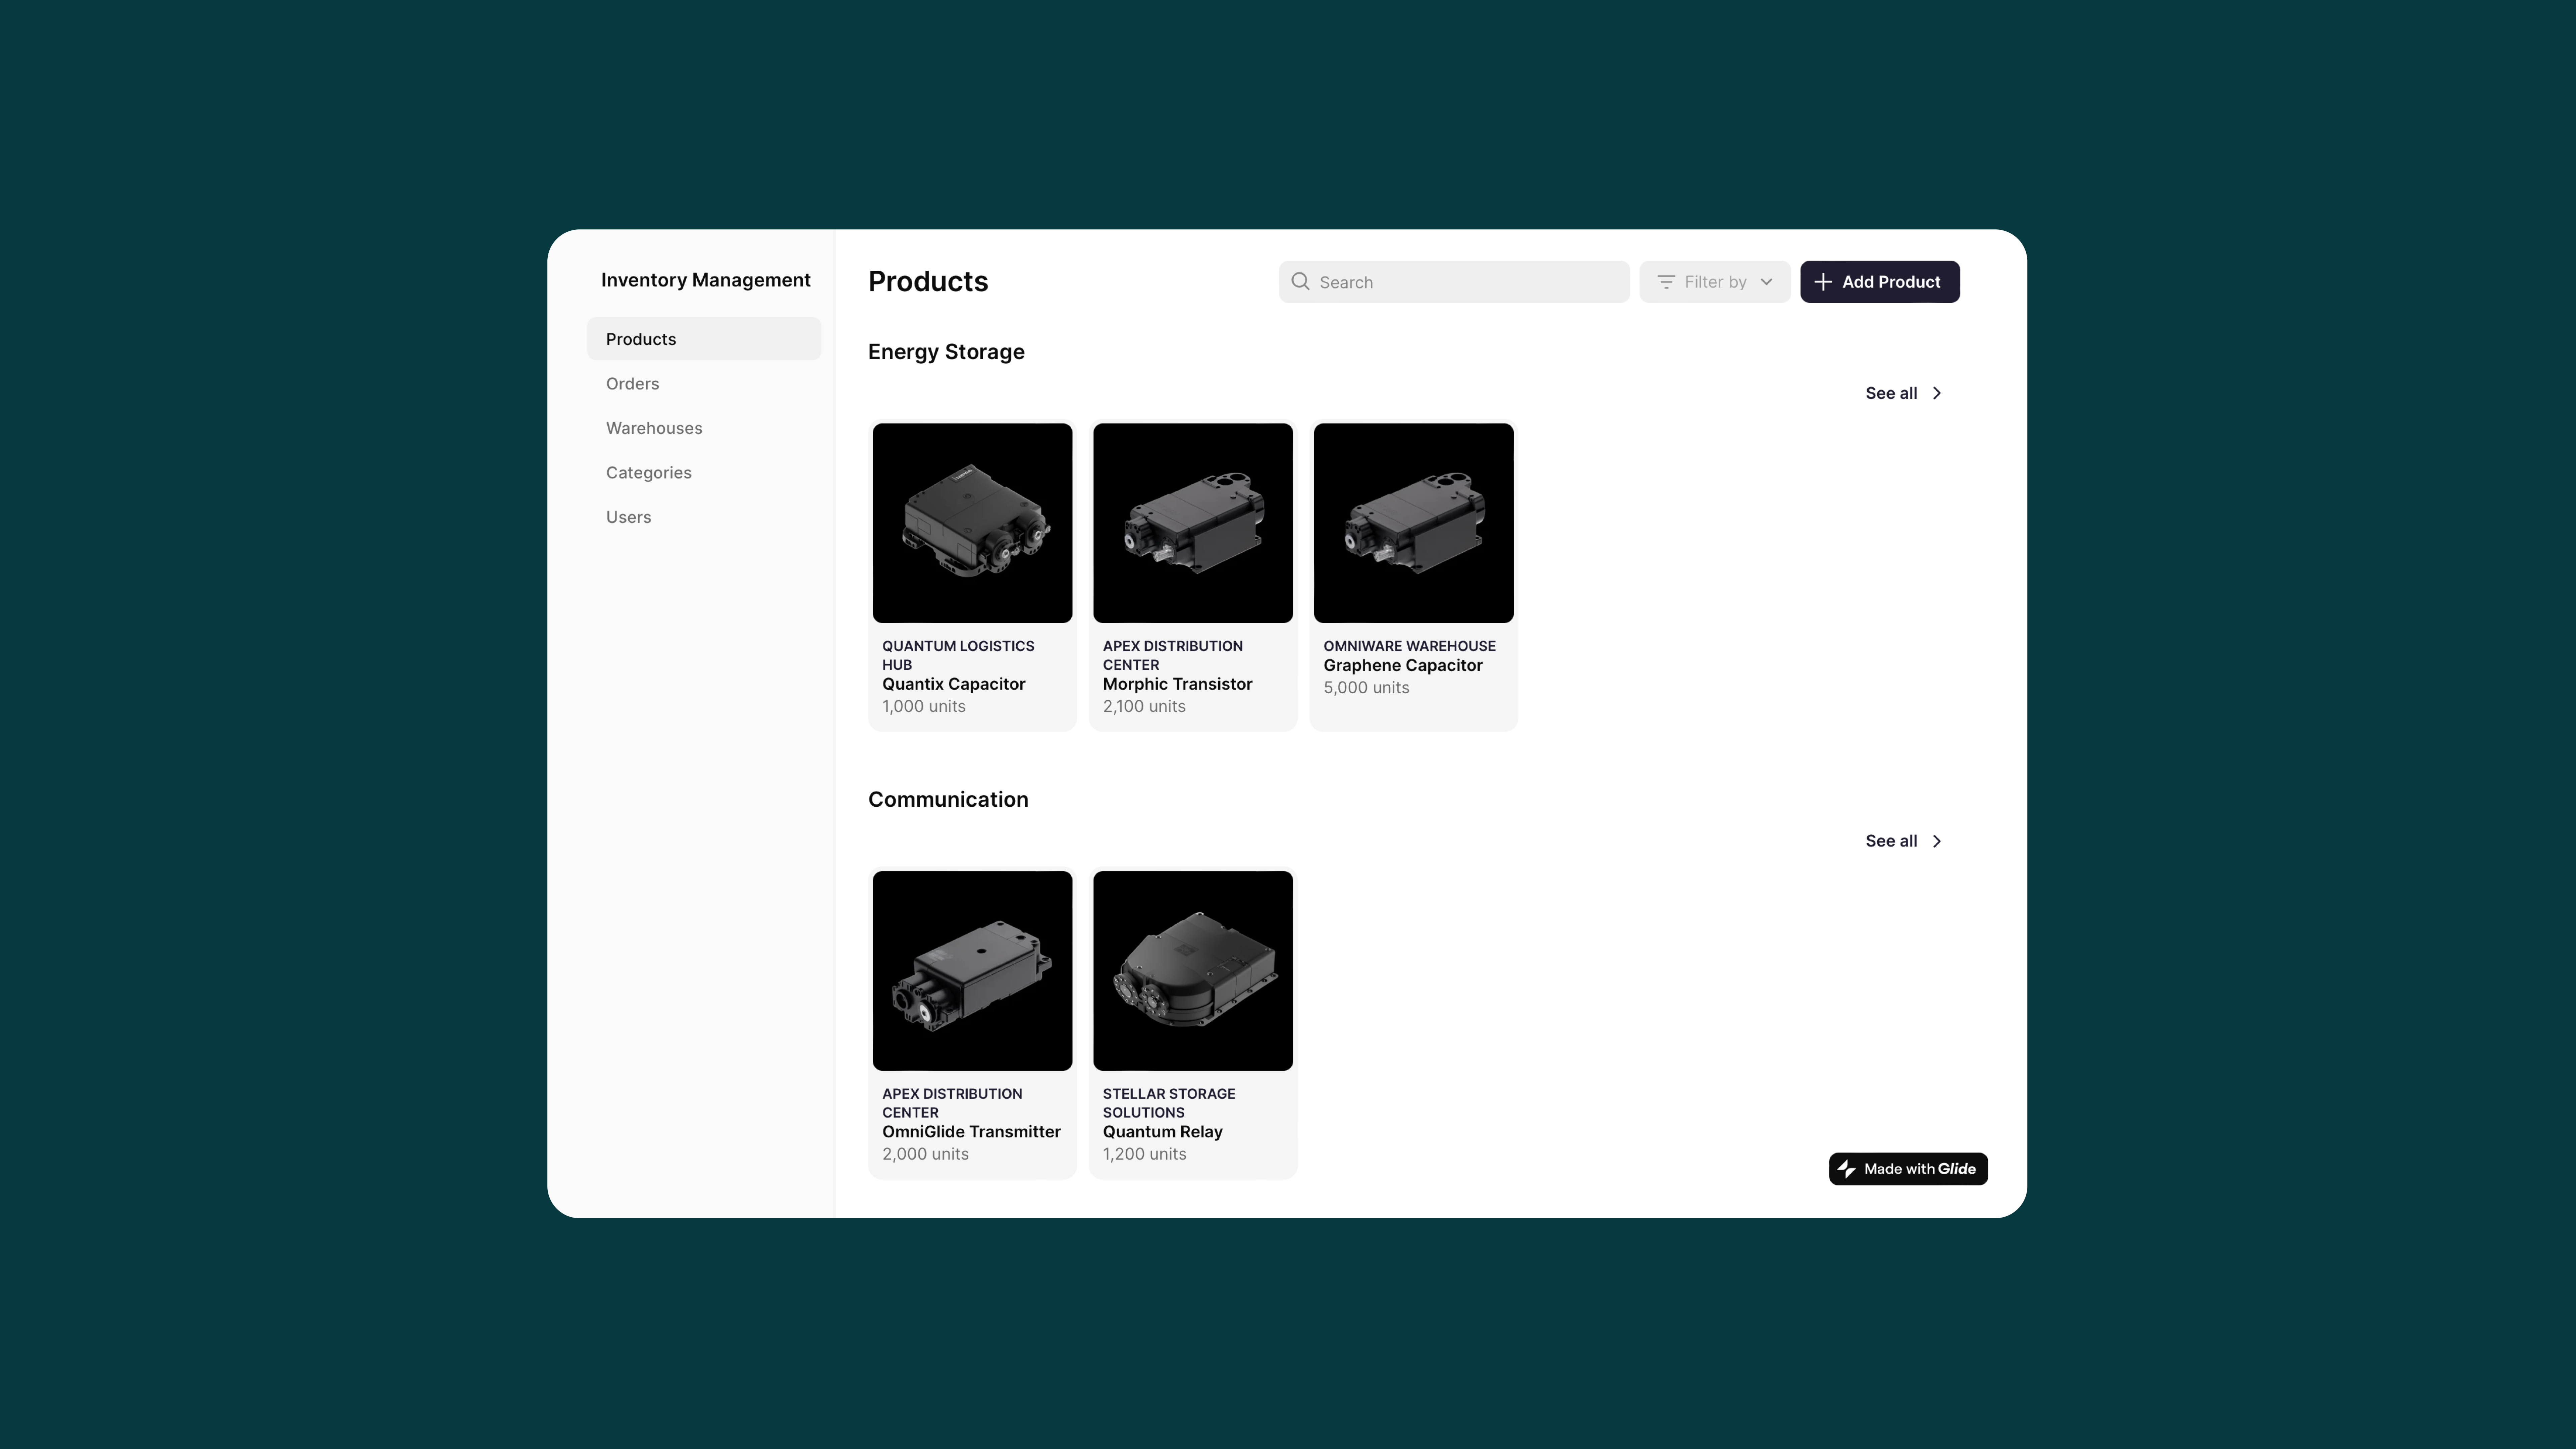
Customize your screens & layouts
Now that Glide has generated a basic app based on your data, you can customize and update everything from right within the 3 main Glide tabs: Data, Layout, and Actions.
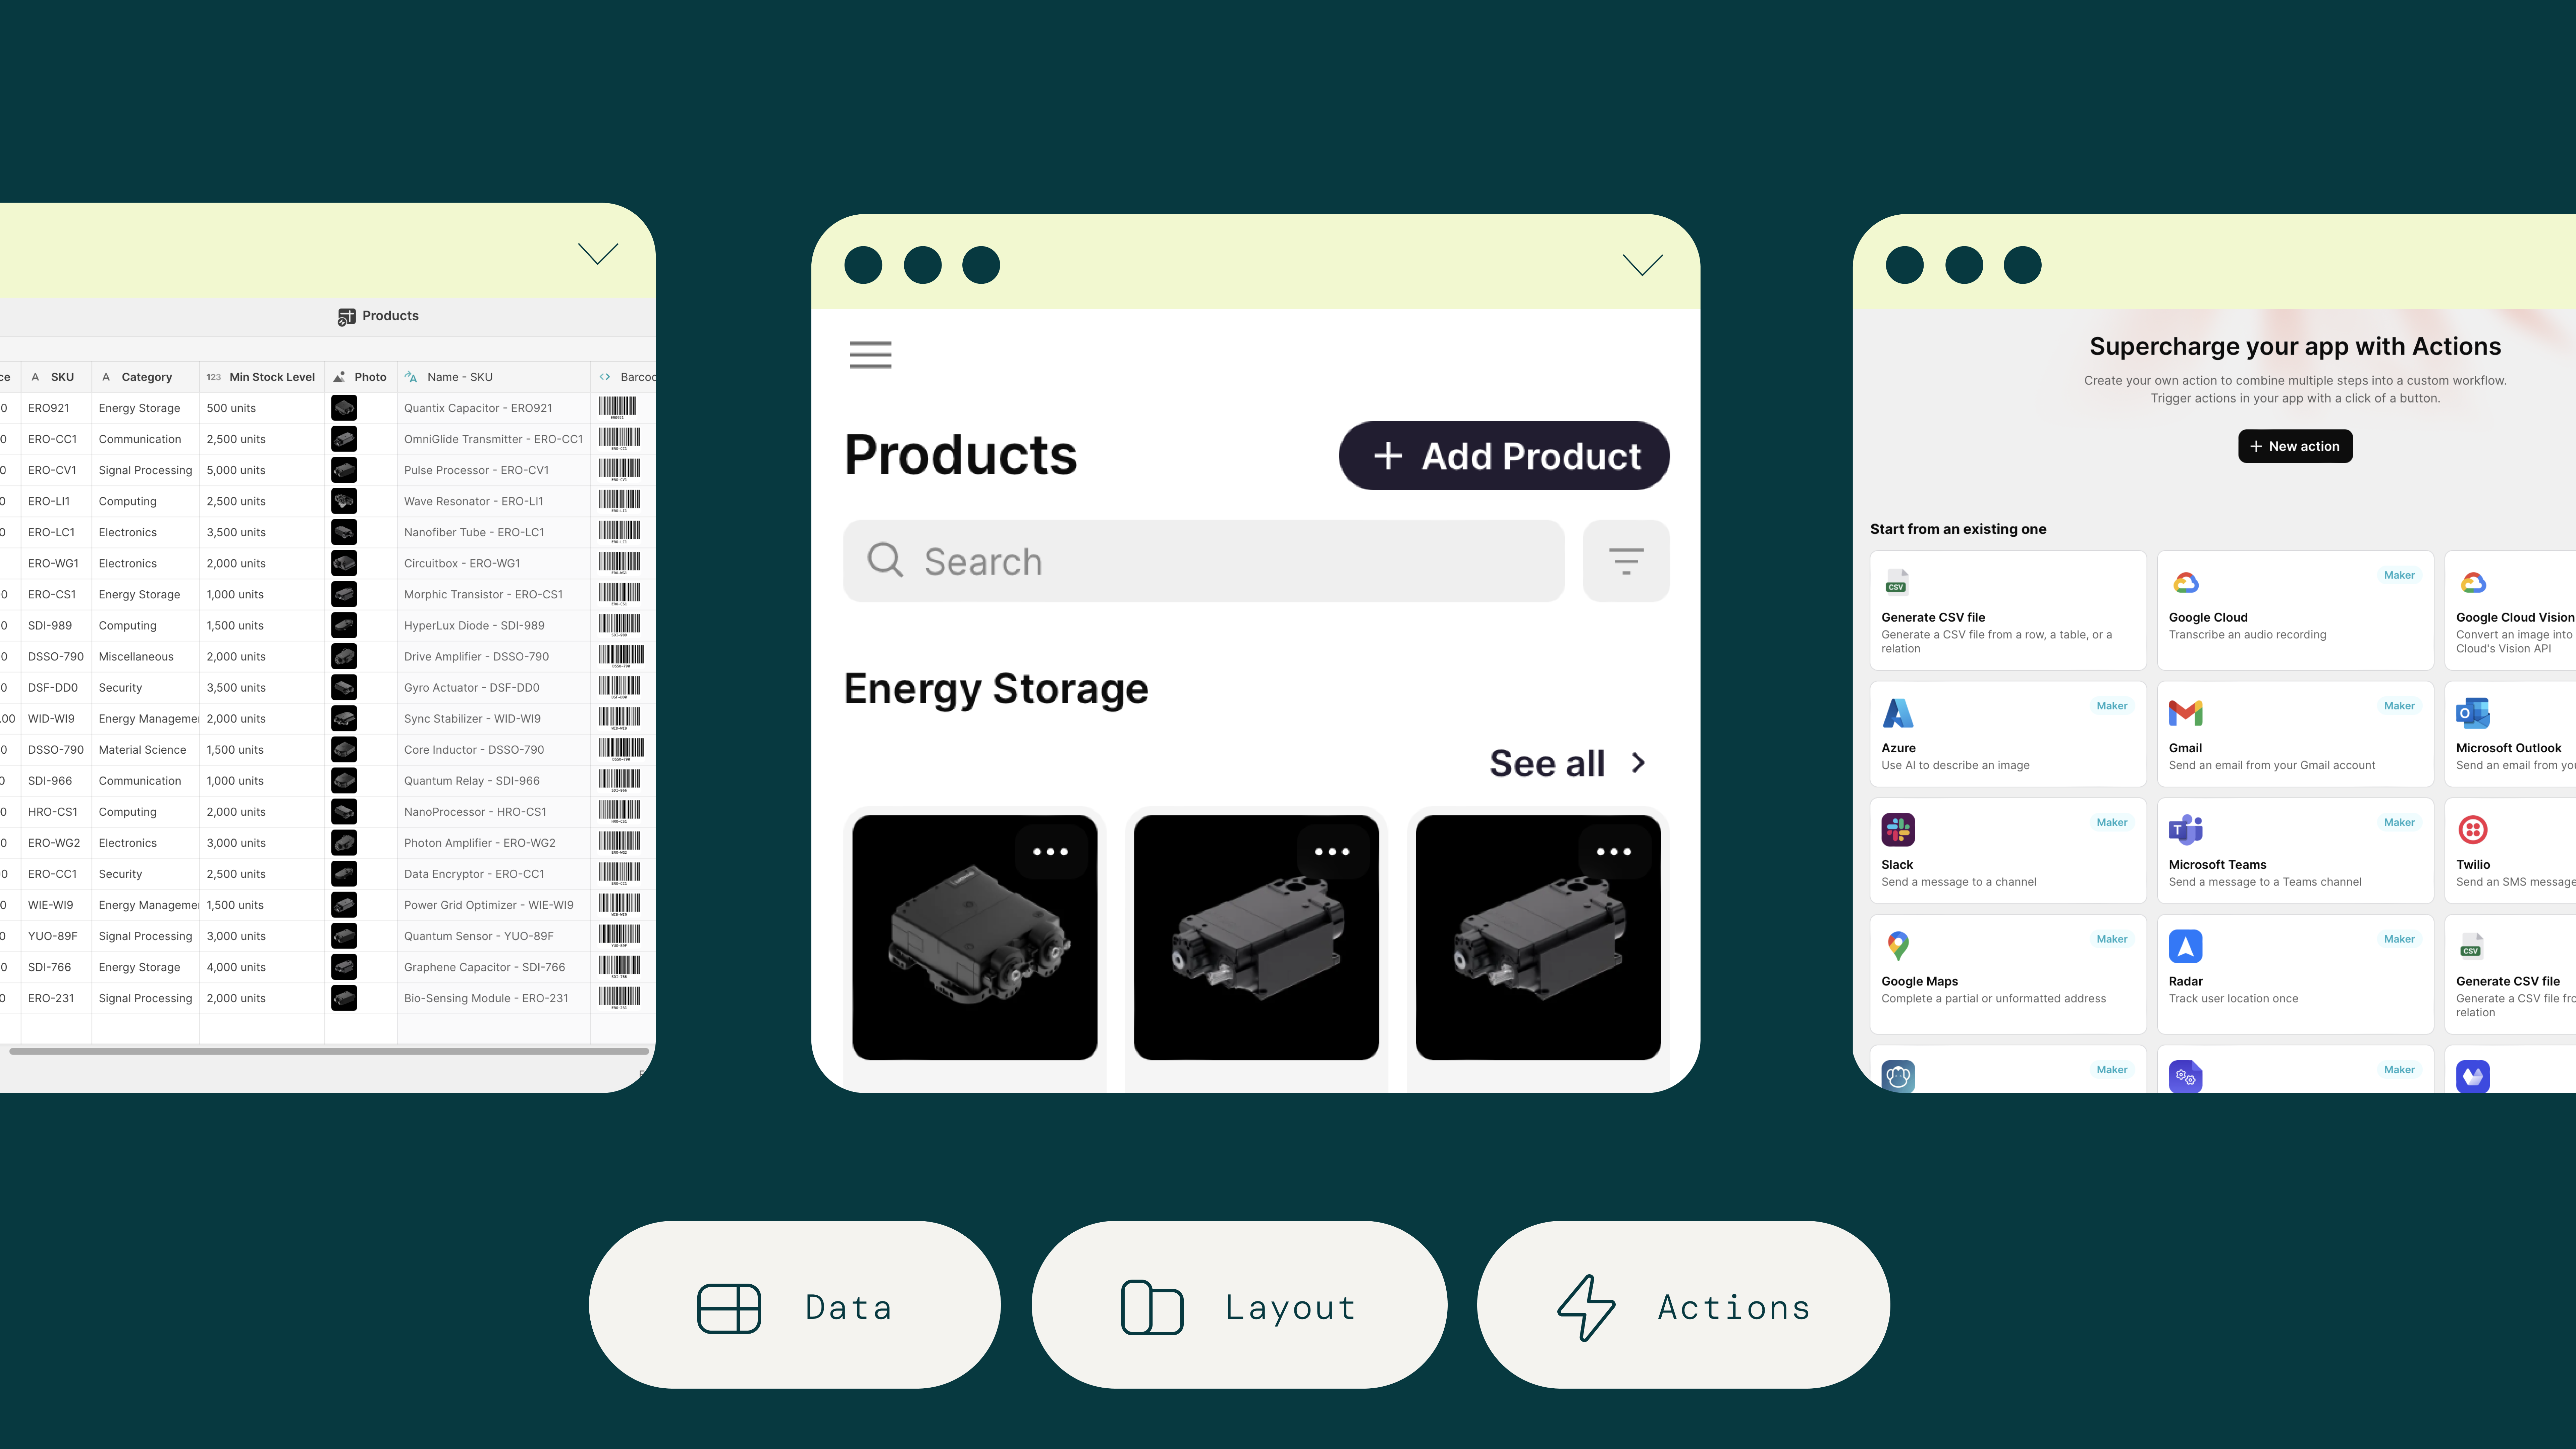
The Data tab—or Data Editor—gives you total control over your data. Whether you make changes to your information in the Editor or the original data source, everything will update in real time to stay perfectly in sync. From the Data Editor, you can create new columns, make complex computations based on your data, use one of Glide’s many third-party integrations, and even inject AI functionality where useful.
In the Layout tab, you can change your app’s look and feel in just a few clicks. The Layout tab lets you add new screens to your app, customize the layout of each screen, add content and titles, interactive buttons with custom actions, and more. You can also customize how users navigate through your app, add forms, and choose from pre-built style elements, including checklists, calendars, data collections, and a lot more.
In the Actions tab, you can create custom workflows that activate when your users take an action. These workflows can be connected to 3rd party tools you use in your business, such as DocuSign or Google Calendar. They can also be connected to pre-built interactions native to Glide, such as ‘add row’, or ‘show notification’. By building these custom, re-useable actions into your Glide app, you can then assign them to interactive components like buttons in the Layout editor. So when someone clicks “Submit” on a form, it could potentially add a row containing their submission to your database and then show a notification to the user that says “Submitted successfully”, for example.
Customizing your screens and layouts is where the bulk of your software development occurs. These three tabs are where you’ll spend 95% of your time when making an app in Glide.
Preview and Launch
Make sure your app works well and looks sharp on all screen sizes by toggling between mobile and desktop view within the Glide workspace. This allows you to easily preview what your app will look like on different screen types—including iPhones, Android smartphones, tablets, and laptop screens. Simply click on the screen icon at the top right of the Layout tab.
When you’re happy with everything, it's time to publish and share your app. You can do so simply by clicking the Publish button at the top corner of the editor. Depending on who your app is designed for, you might want to share it privately or publicly. With Glide, you get a web link that makes it easy to share your app with anyone—or you can change privacy settings to make your app only available to people within your organization or within your ‘users table’.
Make an App Using Glide’s No Code App Builder
In 2025, you no longer need to be a software developer to launch a successful app from scratch.
With Glide and other no code tools, you can simply plug in your existing business data, customize your app screens, and quickly deploy an MVP or complete app with your employees or customers in hours—not weeks, months, or years.
Build your app from scratch on top of your data, or use a pre-built template to kickstart development. Browse Glide’s library of ready-to-use design elements to customize the user interface, and the user experience.
Glide is ideal for making internal business tools and MVPs of larger mobile app development projects. Whether you want to create hybrid apps that respond to various screen sizes or apps specific to mobile devices, Glide’s drag-and-drop interface allows you to easily customize your app’s design and content.
We believe everyone should have access to the power of no code technology — which is why Glide’s pricing starts at free for beginner app builders and scales up with usage and functionality. Glide’s free version gives you the potential to turn raw data and cumbersome spreadsheets into functional, user-friendly apps while exploring the possibilities of no code software development.
When you’re ready, simply upgrade to a paid plan to get access to a suite of 3rd party integrations, AI functionality, enterprise-grade databases, and everything else you need to build a robust suite of tools for your organization.
Need help? The Glide Community is a valuable source of information. Ask a question and a Glide Expert will get back to you usually within an hour. And if you need more hands-on assistance, you can even hire a Glide Expert to help you build your app from start to finish.
It’s time to bring your app idea to life.


