
IT teams use help desk software every single day. When you use something that often, efficiency and time savings add up quickly. Unfortunately, petty annoyances and wasted time tend to add up just as quickly when your software doesn’t fit your needs well.
Many IT help desk solutions on the market are expensive and overloaded with features because they have to fit so many use cases. In a Reddit thread looking for recommendations, u/Omeilix complained, “I've been on the lookout for an exceptional solution myself, yet I haven't come across one that truly stands out.” Another user bemoaned that help desk software is so often “bloated and distracted”.
When you spend so much of your time of your day interacting with a piece of software, mediocre is just not good enough. You can build your own tailor-fit solution instead with the help of a no code platform like Glide — and no one is better suited to build it than an IT person. Your deep understanding of your own processes will help you build better tools — custom software adapts to you, rather than making you adapt to it.
With no code, you’ll be able to create a custom help desk that fits your exact needs and specifications and is available to your team on both mobile and desktop. Your custom software will save you time every single day and let you devote your valuable time to tasks that are more interesting and more productive. Let’s take a look at what you can create.
Create a form to submit support tickets
Your first step is to create the heart of your help desk app - a form for submitting tickets. Since you’re custom-building each field, you have granular control over what information agents get in their support requests.
Start with the following fields:
- Ticket status
- Category
- Created by
- Assigned to
- Created at date
- Description
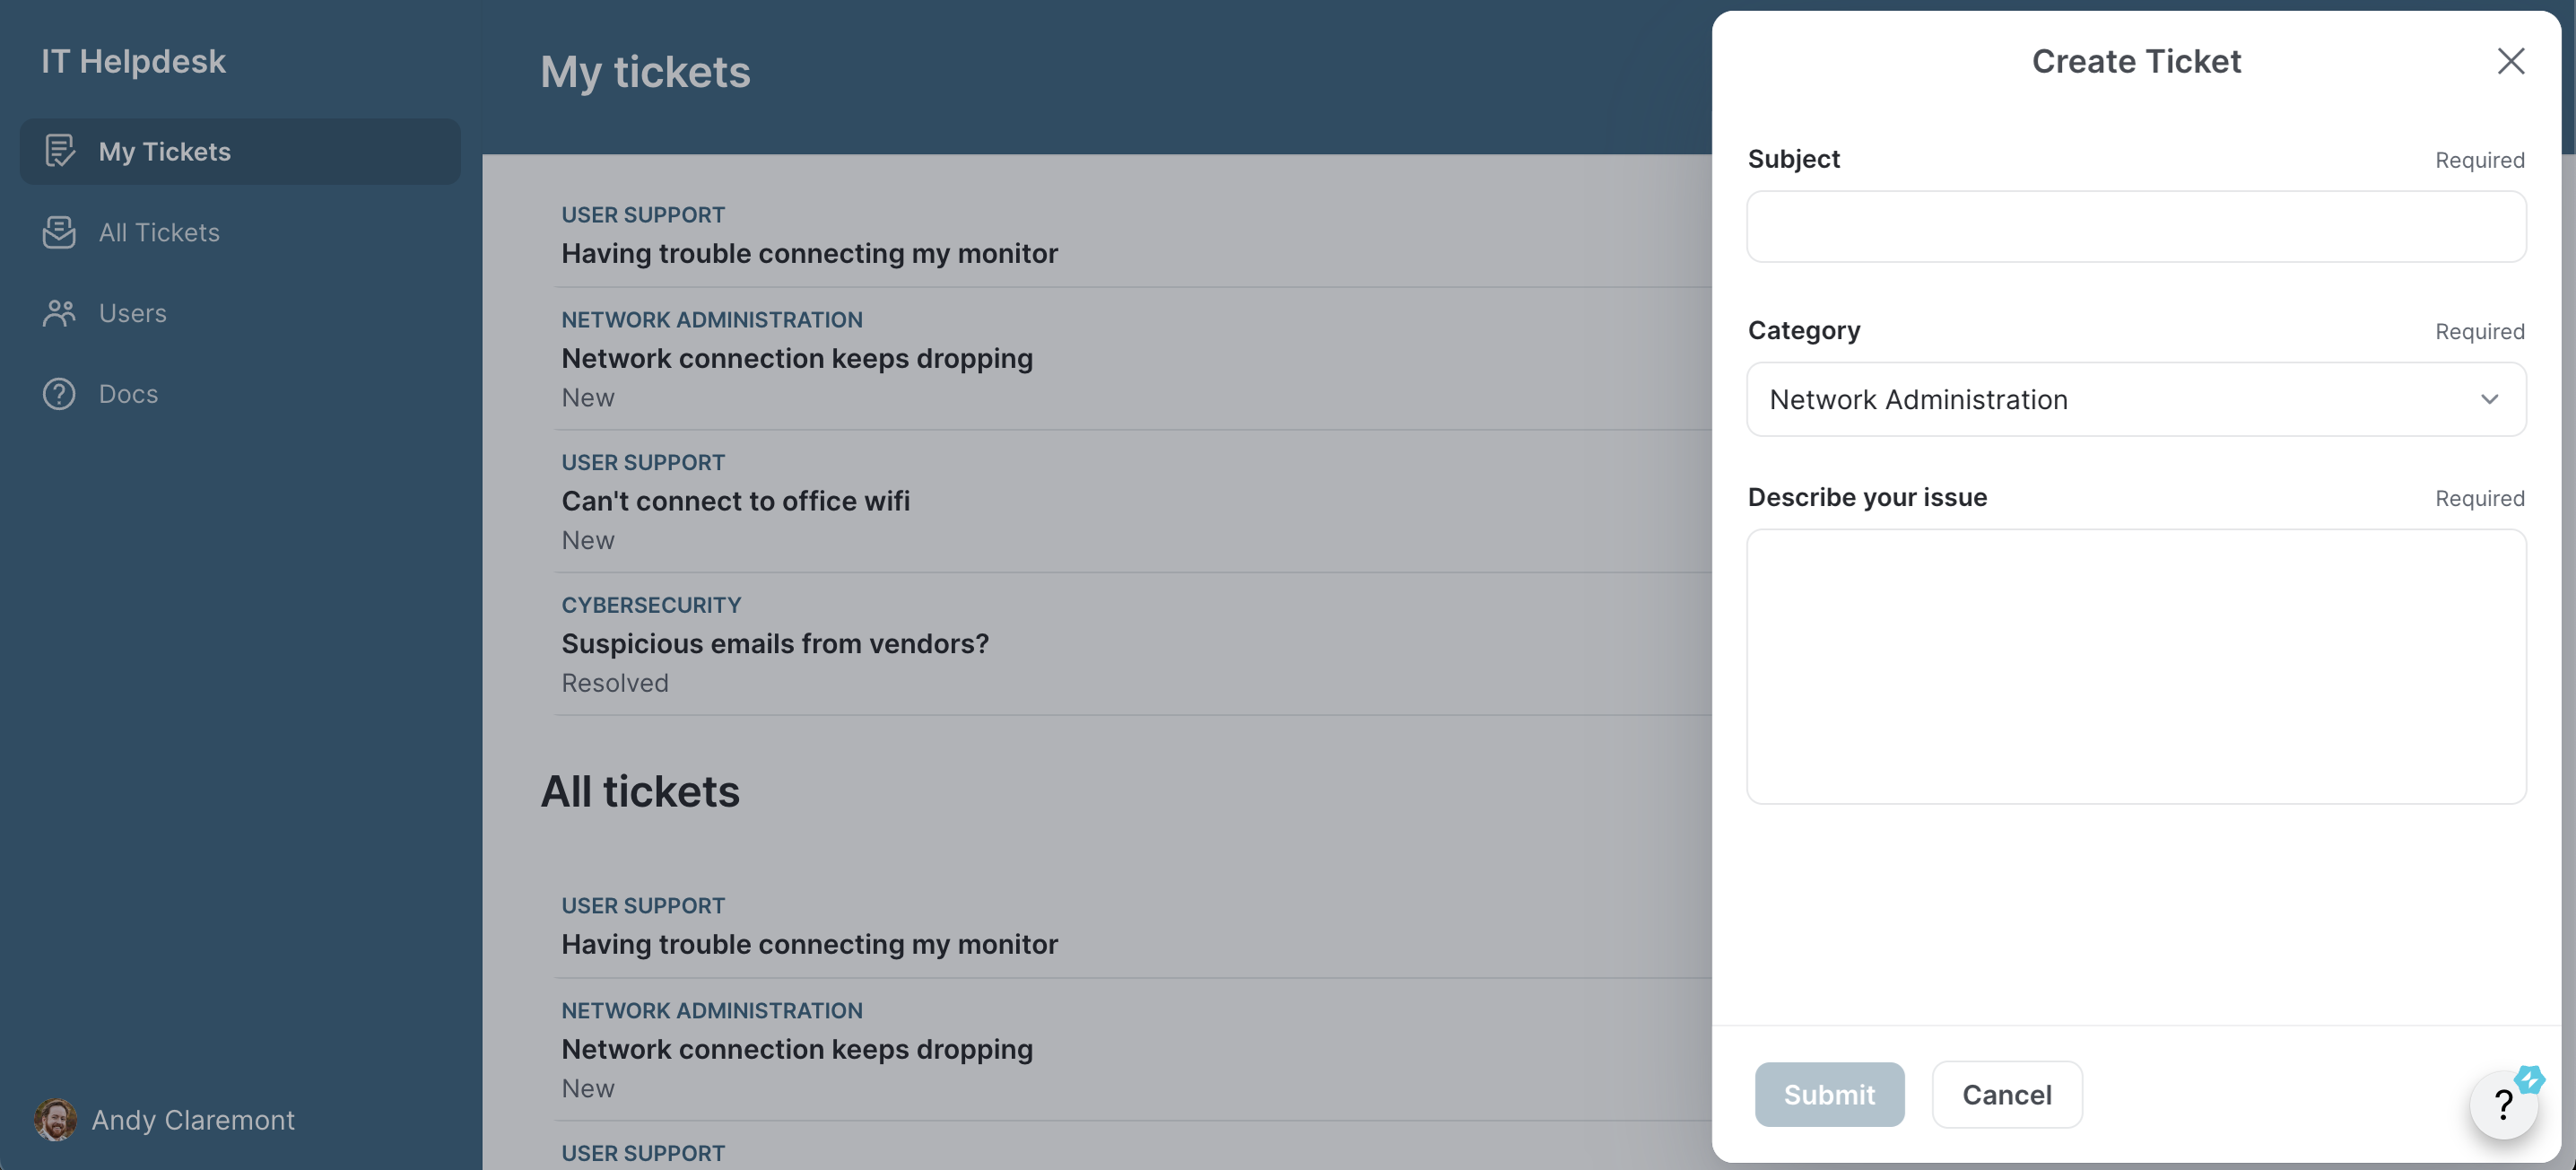
In the user’s view above, you can see only three fields visible for the employee to fill in. That’s because you can set some fields (in this case, ticket status, created by name, assigned to name, and created at date) to auto-fill without user input.
This reduces the complexity of your ticketing system for employees, making your app much less overwhelming and easier to use. Auto-filled fields also help ensure you get that data on every ticket. You can even set certain fields as required to avoid getting incomplete tickets that your team doesn’t have enough information to resolve.
Choose a format for each field. A switch field helps users to answer binary questions. A checkbox allows them to pick multiple options from a pre-selected list, while a choice field lets them pick an option from a dropdown menu. Open fields give users space to describe their issues in more detail in their own words.
Make profiles for IT team members and users
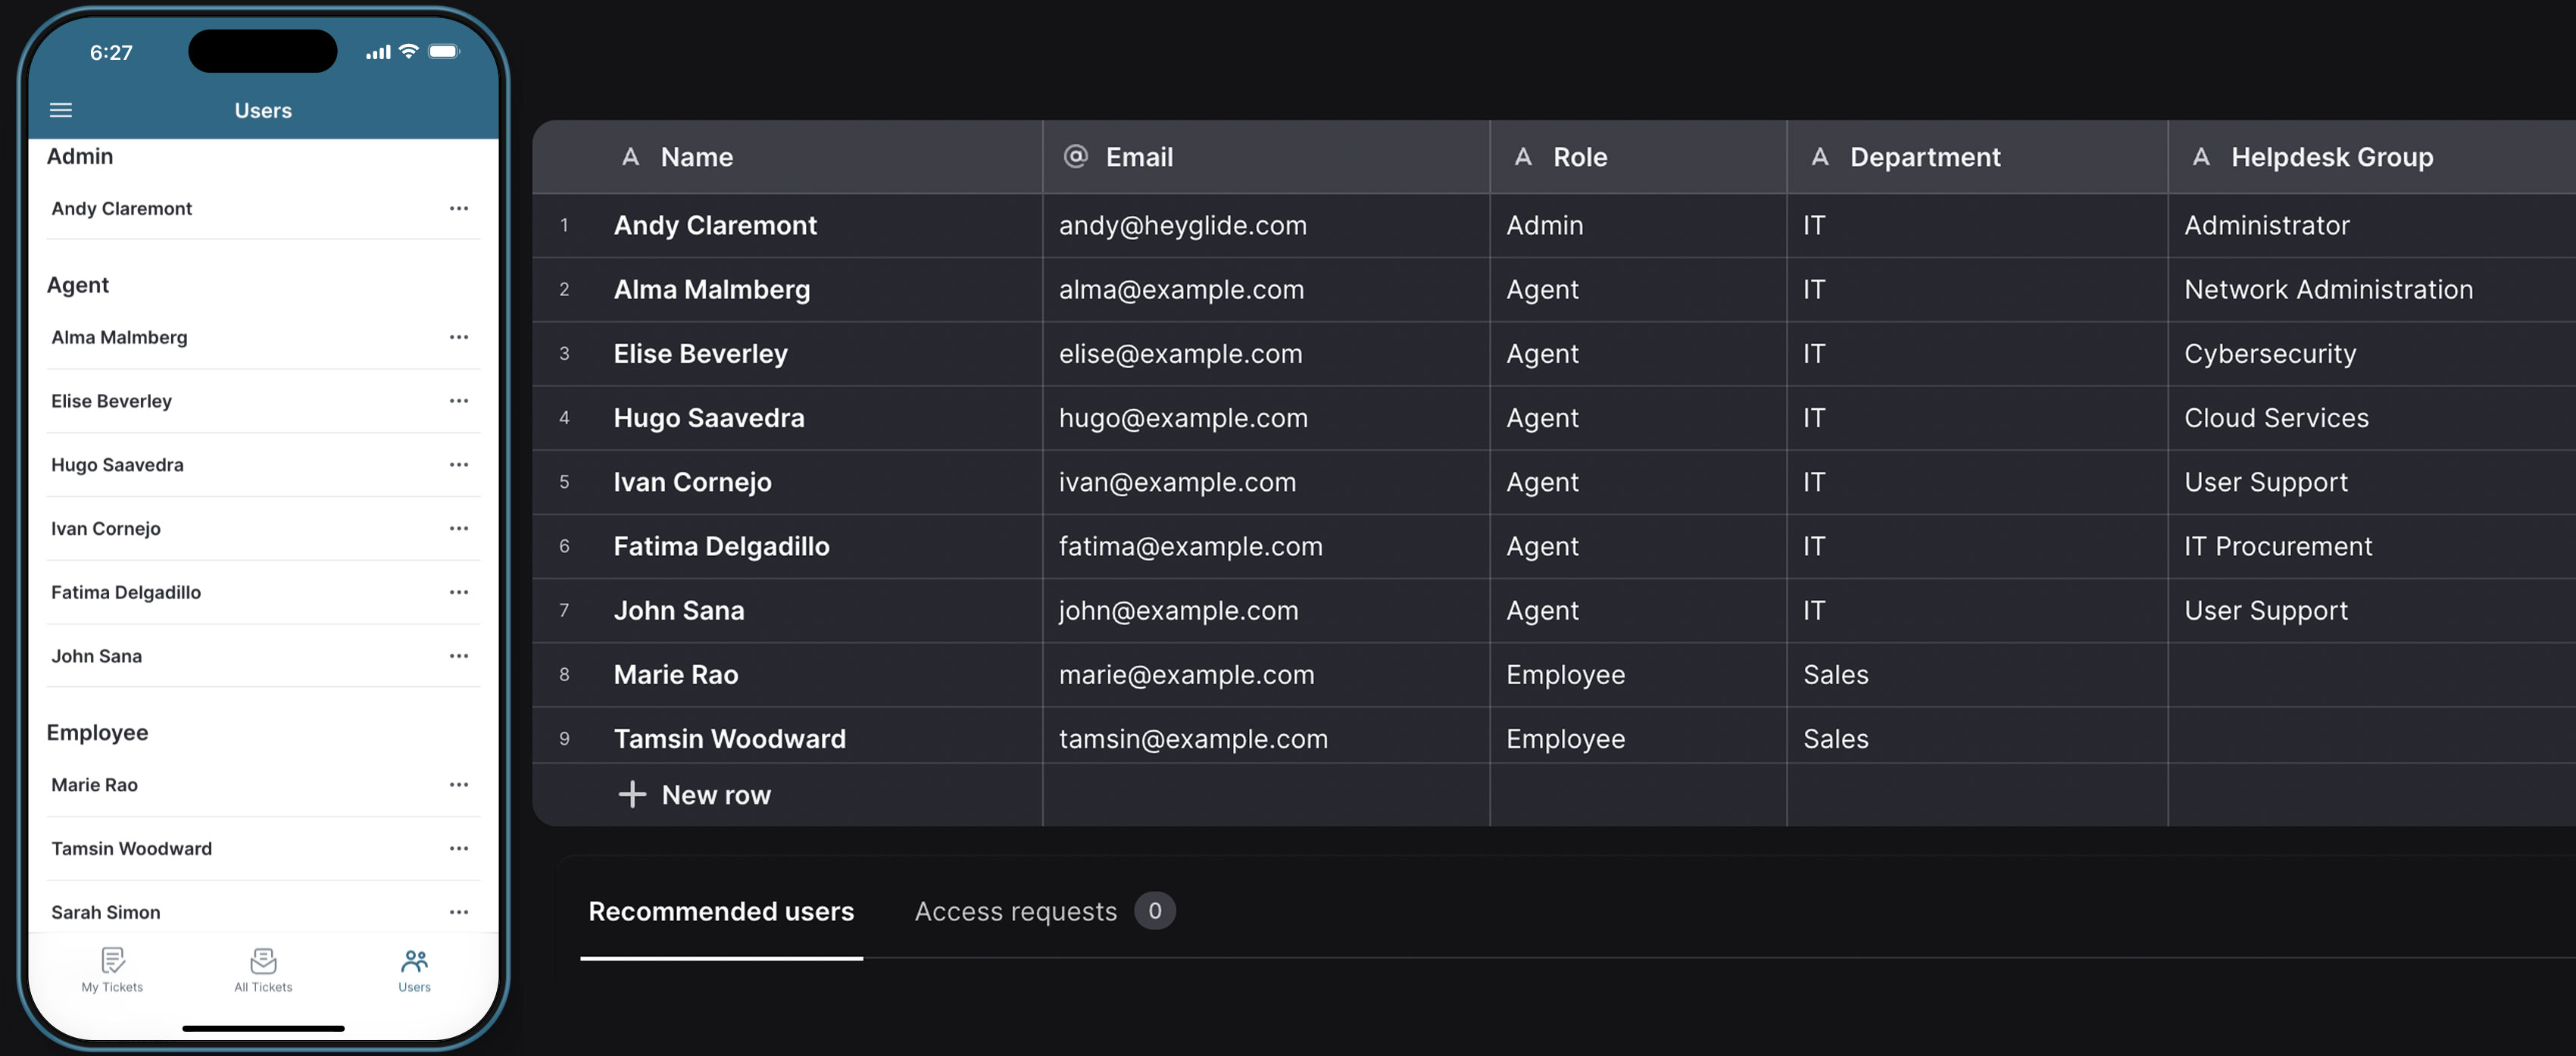
Build accounts for your support agents and users. Above you can see the three basic categories of user you’ll need. On the left is the clean mobile interface of the app, built on top of the user data on the right. The admin is you and whoever else helps you oversee the app. Setting an admin profile gives you control over the security of your app and restricts who can make changes to the app itself.
Create profiles for each IT support agent you have working so they can get tickets assigned to them and move support requests down their own pipeline. Finally, make user profiles for all the employees who will be using your app so that your team can follow up with them when they’ve resolved their issues or have additional questions.
User profiles ensure you always have contact information for anyone submitting tickets, but they also let you restrict visibility and access to tickets to make your app more secure. It’s easy to set up your app so only agents, admins, and the person who submitted a ticket can see and edit it.
Customize your app further
Once you have a basic functional structure in place for your app, you can begin adding and refining features that expand what you can do with your new software. Figure out what your team needs from their help desk software and build features that suit your company’s unique needs.
Create a comment field to facilitate conversations
You may want to add a comment and reply feature to your tickets so your team can discuss problems with users directly in the app. This will reduce how much switching they need to do between tools, but it also keeps a useful record of communications if you need to reference a ticket or come back to a repeating issue.

Add a documentation page
Add a page to your app where your users can see basic information about how to use your app, important updates, and whatever else they need to know about using your app. Use this page to flag security alerts, let employees know about upcoming tech changes or recent bug fixes, and provide them with links to other useful references.
Use photos to help research issues
Add a photo upload feature to your app so users can add screenshots of error messages and suspicious emails, photos of malfunctioning equipment, or images of serial numbers to log new tech. Since your app is easily accessible on mobile, users can take and upload photos directly from their smartphone or tablet.
The employees you’re helping won’t always know what information you need to resolve their issues. This can be especially frustrating if you’re remote and unable to just pop over to their desk to check if their monitor is plugged in or take a look at the message on their screen. Photo uploads help your team see what’s actually going on much more easily.
Create a ticketing pipeline
If your IT help desk flow is more complicated, it can be helpful to set up a ticketing pipeline to track where you are in resolving each issue. Add checkboxes to your support requests so that your team can check off steps as they follow a support workflow. Alternatively, you can add a dropdown menu to move ticket requests along stages in a pipeline.
Include reporting features
Build an analytics dashboard that helps you see trends in your support requests over time. Charts help you visualize data easily. Create an additional page restricted to admins or agents that displays historic support request data visually. This will help your team track how quickly they’re resolving issues or identify common support requests that could indicate a need for more training or better systems.
Use AI to add more powerful features
AI-powered features can help your team do even more by analyzing, categorizing, and summarizing your data in different ways. You can use a text-to-choice or text-to-boolean feature to help you categorize and flag tickets by urgency or type or even assign tickets to the right IT team member.
AI is especially good at understanding and summarizing large quantities of information. Upload FAQs, technical instructions, company guides, and software or equipment manuals to your app’s data. Use AI image-to-text to upload data from any printed files.
Use this data to set up a chatbot that helps users solve simple problems, reducing the strain on your IT team. Your users can ask the AI questions directly and get answers from your business data without having to go to your IT team for every single issue.
Get notifications to your team where they need them
Integrations with numerous other tools make it easy for you to set up notifications for your team in whatever format works best for them. You might want to set up Slack messages, a Microsoft Teams group, or automated email alerts to notify team members when they have a new ticket. Similar alerts can be sent to users when their ticket is closed or if further information is needed from them.
A lot of IT teams, especially contractors, struggle with not being able to leave their desks to work on other things in case an urgent support request comes through. If you designate urgent requests, your team can use push notifications on their phone to alert themselves immediately when something needs immediate attention.
Building custom software puts you in charge of your own tech stack
To get started, build along with this screencast that walks you through the fundamentals of building your own IT help desk from scratch. Once you understand the basic logic of building software with no code, you’ll be able to build all sorts of apps for your team and your business.
When we surveyed IT leaders, 68% of them were receiving at least one request for internal tools each month, some as many as eleven. The most common being Employee Portals (36%), Knowledge Management tools (35%), and CRMs (34%). By using Glide, you can build these sorts of internal tools quickly, creating your own custom interconnected tech stack and getting a lot of work off your plate more quickly than you ever could before.
Once you’re able to get help tickets sorted quickly and your business app request backlog taken care of, your IT team can focus on the more innovative and exciting aspects of your role. You’ll have more time to stay abreast of technological advancements and do higher-profile projects that can elevate your team and push your business forward.
Begin building your first app today with Glide.


