
Dreaming of a slick, beautiful app for your business…but don't know the first thing about coding or graphic design?
Well, that could be a problem when you consider how important an app’s interface is for users.
For an internal app, poor workflows that add extra steps can cause your employees to spend more time completing tasks now than they did “the old way.”
And for consumer-facing apps, a confusing layout that makes it unclear where to even start may send them looking for an easier-to-use option — from a competitor, no doubt.
The solution to nailing the design and functionality of your business app doesn’t have to be taking a time-consuming class or hiring resource-consuming designers and developers. Instead, you can use a no-code platform that makes it easy for you — yes, you! — to create custom, delightful apps your users will love.
In this guide, we’ll introduce you to one such platform and even provide tactical steps so you can make it work for you right out of the box.
But before we get there, let’s first dive into the basics behind designing and planning building beautiful apps so you can take yours to the next level.
Learn the Key Design Principles Behind Beautiful Apps
User interface (or “UI”) is a design term that defines all the pieces of an app (or any digital tool, really) a user interacts with.
UI refers to everything from layout to text and logo placement, button appearance and functionality, graphics or images, text fields, animations, etc.
UI is important when it comes to creating a business app because, to the user, the interface is the product. They aren’t focused on all the data and functionality that makes the app work on the back end. What’s important to them is the front end — what they actually see and interact with to get a task done.
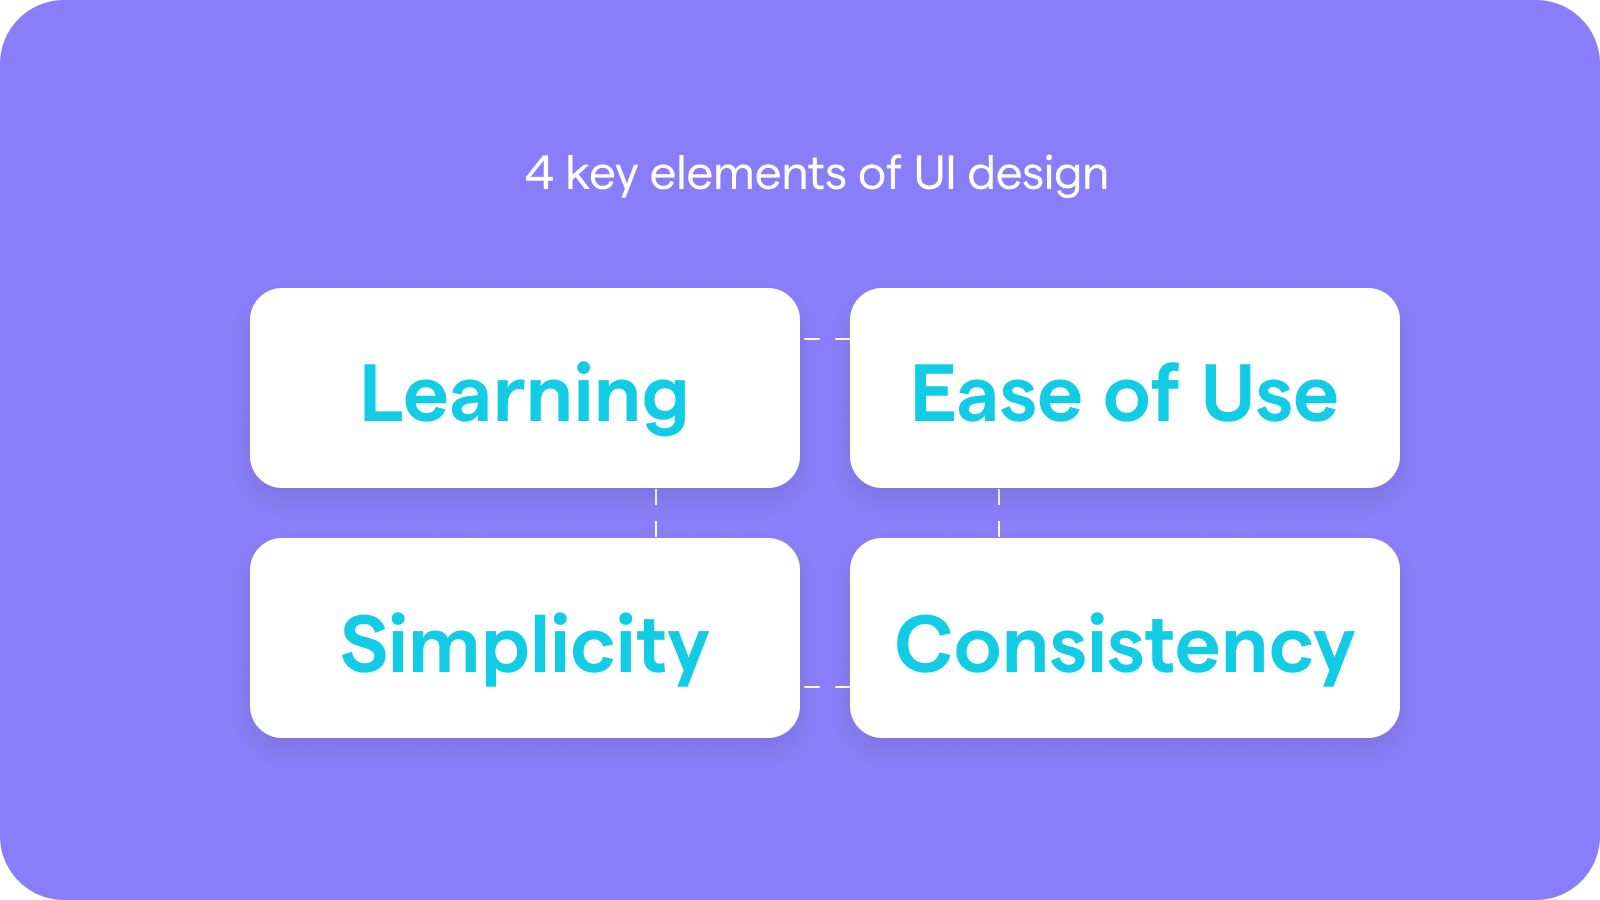
Many app builders think about four “golden rules” when working on UIs. Get familiar with them, too, so you can exercise them later when we walk you through building your first business app yourself.
Enable Users to Learn Controls Quickly
When we say controls we just mean the buttons or other features that enable users to navigate around your app. Menus should be easy to find and easy to use, buttons should help users move to the next action and complete tasks, and so on.
Prioritize Ease of Use
A UI that is intuitive and can be learned quickly is easy to use. Ease of use helps app users develop a sense of mastery and comfort. When users feel comfortable coming back to your app over and over again to accomplish a specific thing, you’ve created greater efficiency and/or a reliable revenue source, depending on if your app is internal or consumer-facing. Either way, ease of use is important to keep your app audience engaged!
Trim the Cognitive Load Where Possible
Working memory is what enables us to work on a task without losing track of what we’re doing at the moment. Cognitive load is how much information a working memory can hold on to at once.
Apps should always be created in a way that doesn’t create too much cognitive load. If it took so many steps to post a picture to Instagram that users couldn’t remember all of them in one go, it wouldn’t have blown up the way it did!
Wherever you can in a workflow within your app, cut out additional activities, information, and steps. Labeling buttons, screens, and steps along the way can also relieve some cognitive load.
Keep Design Consistent Throughout
Consistency is so important in building an app that’s easy to learn, easy to use, and therefore engaging. This is because consistency helps the brain create shortcuts, reducing cognitive load.
There are a few different ways to consider consistency when building apps:
- Stay consistent with popular design norms: Today, most folks have used an app before, and are familiar with some common icons (think “share,” “call,” etc.). Rely on these icons wherever you can.
- Remain visually consistent: Language, colors, and styles that are associated with a meaning should retain that meaning throughout every app screen. For example, if blue text means some language is linked on one page, don’t turn linked language green on another page.
Planning Your App Development Process
With some design best practices bouncing around in your brain, let’s build out your UI toolkit with insight into how great apps get planned.
This section will keep it simple, as we’ll keep the technicalities high-level and focus on the guiding factor for creating any successful app: understanding what your app does and who it does it for.
Define Your Audience
First and foremost, understand the audience you’re building your app for! This is most easily done by creating what marketing professionals call a “persona.” Personas give a face, name, job, and other personal characteristics to each of your ideal audience types. Here is a simple guide on how to create personas.
Personas are a helpful guide as you choose and lay out the functionality of your app. When you understand exactly who you’re building for, you can more accurately answer questions like “What would this persona do next?” and “What other features would this persona like to see?” If you’re building an internal app to help with business processes, this is a good time to look at how your employees work so you can be sure you’re improving upon their current flows. If you’re building an app for your customers, you could conduct a poll or examine the functionality of other tools that already exist in the space.
Decide on Key App Features
Building on the above understanding of your audience, you next want to think about all the tasks each of your key personas might want to complete. Focus on the ones that align with what you want your app to do (is your app all about streamlining customer service conversations, is it for internal inventory management across locations, etc.).
When you have your core tasks in mind, it’s time to ask: What functionality does your app need to have to make completing these tasks possible for users?
Next question: What functionality would actually make these tasks easier to complete? Bonus points if your solution is better than what’s already on the market!
When you’re ready to move on to the next question, you can consider: What additional tasks can you help your audience complete? If not now, you can always build more and better functionality into a future version of your app. That’s the joy of building and controlling your own software!
Remember that features are something you’ll likely continue to think about as your app gets used, you get feedback, and maybe even your business model or focus changes.
Draw Out Wireframes
Ever heard of a wireframe?
Wireframes are traditionally a designer and developer tool for understanding what a mobile app, web app, or website should look like once complete. But in this case, you can think of wireframes as low-fidelity outlines simply sketched out on paper, by hand.
Wireframing can help you think through where specific items will go — such as buttons, graphics, etc. Additionally, building our wireframes is a great way to visualize the flow of your entire app, for each user type and for each task. As you sketch wireframes, you’ll need to think about which steps and screens need to go in what order to get a specific task done.
Don’t worry if your wireframes and app don’t perfectly match the first time around. As you get more familiar with your no-code app builder of choice, you’ll know which features and design elements you have access to and how they work. This information will make your wireframes better and better with each go.
Use Glide to Build a Mobile App for Your Business
Now that you’ve got a strong strategy to build upon, it’s time to dive into actual steps you can follow to create your business app with Glide.
Glide: Turn Spreadsheets Into Powerful iOS Apps and Android Apps
Glide is a modern, no-code app creation platform.
While you may have heard of some of our competitors — such as Bubble and Flutter — what sets Glide apart from these and others is our focus on the user interface.
We meant what we said about the value of great UI and the importance today’s users place on it. That’s why we’ve spent years making Glide easy to use, on multiple fronts. Glide is easy for the average person to use to build business apps — without writing a single line of code or pushing a single pixel. And, Glide apps provide a delightfully easy user experience for your end users.
And just for the record, all the ease of use we’ve built into Glide doesn’t make your apps any less customizable or powerful.
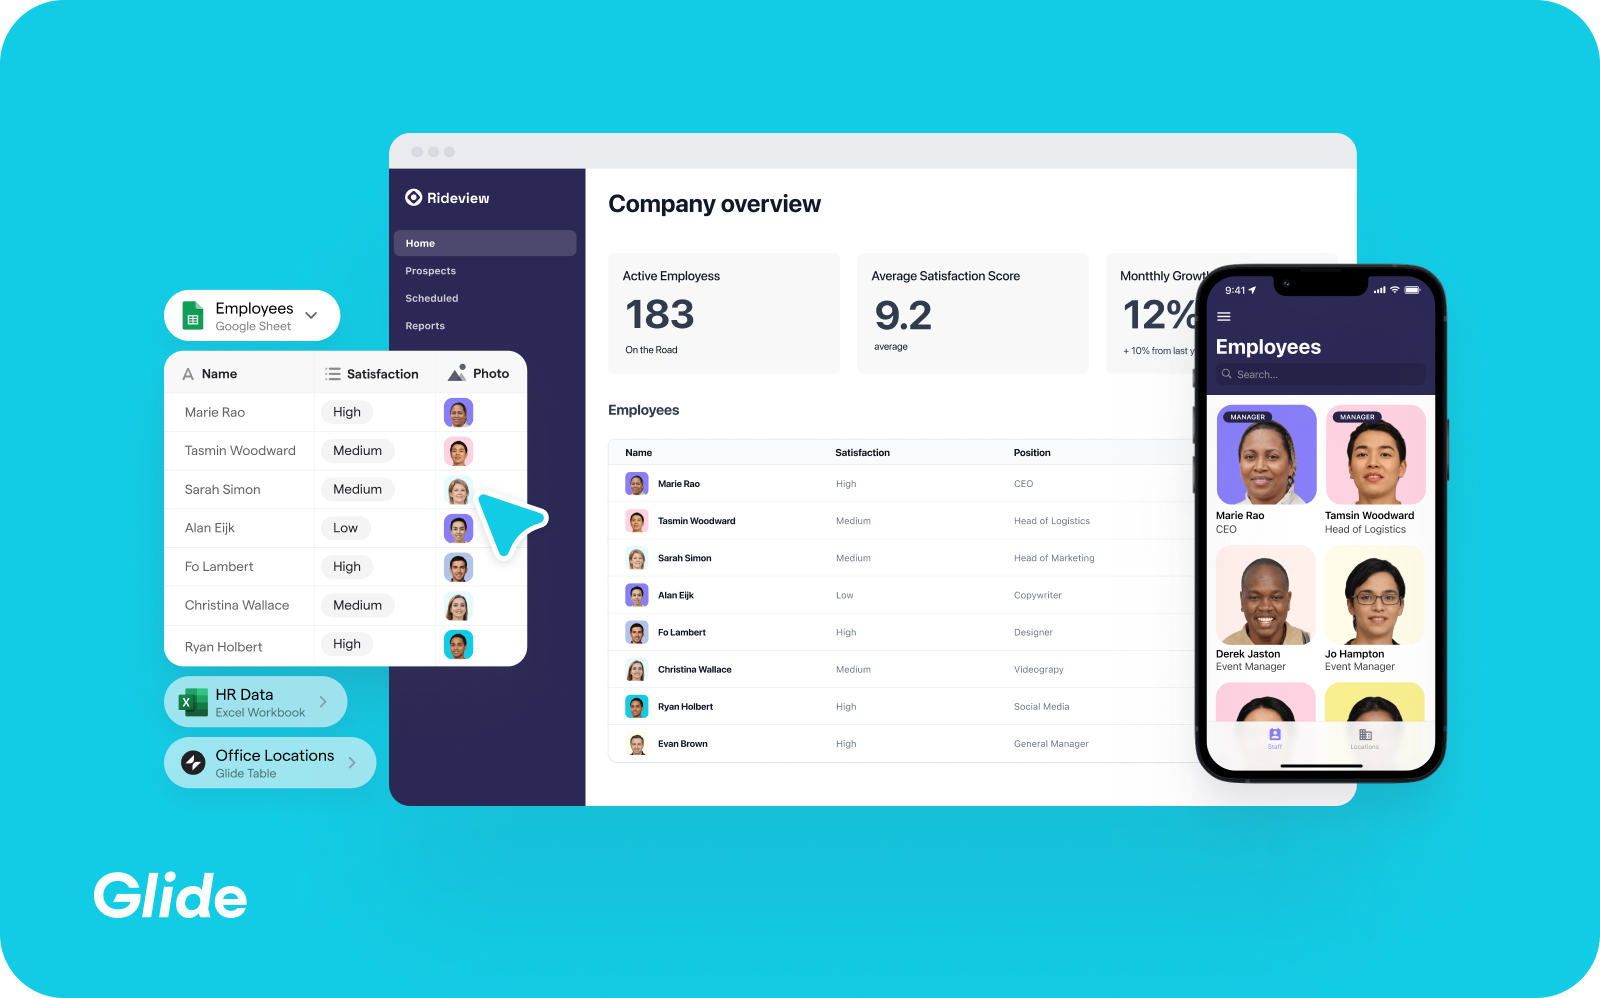
For starters, Glide apps can be populated by data from your Excel, Google Sheets, and/or Airtable documents — or from Glide Tables, our in-app data source! Once integrated with Glide, any data you change at the source will be reflected in your Glide app in real-time, and vice versa. This empowers your Glide app to become a single codebase and trustworthy source of truth for important business information and processes.
Glide uses complex automation to take this information and create robust mobile apps or web pages that are friendly for web, tablet, and mobile users on both Android and iPhone devices. All you have to do then is personalize the design, functionality, and settings using our drag-and-drop editor.
If you’re a little bit worried about design for your first few business apps, feel free to use one of Glide’s templates. Our templates can still be customized to your heart’s content, but they also have stellar UI by default!
Glide even has a solution for helping to automate all those manual processes your key personas are doing by hand — think sending emails, updating databases, etc. Our API works with Zapier to enable a wide range of integrations with third-party platforms.
Love the idea of Glide but aren’t sure where it makes sense for you? We put together a list of just a few low-code use cases to get those creative cogs turnin’.
Whether you’ve got a great process or product in mind that you’re ready to build an app around, or you’re still just along for the ride to see what’s possible — it’s time to do the dang thing.
Let’s Glide.
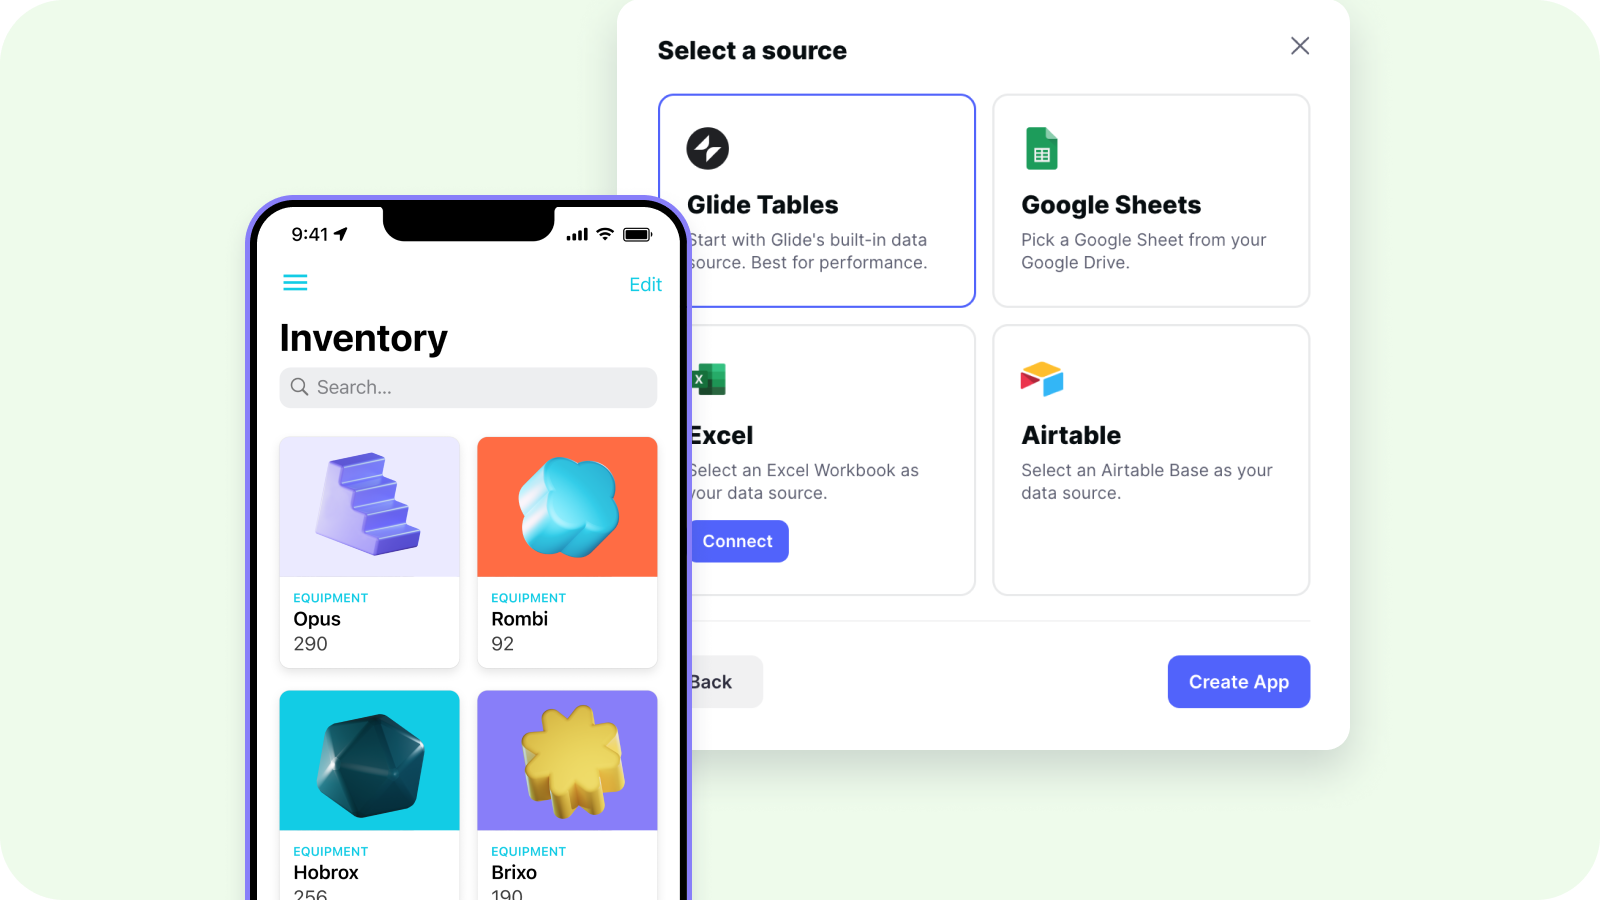
Create or Clean Up the Data Source That Will Power Your App
Step one of building a successful app is starting with a strong foundation. Turn your focus for a moment to the data source that will fill your Glide app with info.
If your app will be helping to create a new process, if you don’t have much data yet, or if your app just isn’t the kind that’s going to need much data, you can go ahead and move to the next step and choose “Glide Tables” as your source.
But if you do have some data to import — think staff information for a communication app, product information for an inventory app, etc. — review our guide to organizing your spreadsheet to make sure it’s ready for Glide.
Create Your App in Glide for Instant, Awesome UI
With your data source all fixed up and ready to use, next visit the Glide Apps homepage and hit any “Sign Up” button to create your free profile in seconds.
Once you’re in your dashboard, choose to start a new project, give it a name, and select whether you would like to create an app or a page. For the purpose of this walkthrough, let’s assume you’ve selected to create an app.
Now, connect your data source (Glide Tables, Google Sheets, Excel, or Airtable). Our system will use your data to automatically create an organized app!
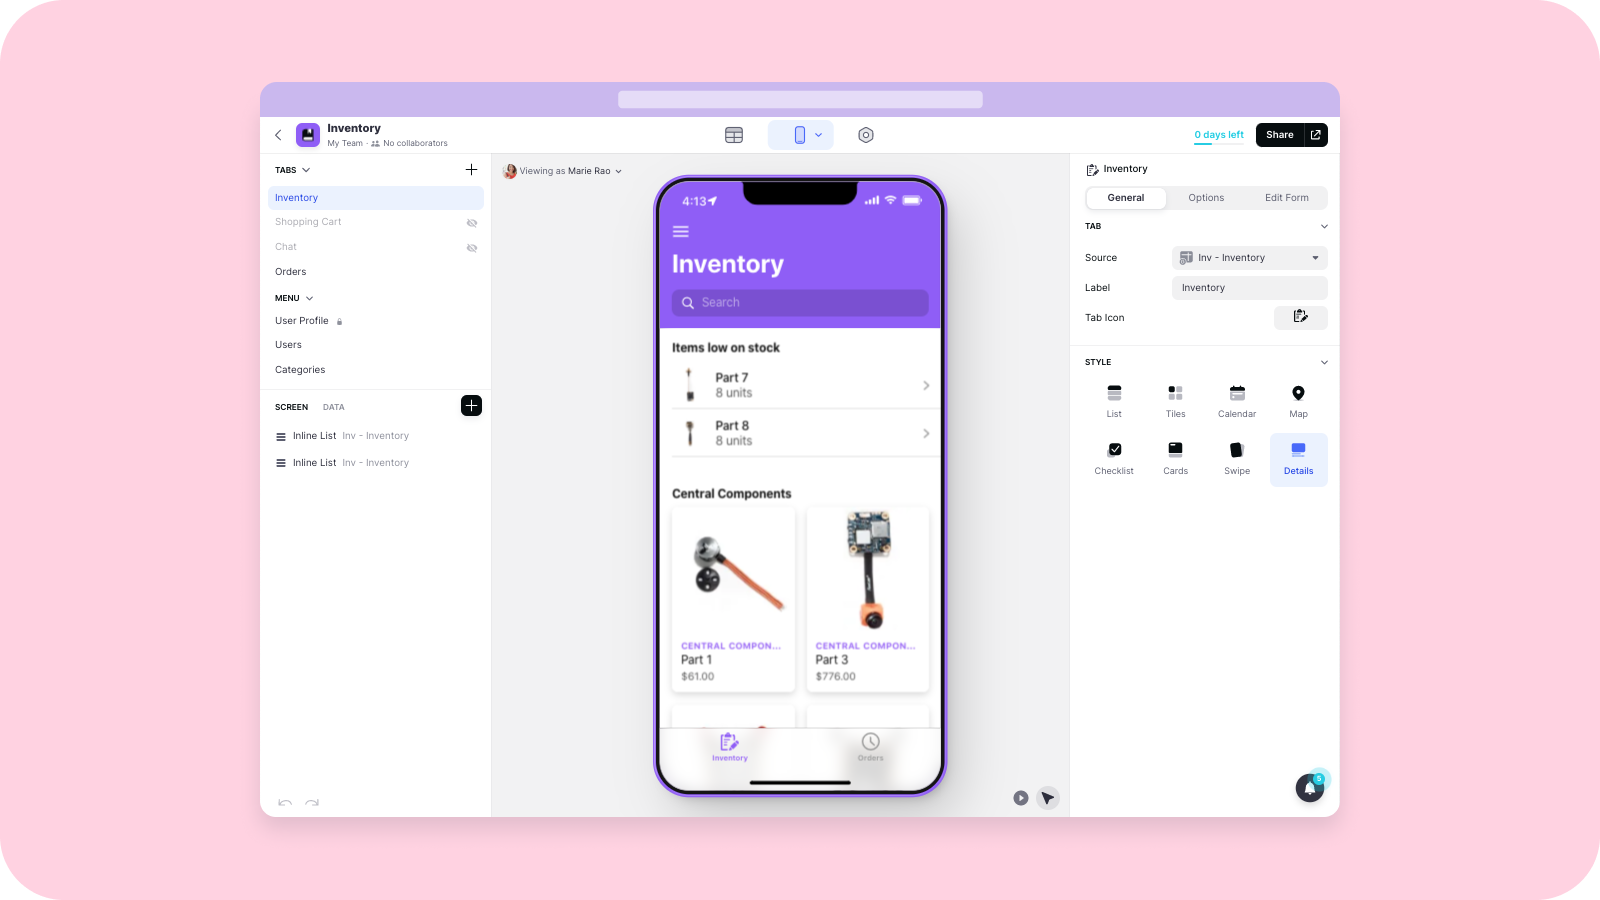
Customize Your App Elements Using Glide’s Drag and Drop Builder
It’s time to customize that app of yours.
Pretty much everything you see in your new app can be customized. On the left side of the editing screen, you can view, add, and remove the tabs and screens that make up your app. Tabs are the main pages to which users can navigate. Screens are all the elements that show up inside each of these tabs. For example, the “Orders” tab of an inventory management app might have on its screen a list of all orders, orders that have been shipped, orders that are awaiting shipment, and so on. On the right side of your editor, you can see all the options to change the source and style of your tabs. Here, you can also change the data source and style for screens, as well as update their labeling, add actions (like a call button, etc.), change visibility and access, and plenty more features we’ll let you dig around and explore.
When you’re ready to move from updating functionality to refreshing app design and settings, use the hexagonal icon at the top of the editing screen. In this mode, you can change the colors and typography of your new app. You can also manage a lot of important settings here, such as privacy controls, user agreements, data sources, plugins, and lots more.
Publish and Launch
With functionality, design, and settings personalized to your unique brand and target audience, it sounds like it’s time to go live with your awesome creation!
Just tap that “Publish” button at the top of your editing screen to push your app to the world wide web. Next, you’ll see a few options for accessing and sharing your app. Double check your privacy settings to make sure it’s accessible to the right people. Don’t worry, if this isn’t clear right now the on-screen prompts will make this process exceedingly easy.
Looking for even more guidance? Learn to glide with our extensive tutorial roundup.
Bonus: Overwhelmed? Hire a Glide Expert to Help!
Even though we’re laser-focused on making Glide simple to use, we get that not everyone can or wants to spend their time building business apps.
For them, we have a solution that’s still much faster and much more affordable than building a traditional app from scratch. Glide’s roster of agencies and individual experts specialize in working with time-starved clients to build beautiful custom Glide apps.
If you want every benefit of Glide’s no-code, UI-focused app builder but just don’t have the time to take advantage of it, connect with an expert today.
Start Building Beautiful Business Apps Today With Glide
If you do have some time to spend exploring and using Glide, it’s quite low-risk to get started.
Sign up for a low-volume account for free, and upgrade when you’re ready to move on to more powerful apps.
With the above UI design strategies in your pocket and Glide on your side, your genius is unstoppable.


