In the ecommerce world, many managers and business owners spend most of their time thinking about how to optimize their product range, improve the customer experience, and of course grow sales.
That doesn’t leave a ton of time to think about things like inventory management. Yet, it’s pivotal to success in the above goals — and more.
It’s time to create an inventory management dashboard that centralizes stock information so you can stay ahead in a competitive ecommerce environment.
But you don’t know how you say? That’s no problem. In this guide, we’ll walk you through the simple steps to using Glide to build an affordable inventory management app that’s easy to use and scales with your business.
How Ecommerce Businesses Benefit from Inventory Management Dashboards
An inventory management system is central to helping businesses strike a balance between having enough products for customers and not wasting money or space on excess inventory.
With inventory management dashboard software, you can create one such system that also stays up to date with stock changes and is accessible company-wide. Here’s why a modern inventory management dashboard is one of today’s most crucial business tools.
Increase Inventory Accuracy
Of course, the main benefit of an automatically-updating inventory dashboard is that it easily keeps your inventory details accurate, no matter who in your company is accessing it, or when. This helps your team understand what’s in stock and when it’s time to reorder, flawlessly keeping up with demand without over-purchasing.
Improve Customer Experience Through Reduced Overselling
Understanding what’s in stock, what’s on its way, and what’s selling quickly isn’t only about growing revenue. Having up-to-date data about the status of products empowers you to make sure you always have precisely what consumers want, when they want it. Avoiding overselling as an ecommerce business is a great way to improve the customer experience. And an improved customer experience has been shown to lead to more purchases and word-of-mouth recommendations.
Track Key Business Metrics
Modern management software provides an accurate, real-time view of what’s going on with your inventory. This insight means you can track key inventory metrics that indicate the health of your stock, your customer base, and your business as a whole.
As far as which metrics you should monitor, that’s really up to you. Whatever metrics you choose to track, we recommend they tie back to overarching business goals. For example, if increasing revenue is a goal, you can monitor return on investment (ROI) as well as metrics like top-selling items, inventory turnover ratio, excess stock levels, carrying costs, etc. Or, if you’re aiming to build a better customer experience like we mentioned above, you can go beyond the inventory level basics (stock on hand, stock to receive, etc.) and also monitor metrics like fill rate over time, product returns and reasons, overdue orders, and order accuracy — all of which may provide some insight into customer feelings and an opportunity to improve them.
By monitoring the right metrics you’ll be able to spot trends, conduct experiments, and make changes that move you toward your goals.
Grow Employee Productivity and Morale
Poorly organized stock isn’t just bad for customers, it’s also demotivating for workers who have to spend their days tracking down stock information and fielding questions from shoppers who can’t find the product data they need. With an inventory management dashboard that serves as a single source of truth, there’s no more uncertainty or chasing down stock data. This improves worker morale and gives employees more time to focus on productive aspects of their jobs.
Reduce Holding Costs and Risks
Between the expense of transportation, storage, and insurance and the threat of loss from theft, natural disaster, or becoming obsolete — there’s a lot of cost and risk that goes into holding excess stock while you wait for it to sell! The best way to reduce this cost and risk is to reduce the amount of stock you have on hand. This is easily done with modern inventory management software that gives you insight into your exact inventory numbers and sales trends so you can always make the right call on when it’s time to re-up your stock.
5 Steps to Creating No Code Inventory Management Software with Glide
Inventory management dashboards are a must when it comes to uncovering the product and sales information you need to extract business-guiding metrics.
But how do you acquire software that does exactly what you need it to do, nothing you don’t, and for a price that doesn’t put you out of business?
UseGlide Pages to build an affordable inventory management dashboard application that fits your precise needs — no code knowledge or pricey development resources required.
Here’s how.
1. Create a Glide Account
Visit the Glide Apps website and use the “Sign Up” button. Follow the on-screen instructions to get your free account up and running in minutes.
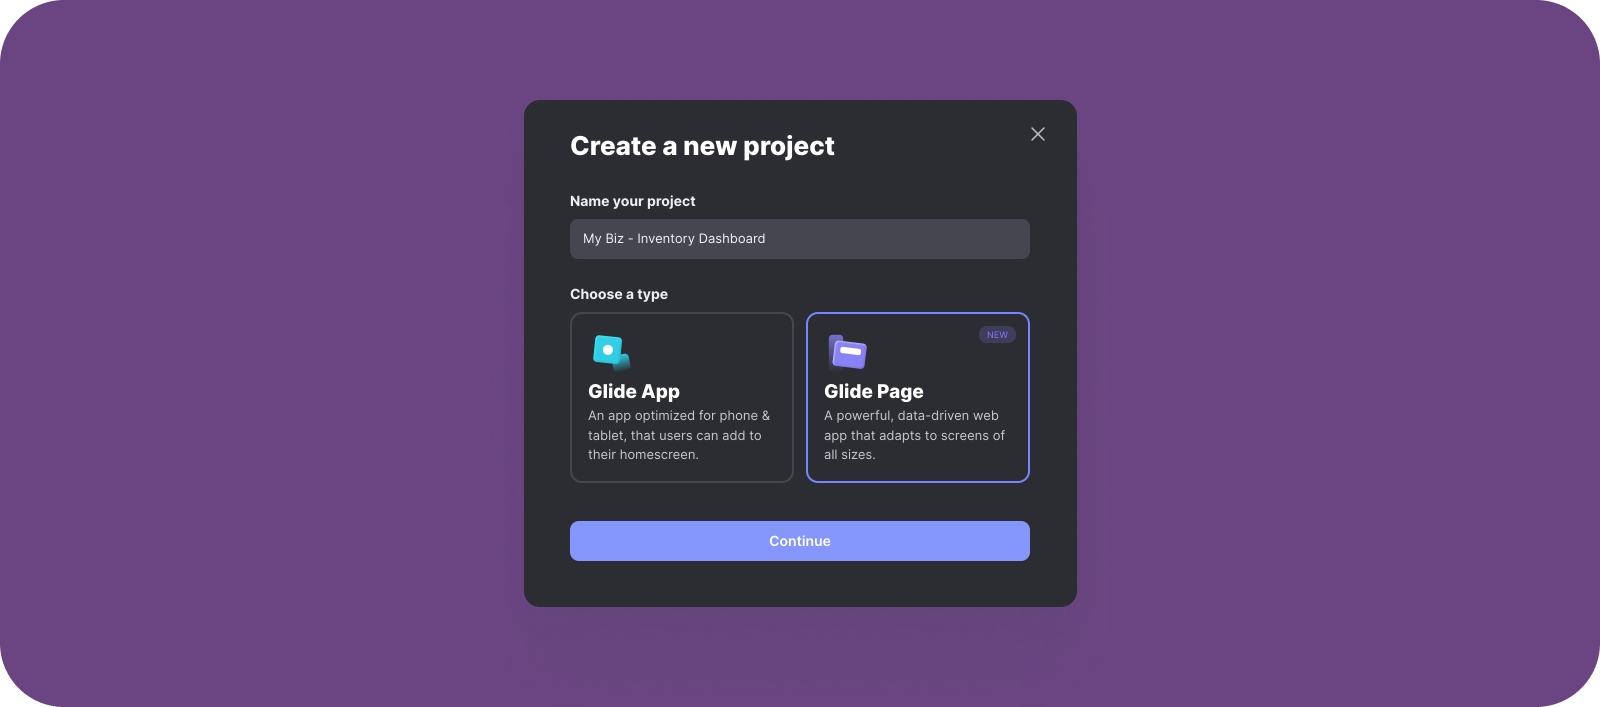
2. Start a New Project
Once you’re logged in to your Glide account, you’ll see your account dashboard. To start building your inventory management web application, select “New Project.” Now add a name, choose “Glide Page,” and select a template (blank is a good way to go if you want to start simply and play around with customization later — which we’ll show you how to do).
You can also start with a fully pre-designed Inventory template in the “Discover Glide Pages” section of your account dashboard. If you go that direction, skip to step four to learn how to edit the data and customize the look of a template.
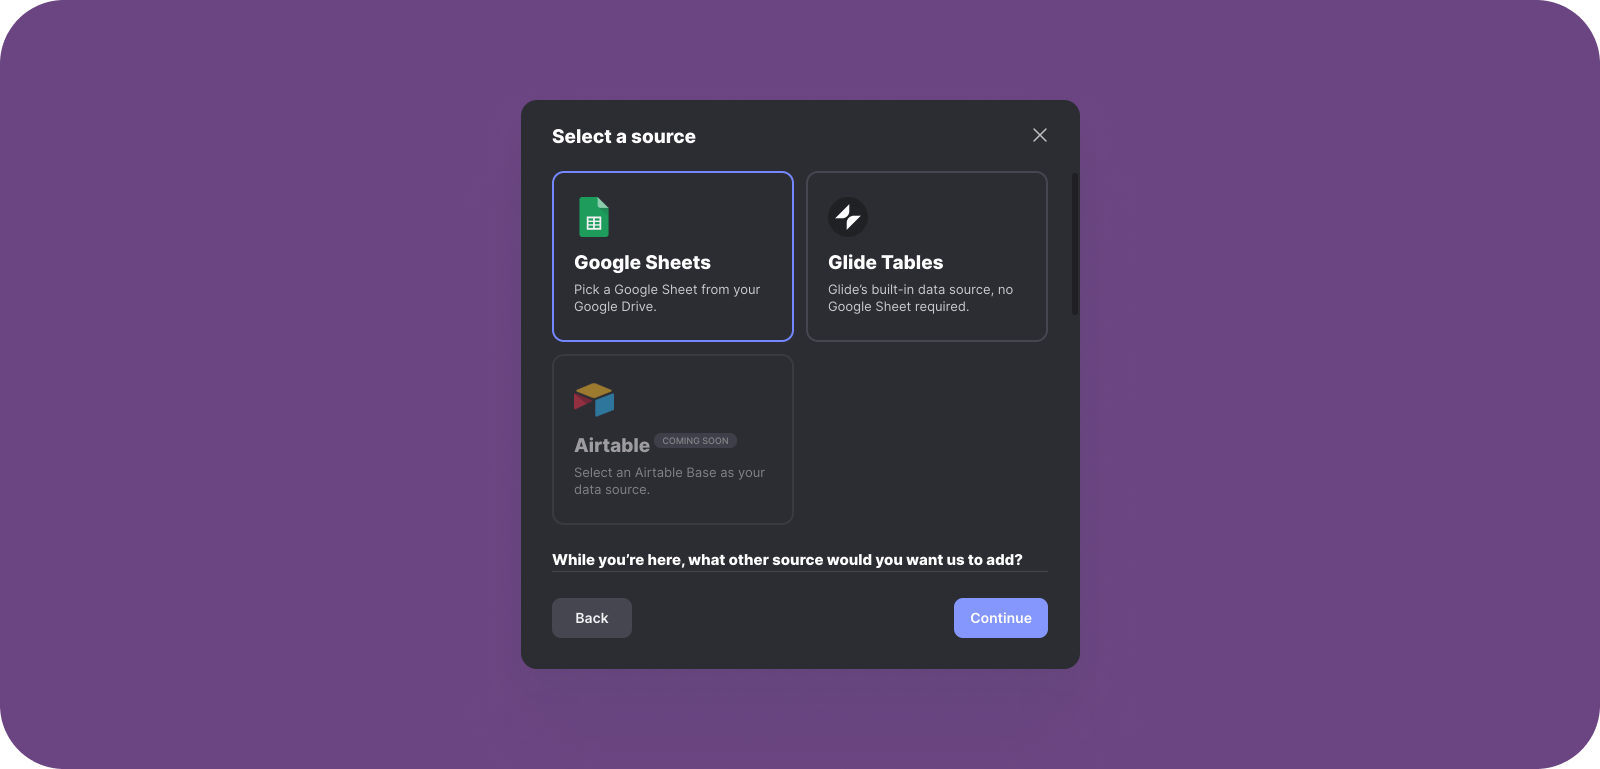
3. Hook Up Your Inventory Data Source
Next you’ll be asked for the source you want to use to populate your inventory management dashboard. Glide Tables is a good option if you don’t have much inventory data yet and want to fill out your app from scratch. However, if you’re an established ecommerce business, you may instead want to connect a Google Sheet full of your stock information. Use our guide to organizing your spreadsheet to ensure the formatting is optimized.
Your Glide app will pull data from connected Google Sheets pages in real-time, meaning your spreadsheets and application always stay in sync. So even if some staff work in spreadsheets while others use the app, both sources will still be accurate when it comes to inventory information.
4. Customize Your Glide Web App
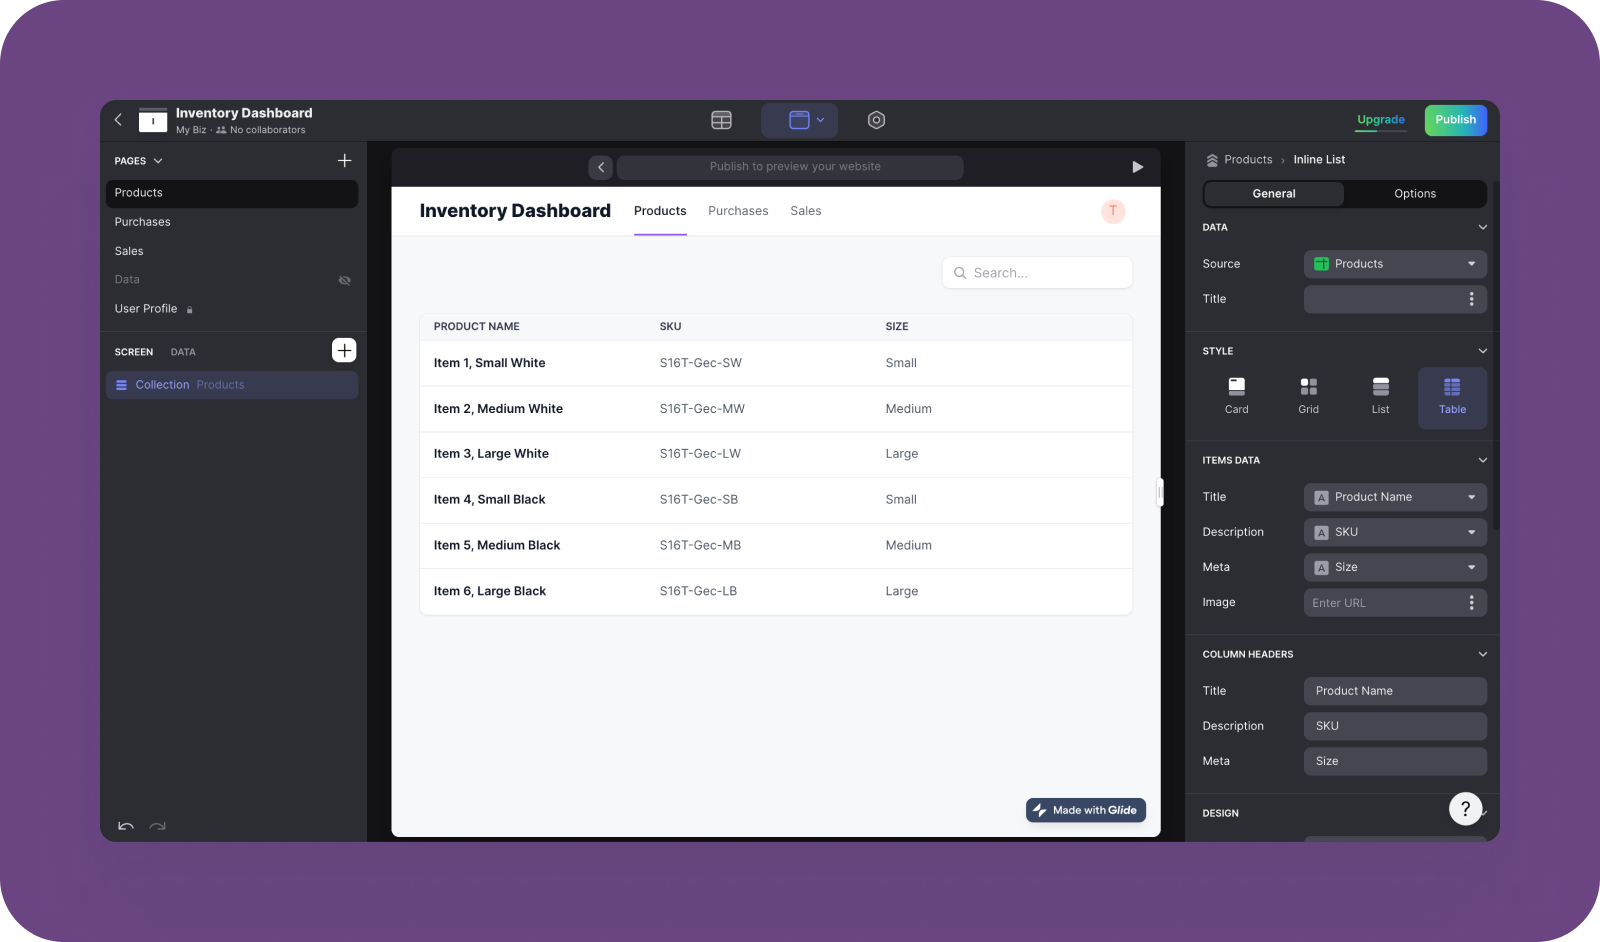
With your data source chosen, you should find yourself in the web app builder!
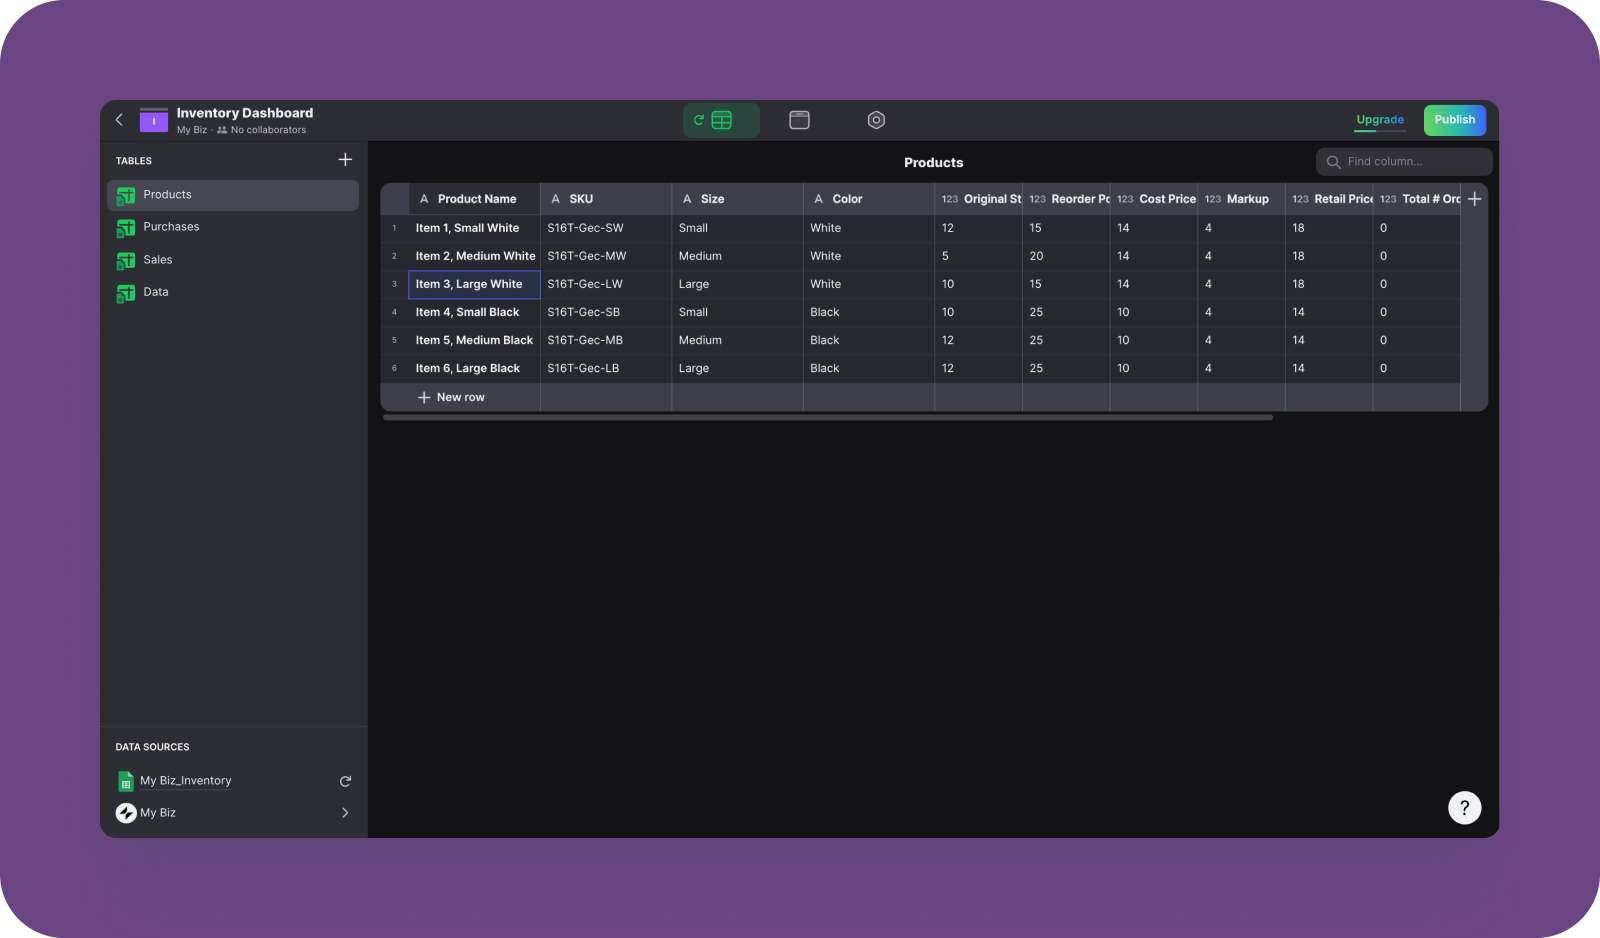
The first screen you’ll see is one displaying the first page of your connected spreadsheet. It will be in Card format and you’ll find you can dive into the details of each item by clicking on the card. The formats and screens you see here can be customized practically infinitely thanks to Glide’s flexible features.
For starters, click into “Collection” on the left side of the builder page. From here, you can change the format (from Card to List, Table, etc.), choose the columns you want to pull in from your spreadsheets, add headers, build actions (which display as buttons), and more. You’ll see all of these changes appear in real-time in the builder.
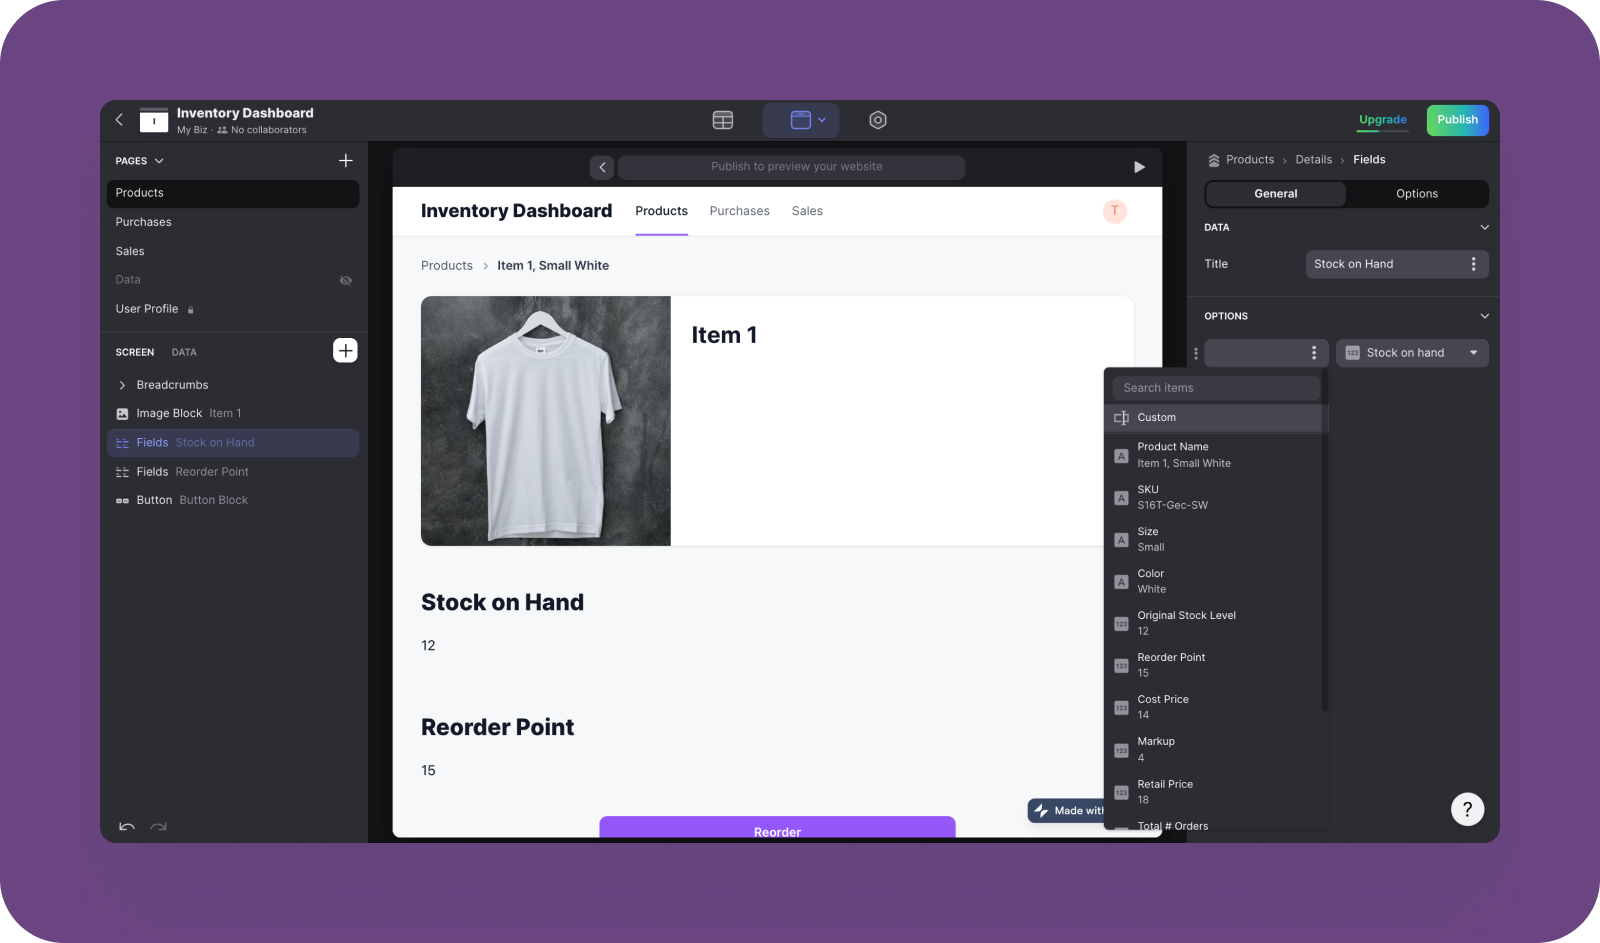
You can also click into the items on the main page to customize what the detail pages look like. Again on the left side of the builder, use the plus icon to add any elements you want, like images, fields, buttons, and more. On the right side of the builder, you can edit what each of these elements contains. Fields can be customized to pull in information from the spreadsheets you added, for example. You can even add buttons here to help users quickly do things like make a call, send an email, or use Zapier functions!
Once you have all your inventory details up to date, you can play around with how you want your inventory management web app to look.
Use the hexagonal icon at the top of the builder screen to pull up all the customization features. Here you can change the look of your web app as well as play with important settings — changing the name of your app, updating inventory data sources, adding terms and conditions documentation, integrating with other business tools you might already use (Google Analytics, Zapier, etc.), and tons more.
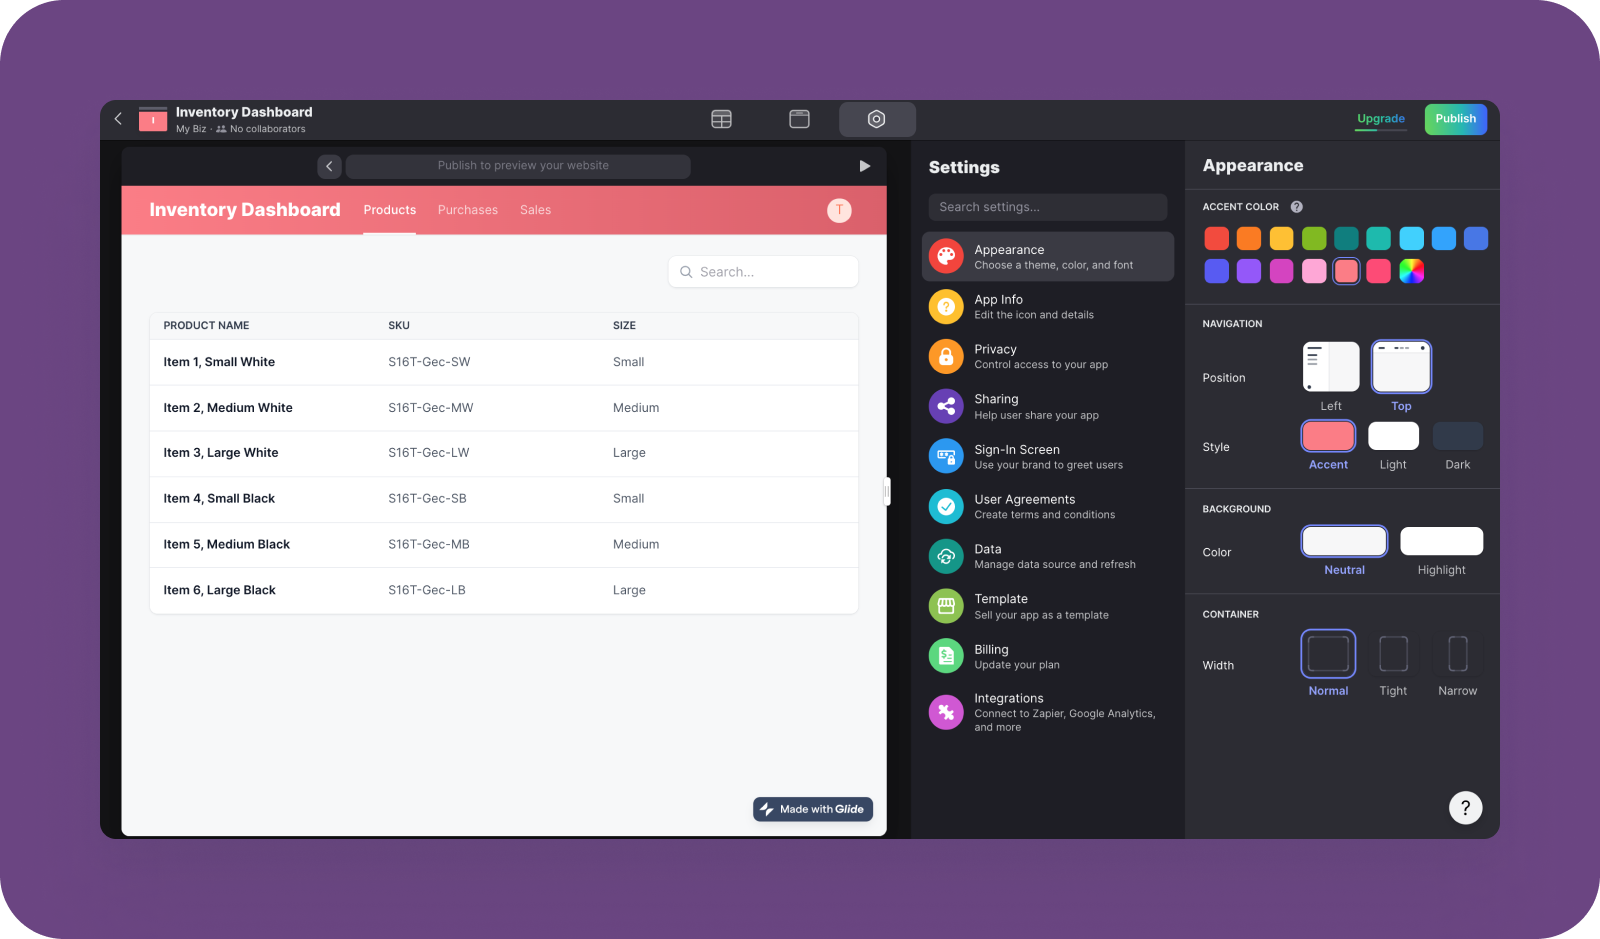
As we mentioned earlier, you can manage your inventory from this new dashboard just as easily as you can from a spreadsheet. And no matter where you make changes, both sources will remain up to date. If you’d like to enter data in your Glide app instead of in Google Sheets, just toggle over to the spreadsheet icon at the top of the builder page.
5. Publish!
Have your inventory management app all designed and synced with your data source? Then you’re ready to hit publish in the upper right corner of the builder!
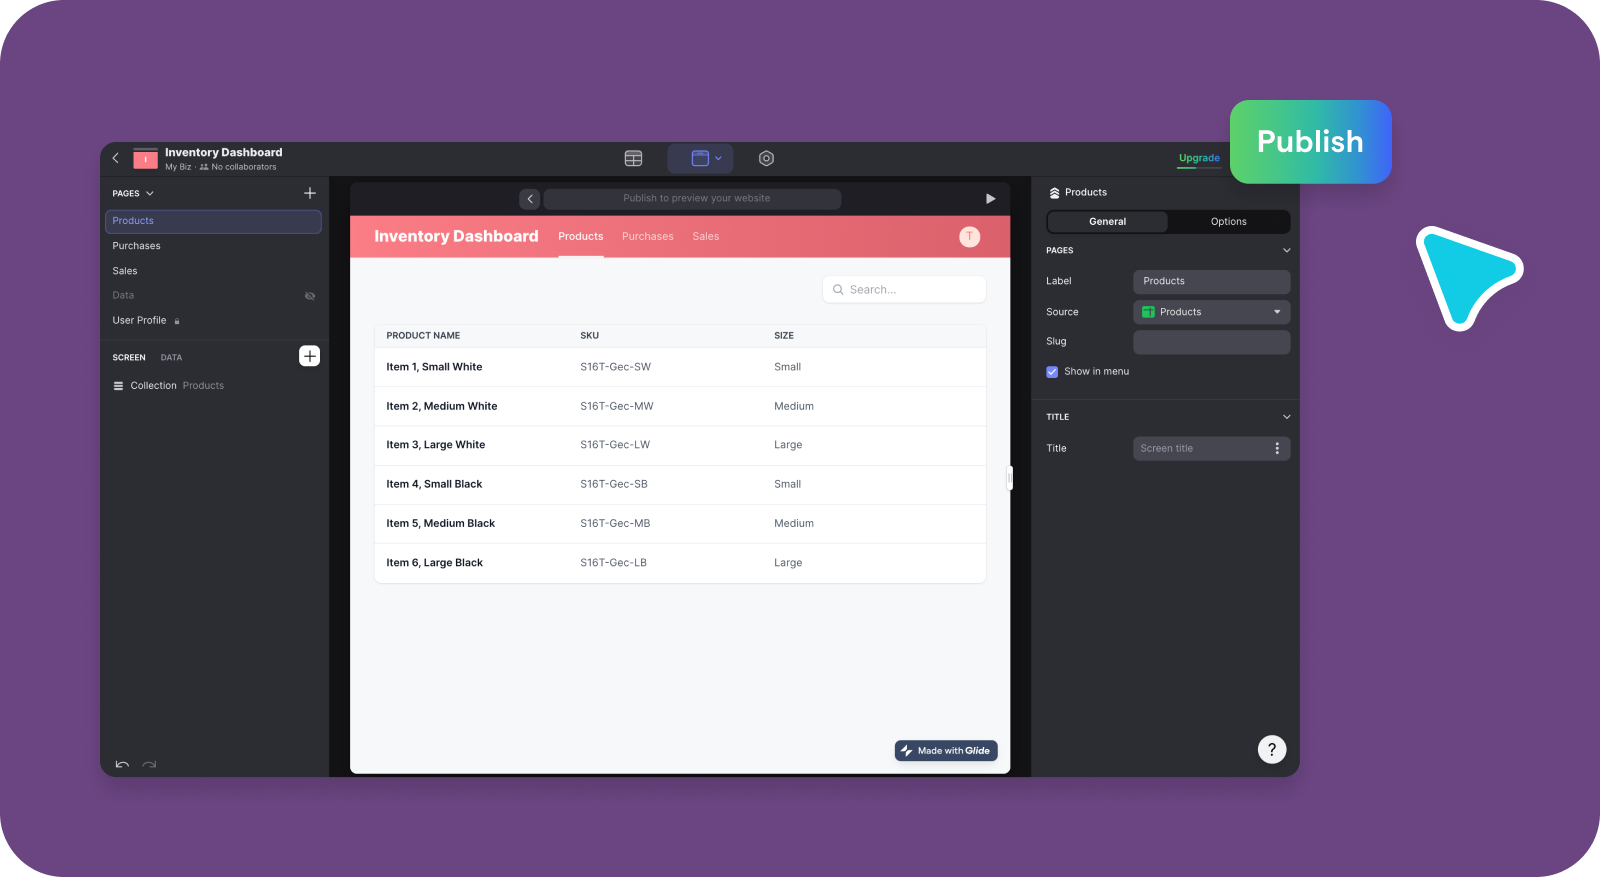
You’ll have a few options for viewing and sharing your new inventory management web app. Depending on your settings, app viewers may have to use their email and a pin generated by Glide to see the app. The on-screen guidance will make all of this easy to step through.
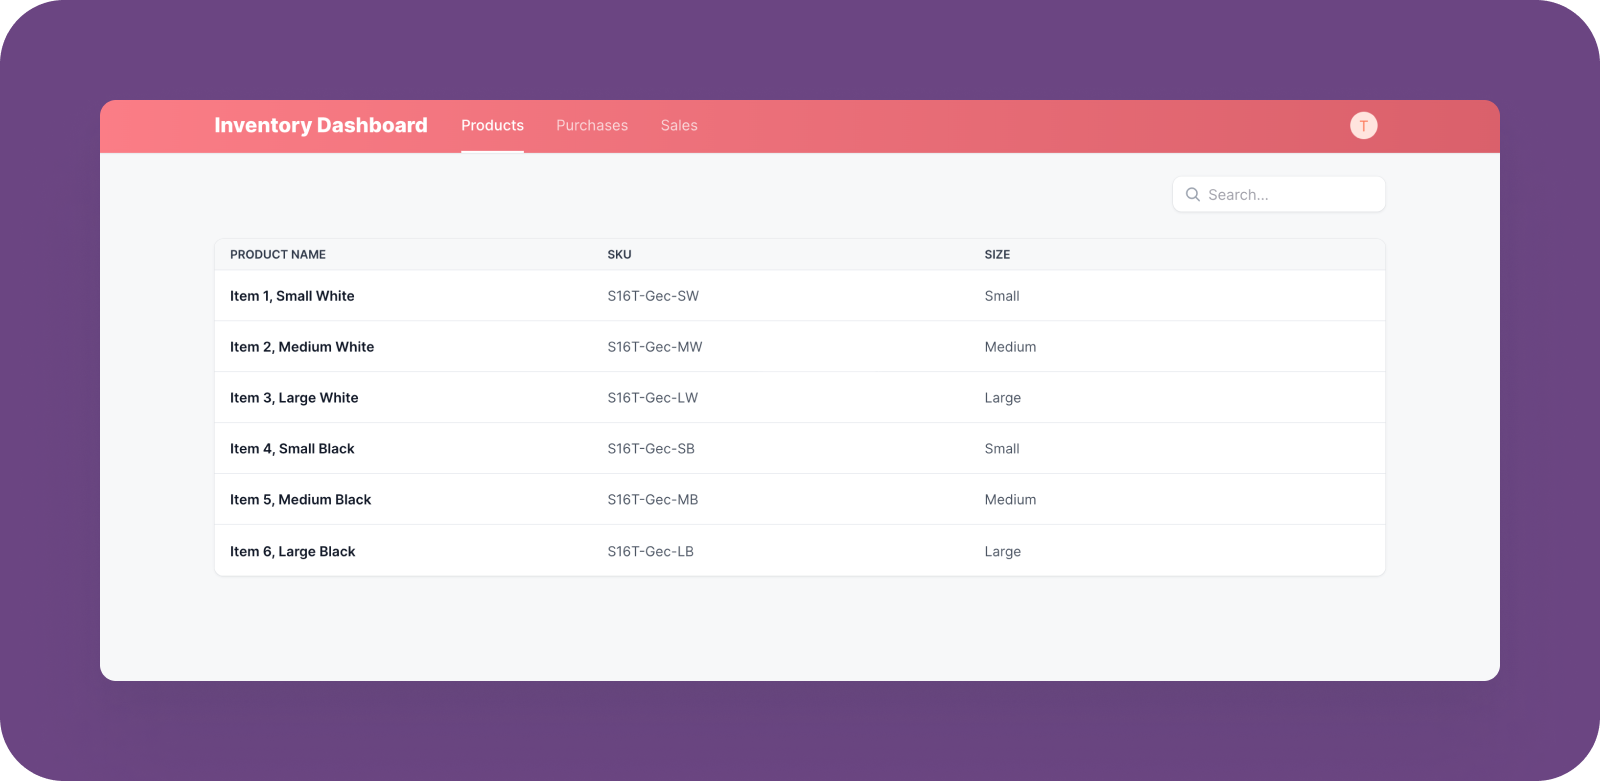
Ready to see the app we created over the course of this walkthrough? Here it is, live and online:
No Code Inventory Management Software is the Answer to Common Concerns for Ecommerce Businesses
There are plenty of concerns that arise when ecommerce organizations start shopping for inventory management software — and they’re all valid!
Frequently, this kind of dashboard can be prohibitively expensive. This is even truer if you want a tool you can customize and brand. On top of this, many complex systems are so tricky to navigate that the people who need to use them are never able to comfortably, reducing adoption. Then there’s the problem of keeping the data in your dashboard synced across users and data sources.
Glide Pages is the solution to all of these issues.
You can access Glide’s no code builder to create an inventory tracking and inventory management dashboard for a single, reasonable monthly payment. No hidden hosting or domain fees and no need to hire expensive design or development personnel. Glide is also just as simple to set up as it is to use — as you no doubt saw above. And perhaps most important of all, with your Glide web app your inventory is always up to date, no matter if a worker updates it via mobile app out in the field or on their desktop back in the office.
Learn more about how powerful yet approachable building your own inventory management software can truly be by playing around with our inventory management template today.