

Expense tracking is simple. Until you scale it.
Your field sales rep is traveling to three client meetings this week. She pays for gas, parking, and lunch with a client. She stuffs the receipts in her wallet, knowing she'll deal with them later. By the time she's back at her desk two weeks later, one receipt has faded beyond recognition, and another is missing entirely. She reconstructs the expenses from memory and credit card statements, submits them through your company's expense system, and waits three weeks for reimbursement. This happens across your organization every day.
An employee pays for a client lunch. A field technician buys materials at a hardware store. A sales rep covers gas, parking, and airfare during travel. Each purchase generates a receipt. Each receipt must be captured, categorized, approved, and reimbursed. And each step introduces friction.
Paper receipts get lost. Employees delay submitting reports. Finance teams manually reconcile spreadsheets. Managers wait weeks for visibility into spending. And leadership lacks real-time data to understand where money is going. Inevitably, the result is slow reimbursements, inaccurate reporting, frustrated employees, and a surprising amount of wasted time.
A mobile-first, custom expense tracker built with a no-code platform like Glide can solve all of these problems at the source.

Turn your Excel spreadsheet into an app
Learn howThe cost of manual expense tracking
An inefficient expense-tracking system creates a myriad of headaches for businesses.
Lost receipts, incomplete expense information, and delayed submissions
Expenses are typically incurred where work is happening: on-site, in the field, or in transit. If those expenses aren’t recorded right away, they are too often forgotten, lost, or incomplete, and they often arrive missing documentation. As a result, finance teams may spend hours chasing people down for information, and employees wait weeks to get reimbursed. Delayed submissions create cash flow issues for employees and accounting headaches for finance.
Spreadsheets and email create information silos
Expense data often lives in individual spreadsheets, email attachments, and messages scattered across systems. Version control issues can lead to duplicate entries or missed expenses. Finance teams have to manually consolidate data from multiple sources just to generate basic reports.
Spreadsheets create information silos that create friction across many teams. It’s hard for team leads to get visibility into current spending patterns because there's no central location to view that information. When a project manager needs to know whether her team is over budget this month, she might not be able to answer without emailing everyone and waiting for responses.
“Prior to Glide, we had been using spreadsheets to collect project finance information. We'd send spreadsheets out to our client. We'd get 50, 60, or 70 of these spreadsheets back, and we'd have to recombine all of that data.”
Ron Heims
Director of Practice Innovation, RDG Planning & Design
Generic expense software doesn't match your workflow
One-size-fits-all tools force you to adapt your processes to their structure. Your business tracks expenses by project code and client billing status, but the software only lets you use its predefined categories. Limited customization options mean you can't capture the specific information your accounting team actually needs. High per-user costs make enterprise expense software prohibitive for smaller teams. Integration gaps require you to manually transfer data between your expense tool and your accounting system, which defeats the purpose of having software in the first place.
What a custom expense tracker gives you
Building your own expense-tracking app with Glide means you create a solution that works exactly how your business needs it to, without having to hire engineers to custom-code software. This can benefit your business in multiple ways:
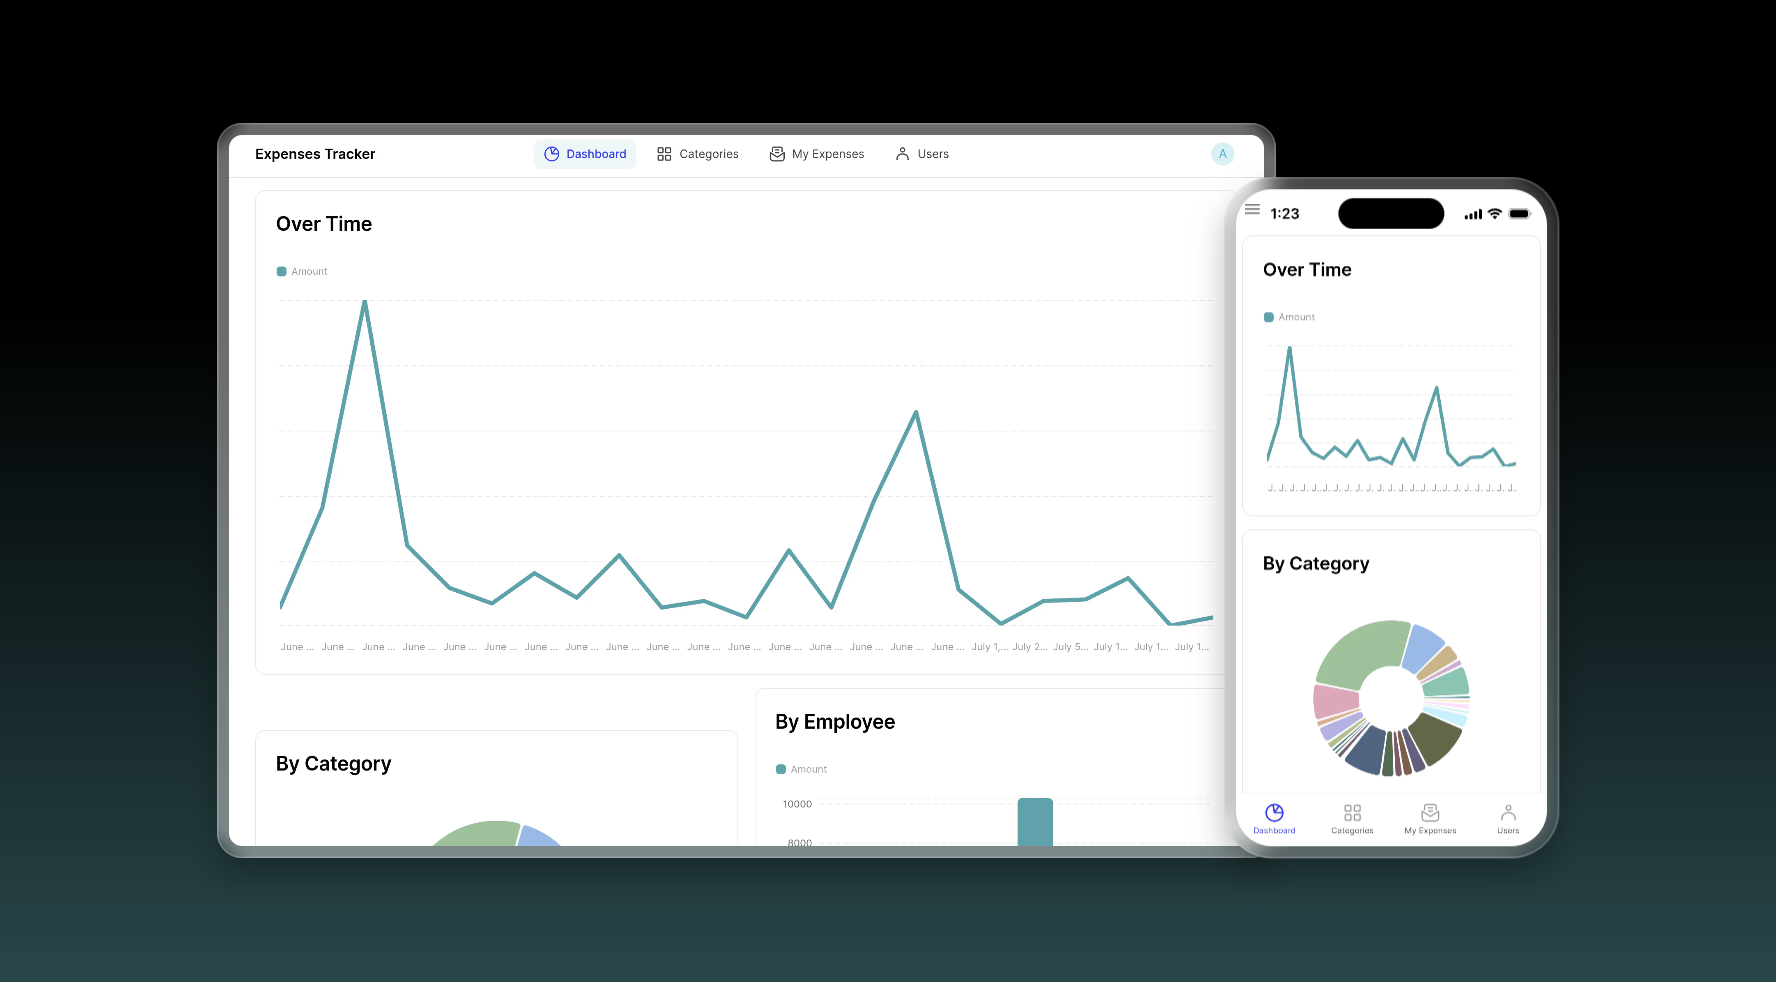
Submit receipts from anywhere with a mobile app
Glide apps are automatically optimized for mobile use and can be accessed on any employee’s device while on location. They can submit details in the moment from a client location, worksite, or while in transit. You can also add AI-powered receipt scanning to your app, saving additional time. Employees snap a photo with their phone, and Glide’s AI can extract structured data from receipt images, auto-fill expense forms, and categorize expenses appropriately while still giving employees the ability to check and adjust information as needed.
RDG Planning and Design, a top architecture firm, built a project expense app that worked exactly this way. "The RDG Expense Tracker app allows team members to take a picture of their credit card receipt using their phone," said Ron Heims. The app uses AI to automatically extract the company name, amount, and receipt date. "One of my beta testers told me that this app saves him probably two to three hours a month over Expensify. When you multiply that by the approximately 50 credit cards in our company, that's a hundred and fifty hours a month."

Learn how RDG Planning & Design builds more efficient processes for architecture and design projects
Read their storyReal-time visibility for managers and finance
Live dashboards give finance teams clean, centralized data without consolidating spreadsheets, and leadership gains real-time visibility into company spend. You can set up views that give visibility into current spending against budgets by team, project, or category. Create approval workflows to route expenses to the right people based on amount, expense type, or department. Build in reporting tools that give your team instant access to spending patterns and trends, so a manager can check if you’re over budget by opening the app rather than waiting three days for someone to compile a spreadsheet.
Direct connection to your data sources
Glide connects to data sources like Google Sheets, Excel, Airtable, SQL databases, and more. It can also integrate with QuickBooks, Gmail, and other software applications through native integrations and APIs. The data your employees enter on their phones appears immediately in the spreadsheet or database your finance team already uses. Changes sync automatically and integrate with your accounting software, so you don’t have to worry about double entry.
Customization that matches your business rules
You can define your own expense categories, approval chains, and spending limits, and add fields specific to your needs, such as project codes, client billing flags, and mileage tracking. For added privacy, you can configure different views and permissions for employees, managers, and finance. With no-code, you’re able to modify the app as your processes evolve without needing developers. When your business changes how it operates, you can change how your app works instead of being locked into decisions a software vendor made for you.
Build and iterate quickly with no-code
Glide's no-code interface means your team can build tools without the expense and long timeline of engineering. You can make quick changes to adapt to business needs and address problems as they become apparent. Ron Heims at RDG explained: "Literally within a week, I built a way better app than I had using another platform. And the people I shared it with were blown away by how incredibly intuitive and easy the new app was."
Building your expense tracker in Glide
Now it’s time to start building your expense tracker app. You’ll start with your spreadsheet and design an intuitive interface for your users in Glide.
Step 1: Connect your data source
First, link Glide to your Excel spreadsheet, Google Sheet, Airtable base, or other data source. This spreadsheet becomes the backend for your app. If you are starting from scratch, you can also use Glide’s native Big Tables as a free data source. You can also use Glide’s native QuickBooks integration to connect your app directly to your accounting software.
Once your data is connected, Glide will automatically recognize your columns and create corresponding fields. From there, you can customize what your app displays and adjust how information appears for different users. If you don’t yet have an expense spreadsheet, create one with columns for all required fields. Include fields for status tracking (submitted, pending approval, approved, rejected, and reimbursed), as well as user identification fields such as employee name, email, and department. If you need to track categories, projects, or approval hierarchies separately, you can set up related tables later.
Step 2: Build a “Submit expense” flow with a form screen
Go to the Layout editor and create a clear entry point like a “Submit Expense” button. Configure that button to open a form screen using Glide’s Show Form Screen action, which automatically presents a Form Container tied to a destination table (your “Expenses” table). This is the simplest way to ensure every submission becomes a new row, without building a bunch of custom navigation.
On that form screen, include an image picker tied to your receipt image column, plus the core fields you want employees to fill out (amount, category, project/client, notes). If you want values like “Submitted” status to always be set, it’s usually best to pass them through the form itself (for example, with a default value/hidden field pattern) rather than trying to “set column values” after the form submits.
Step 3: Turn on AI receipt scanning with Image to Text
To add AI receipt scanning, go back to the Data Editor and add an Image to Text AI column. Point its “Image” input at your receipt image column. Then choose a method that fits your workflow: plain text if you just want a quick transcription, or JSON/structured output if you want Glide to return predictable fields you can map into your data (useful for things like vendor, total, and date).
If you want the extraction to run automatically as part of the submission experience, you can also trigger Image to Text from a Workflow (for example: user submits, workflow runs Image to Text, you show a confirmation). Glide’s Image to Text doc shows how to run it from the Workflow Editor and optionally end with a notification so the user knows their receipt was processed.
Step 4: Add a review/approval action (optional)
For manager approval, create a “Review” screen that lists submitted expenses, and add an “Approve” (or “Reject”) button on the detail view. Configure those buttons to run a Workflow that updates the expense’s status and, if you want, notifies someone (finance, the submitter, or a Slack channel/email). The Workflow Editor is designed for exactly this kind of multi-step automation, triggered by a user action in the app.
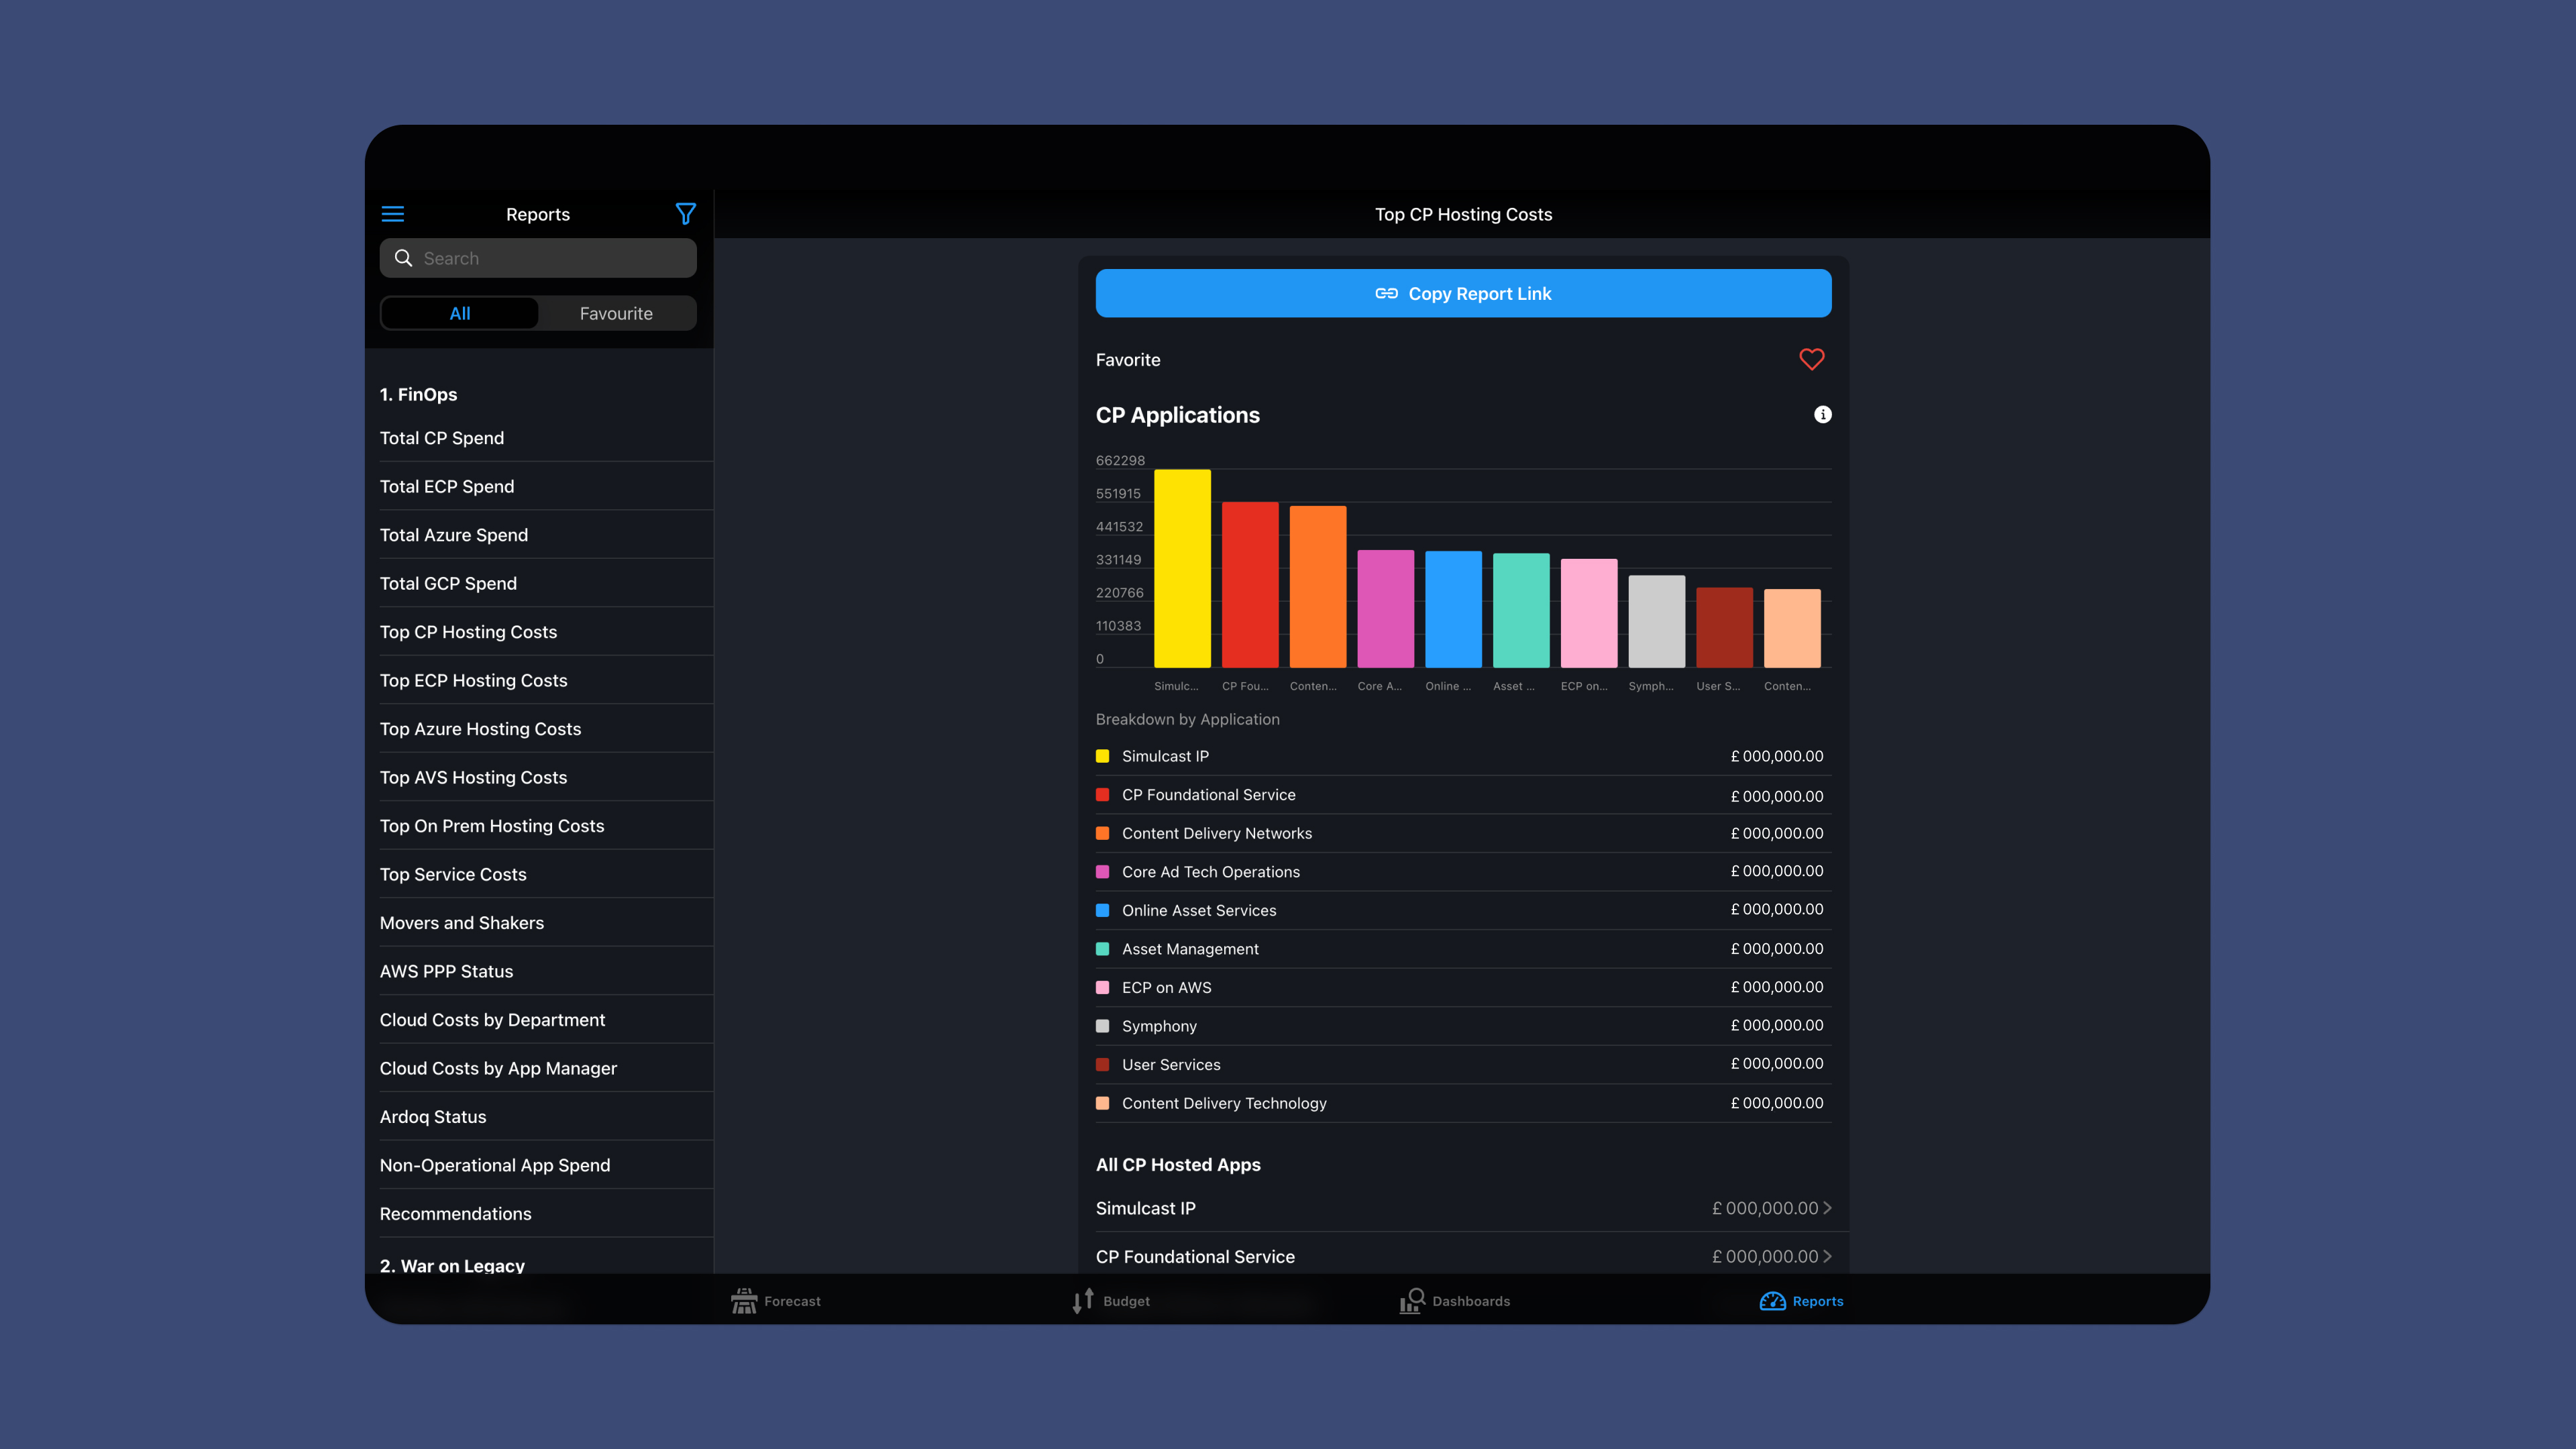
Step 5: Build dashboards to visualize spending
Once your expense submissions and approvals are working, the next step is to make the data useful. You can build custom dashboards in Glide that display data using chart, graph, summary, and table components connected to your “Expenses” table. You can allow users to filter and customize their own views to make this data more useful.
Start by creating a new tab or screen called something like “Dashboard” or “Finance Overview.” In the Layout editor, add components that summarize key metrics. Glide includes chart components (bar charts, line charts, pie charts) and summary-style components that can show totals, counts, or averages. These components are configured by pointing them to your Expenses table and selecting which column to aggregate (for example, total Amount this month or count of Pending expenses). Glide’s chart components documentation explains how to bind charts to specific columns and group data by category or date.
To make dashboards more powerful, use filters and computed columns. For example, you can:
- Filter the dashboard to show only expenses from the current month.
- Group spending by Category to show where money is going.
- Group by Project or Client to monitor profitability.
- Add a “Pending Approval” filter to give managers a quick action list.
Because Glide dashboards read from live data, they update automatically every time a new expense is submitted or approved. If you want different dashboards for different roles (for example, managers see only their team, finance sees everything), you can create multiple dashboard screens and apply visibility conditions, which leads to the next step.
Step 6: Set privacy, row-level access, and visibility
Expense data is sensitive. Glide allows you to control who can see what at two levels: row-level data access and component visibility.
First, configure row-level security in the Data Editor. In your Expenses table, set rules so that:
- Employees can only see rows where the “Employee Email” matches their logged-in email.
- Managers can see rows tied to their team.
- Finance can see all rows.
Glide’s row owners and visibility rules are documented in the data and user access guides. This ensures users cannot access data they are not authorized to see, even if they navigate around the interface.
Next, control what appears on each screen using conditional visibility. Every component and screen in Glide has a “Visibility” setting. You can configure it to only show if certain conditions are true. For example:
- Show the “Approve” button only if the logged-in user’s role is “Manager”.
- Show the Finance Dashboard only if the user’s Role column equals “Finance.”
- Show “My Expenses” if the user is an employee.
This lets you use a single app for everyone while delivering completely different experiences based on role.
For more advanced setups, you can create a Users table that includes fields like Role, Department, or Manager Email. Then use those values in visibility conditions and data filters. Glide’s documentation on user profiles and visibility explains how these role-based conditions work.
By combining row-level data rules with component-level visibility, you ensure:
- Employees only see their own expenses.
- Managers see their team’s data and approval tools.
- Finance sees full reporting dashboards.
- Executives see high-level summaries only.
This structure keeps sensitive financial data protected while still giving everyone the insights they need.
Step 7: Publish and share your app
Lastly, customize your app’s appearance, setting colors and logos to match your business. When that’s done, hit “Publish,” and your app is live and ready to share.
You can give access to your new Expense Tracker in a few ways. Send emails inviting team members to the app, share the URL, or print a QR code in the office, in company vehicles, or on-site for users to scan and log in to your app. To ensure your expense tracker is always quickly accessible, encourage users to install the app to the homescreen of their device so it feels and functions just like a native app.
Add more features to match your business’s unique needs
You can expand your expense tracker with these capabilities and more if your business has specific requirements or unique ways of working.
- Mileage and per diem calculations: Add automatic mileage calculations based on entered distances and your company rate. Create per diem tables that calculate daily allowances by location. Build trip expense views that group related expenses together. Include multi-day trip planning with advance estimates so employees know their budget before they travel.
- Budget tracking and alerts: Set spending limits by category, project, or time period. Add visual indicators when spending approaches budget thresholds. Create automatic alerts when budgets are exceeded. Build budget-versus-actual reports for financial planning. Your project managers can see when they're approaching their project budget and adjust accordingly.
- Client billing and project costing: Add client and project fields to expenses. Create billable versus non-billable classifications. Generate client-ready expense reports that show only billable expenses for a specific project. Track project profitability by comparing billable expenses against project revenue. This matters for professional services firms, consulting companies, and anyone who bills clients for project work.
Start tracking expenses more efficiently, from anywhere
You don't need to accept the limitations of paper receipts, generic software, or spreadsheets. Building a custom expense tracker with Glide gives you a solution that matches your actual workflow, works on the devices your team already carries, and connects directly to your financial systems. Start with basic expense submission and approval, then add features as your needs evolve. The result is faster reimbursements for employees, better visibility for managers, and less manual work for finance. You can build this in days, not months.
"We were able to put together apps that streamline our processes very quickly and they've helped our staff to be more productive," said Ron Heims at RDG. "We now have more efficient processes that people can use quickly and easily. They can capture information that goes back into our systems without a lot of extra effort."


