Getting Started with the Glide API

A guide to working with the Glide Tables API for non-developers.

Introduction to APIs

Learn the fundamentals of APIs.

Who has access to Glide API?

The Glide Tables API is available to anyone with the Pro, Business, or Enterprise plan. Connecting to your Glide Tables via the API lets you automate your data management and integrate it with your own applications. With the API you can:

  1. Add row to table

  2. Set columns in row

  3. Delete row

If you have the Business or Enterprise plan, you also have access to get all rows and query Big Tables with SQL. Need to upgrade? Click here to see all our plans.

How do I access Glide API?

To get started:

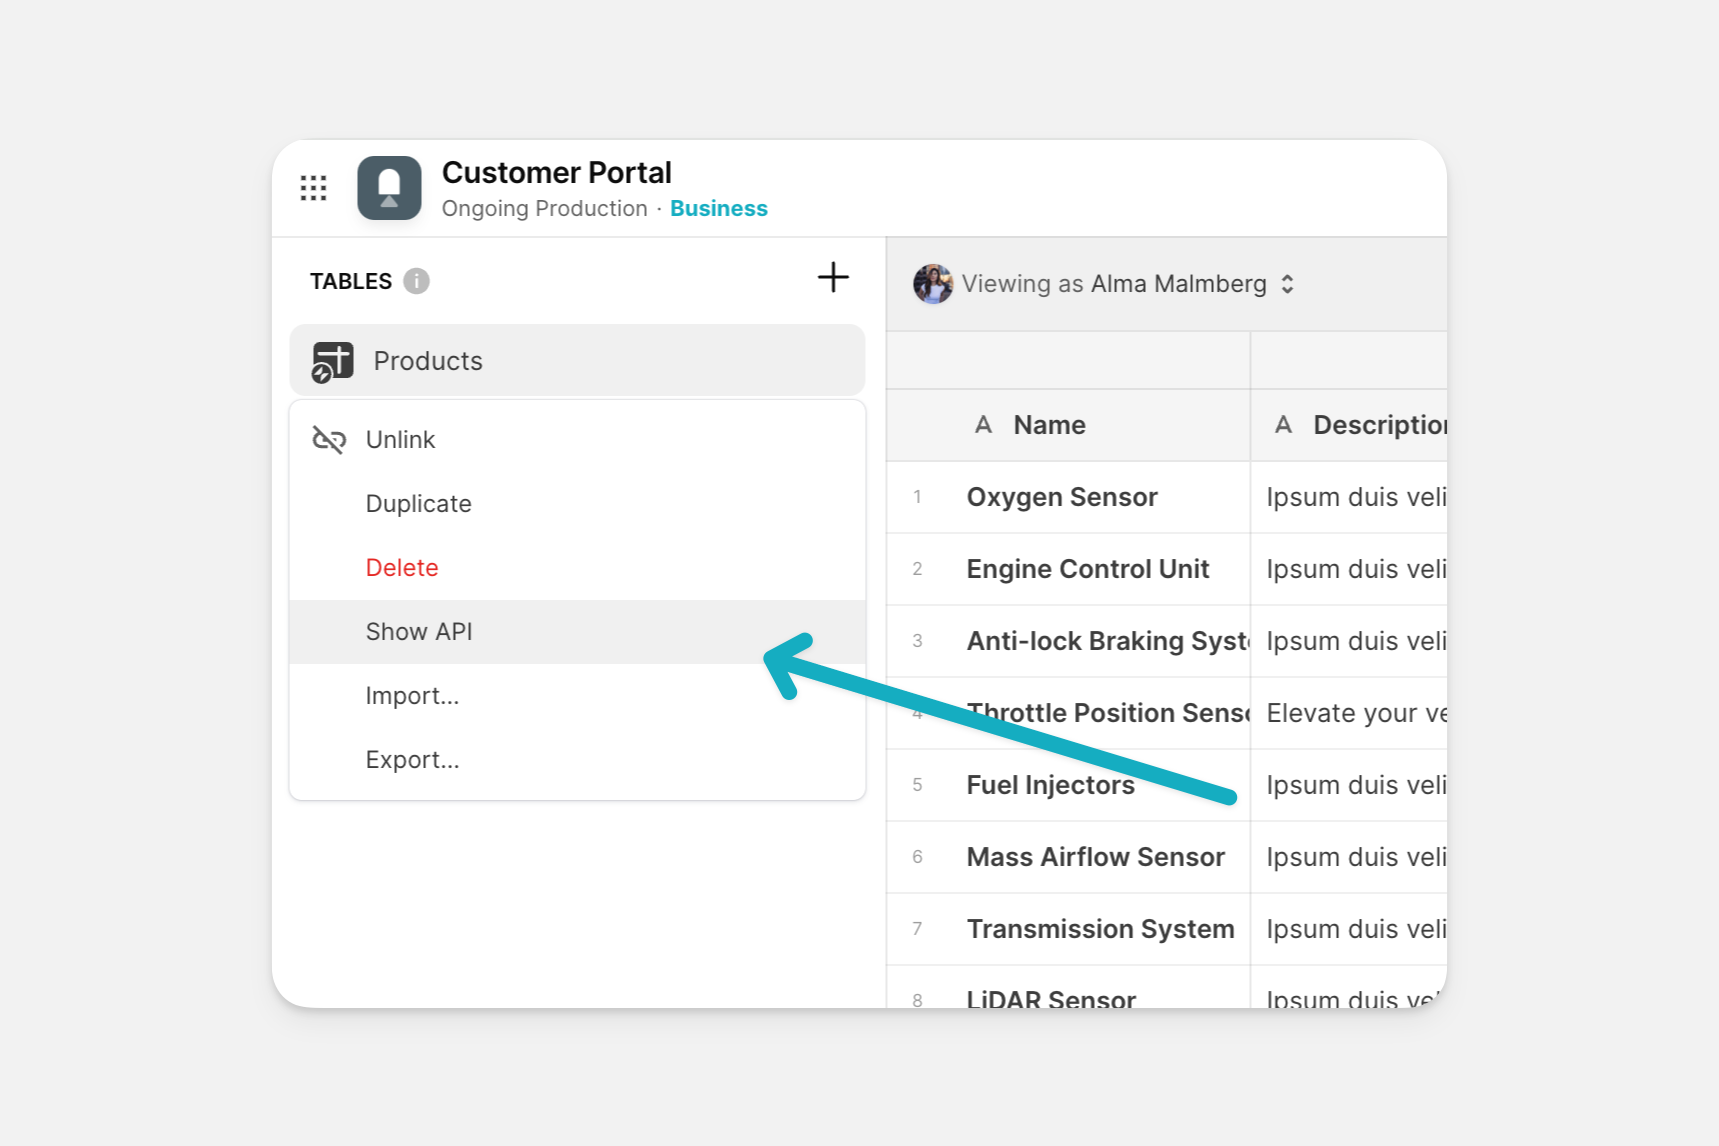
  • Open the Data Editor.

  • At the bottom of any Glide Table, click Show API.

  • You can also go to the right-click on the table icon and select show API.

    Show the API instructions screen.

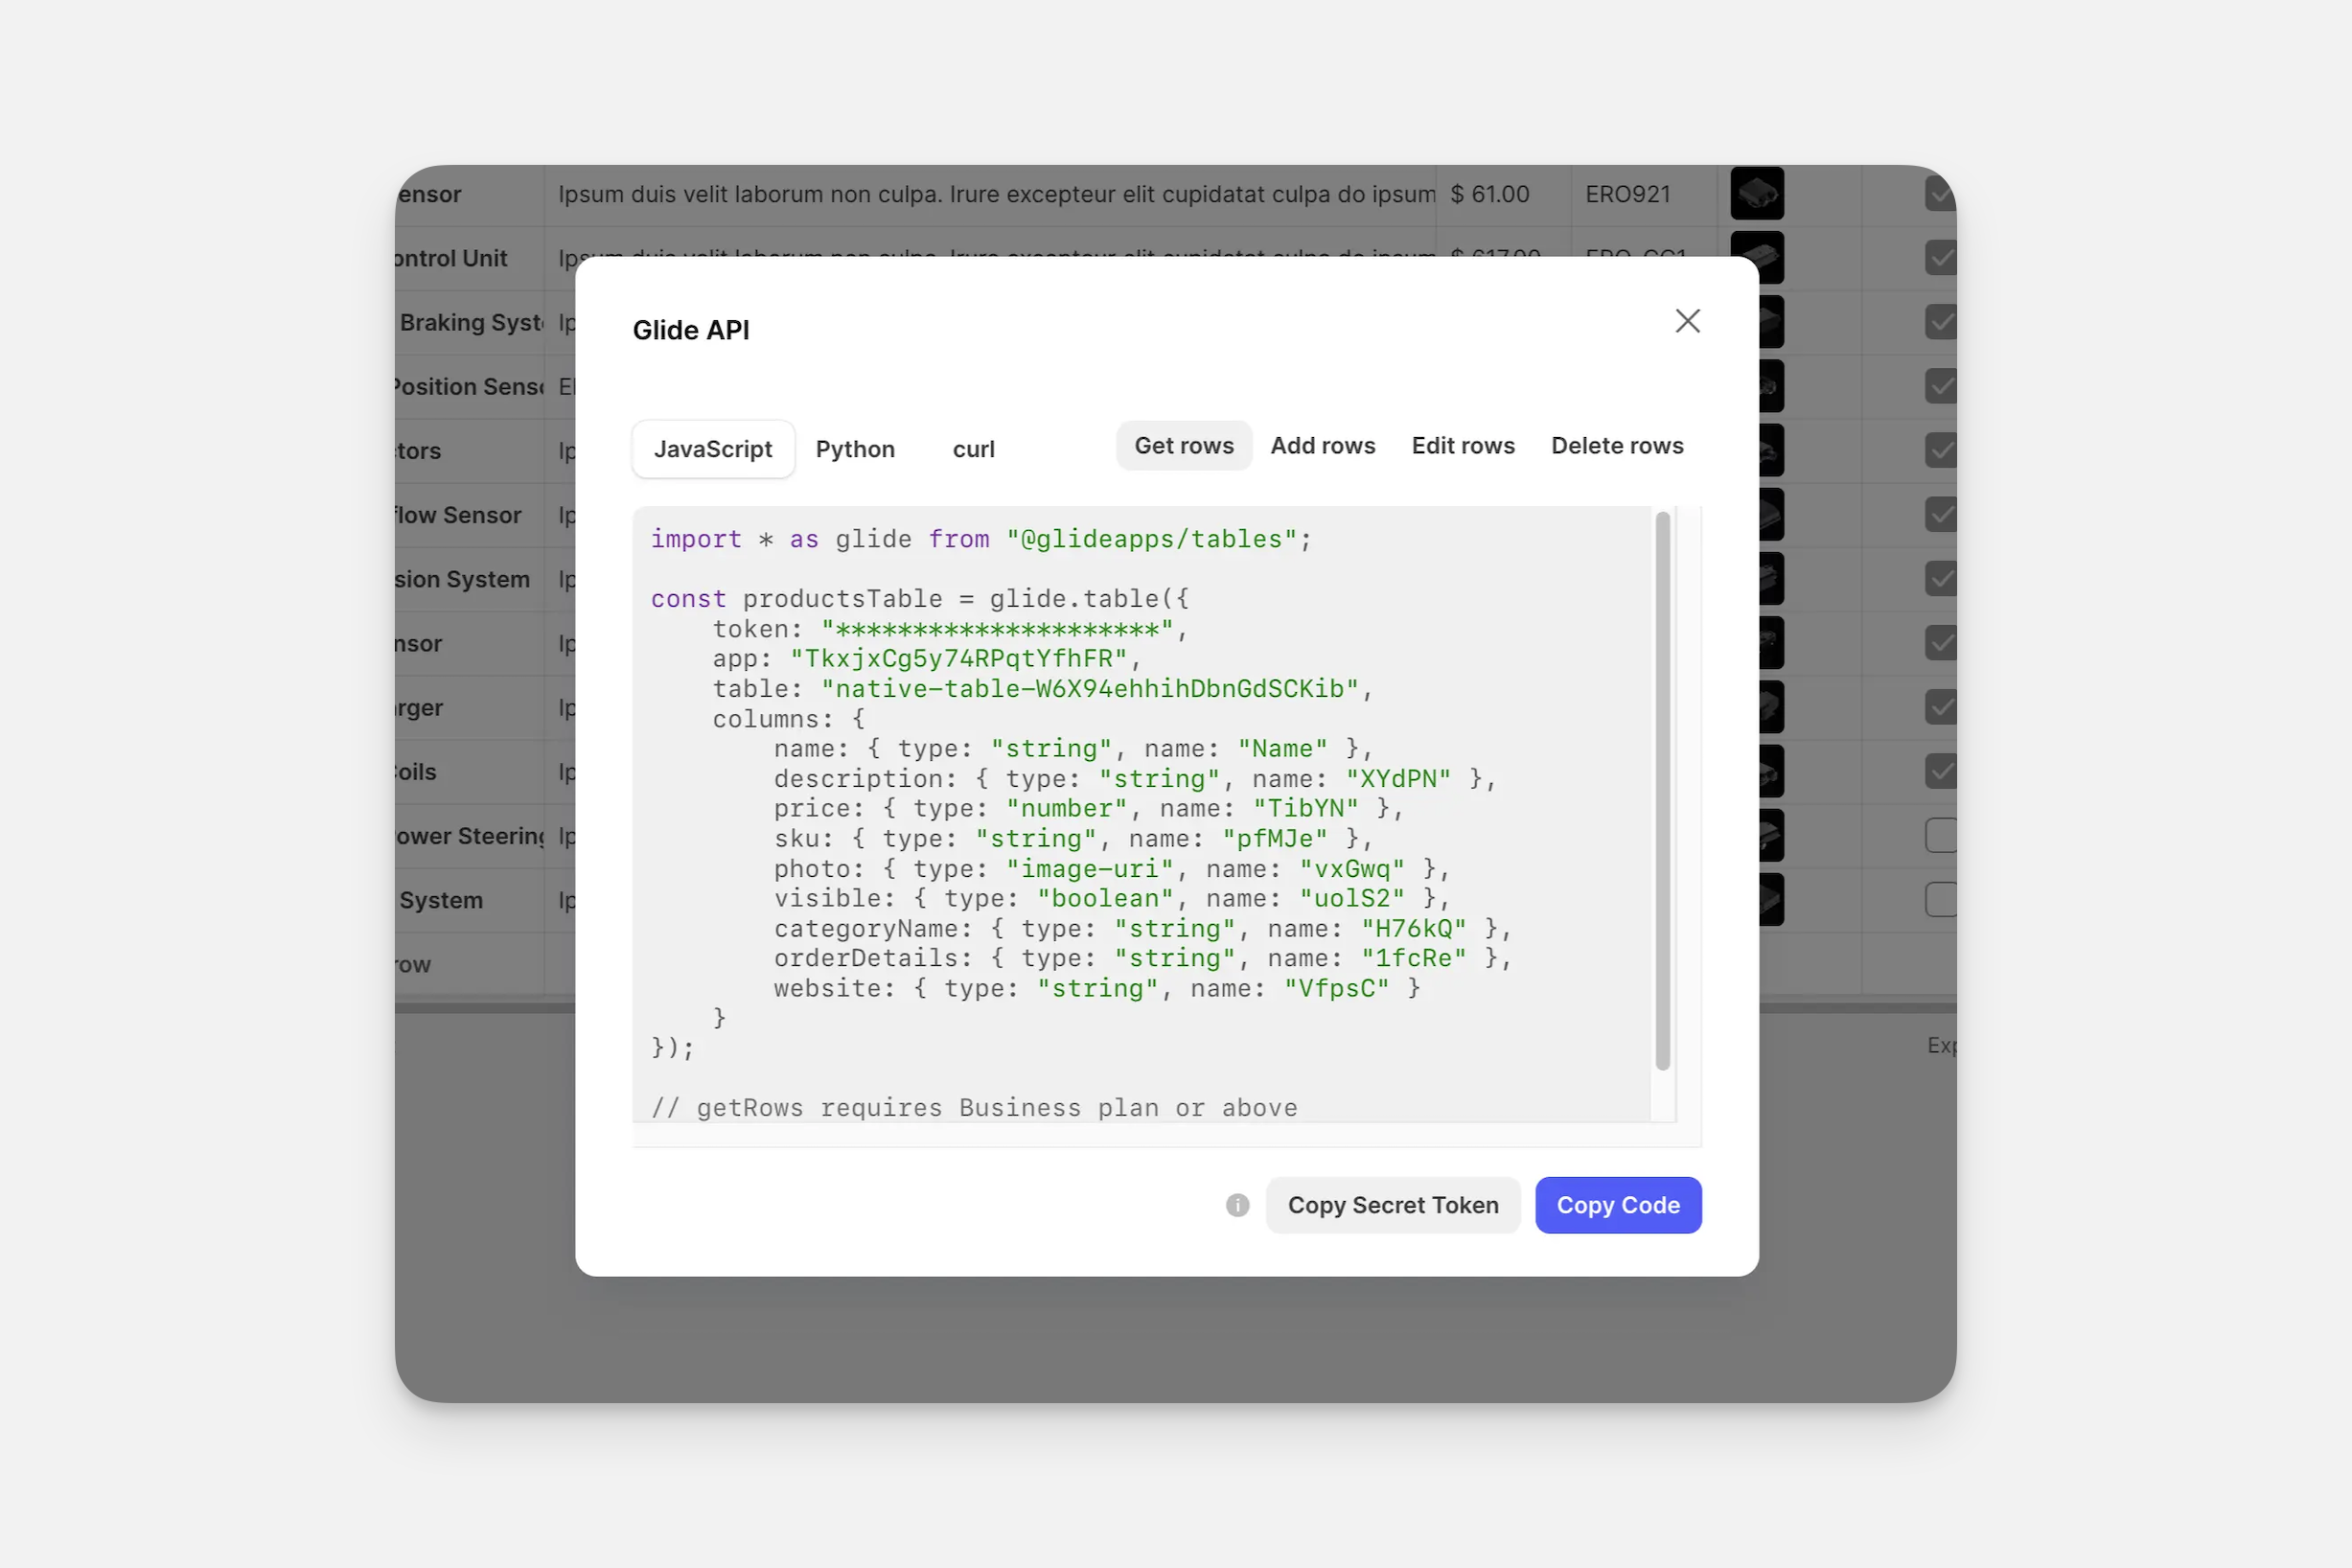
When working with the API, you will pass a unique API Key, sometimes labeled a Bearer Token. It's a long sequence of random numbers and letters that looks like this: 2F2733E2-2B70-4291-8250-633B9E8F16AF Treat this as a password—it's a secret that you shouldn't share.

The API Instructions screen displays the calls to use to take the available actions.

Available API calls for tables. Example calls are given for JavaScript, Python and Bash (curl).

If you're already experienced with APIs, you can view the reference doc here.

Let’s take a look at a detailed example of building in Glide with API.

Example: Tracking Business Leads in ClickUp

This guide uses project management tool ClickUp, and shows you how to sync some data between ClickUp and your Glide Table.

Let's say you want to track the data of any active business leads created inside ClickUp. Each lead goes through different stages:

  1. New leads are created

  2. Leads are then marked qualified, or

  3. Leads are marked disqualified

The board in Clickup.

You want your Glide table to reflect the above data to show:

  • When new deals are created, adding a new row in the Glide Table

  • When existing deals are updated or edited, set column value in the Glide Table

  • When existing deals are deleted, removing rows in the Glide Table

Using Zapier to Trigger API calls

To achieve this, you can use Zapier to trigger the API calls whenever things happen inside ClickUp.

There are alternative platforms you can use, such as Integromat and Apps Script. You can also use platforms such as Postman and Rest test test to test the API, ensuring you've configured the parameters correctly.

You'll create three API calls inside Zapier to sync Clickup to your Glide Table:

  1. Add row when new lead is added

  2. Set columns in a row when the lead is marked qualified

  3. Delete row when the lead is market disqualified

Add Row

In order to create a row via the API in the Glide Table, you need to do the following:

  1. Create Trigger (new object in Clickup)

  2. Using Webhooks by Zapier (Custom Request action, a.k.a. Custom API call), copy the Add Row API usage:

1 {

2 "kind": "add-row-to-table",

3 "tableName": "TABLE-NAME",

4 "columnValues": {

5 "COLUMN-NAME": "COLUMN-VALUE",

6 ...

7 }

8 }

Configuring the Zap

To configure the Zap, set the following conditions:

  1. Method: POST (request type)

  2. Glide API URL: [insert URL from] (destination)

  3. Data: [insert JSON Object, from Add Row API Usage] (data sent to destination)

The webhook configuration in Zapier.

You can then choose to insert the appropriate data for each field within the JSON Object that you'd like to capture from ClickUp, using Zapier's Insert Data field. These data inserts will dynamically be sent to Glide through this API call.

Not all columns have to be specified. Columns that are not specified will remain empty or unchanged.

Adding Headers to the Zap

The final thing we need to do is define the “headers”. The “headers” are found within the Add Row API Usage. Within Glide's curl statement, you'll see we have two headers that need to be passed along.

Header 1

The first is the content type. You can see that here, “content type” is set to application/json. This tells the API what format the data that you're sending through is in.

JSON refers to what is called JSON format or JavaScript Object Notation.

Content Type: application/json

Content Type: application/json

Header 2

The second header is the authorization or the authentication token (also seen above). This is a security feature that permits you to update this article Glide Table. Without this, Glide would reject the request (API Call). This makes sure that other users outside of your team can't update your table. Without the authentication token, they don't have access to do so.

Authentication: [insert Authentication Token]

Row IDs

Depending on the platform that you're using, you may need to create a workaround to store the Row ID that Glide produces each time a new row is added within the table.

Configuring the Row IDs in the zap.

In this scenario, you need to store the Row ID that gets returned whenever a row is created and map it to the ID of the lead inside ClickUp.

Some platforms don't have an action where you can update a custom field inside of a task.

Here, you've created a third step in our Zap to create a new row in a Google Sheet to store the Row ID that was added in the Glide Table. In this example, you're mapping this Row ID to the ID of the object inside ClickUp. This helps you map each lead in ClickUp to a specific row inside of Glide. You'll need this when updating or deleting the rows as shown below.

The rows of data to be updated.

Turn the Zap on. Now, when you add a new lead inside ClickUp, you'll see it adds a new row to the Glide Table

Update Row (Set Columns)

The next Zap is set to update a row based on activity inside ClickUp. Again, using Webhooks by Zapier (Custom Request action), copy the Set Columns API usage:

Just like when adding a row, most details will remain the same. The only thing that has changed is the JSON object.

  • The action is now set-columns instead of add row

  • You also need to define the Row ID so that Glide knows which row you want to update

Inside your Zap

  1. Your trigger is whenever a lead in ClickUp is changed to a qualified status,

  2. you have an action to look up the Row ID based on the ClickUp ID for that lead, and

  3. then you send another custom request (or custom API call):

1 { 2 "kind": "set-columns-in-row", 3 "tableName": "TABLE-NAME", 4 "columnValues": { 5 "COLUMN-NAME": "COLUMN-VALUE", 6 ... 7 }, 8 9 ROW-ID-OR-INDEX 10 }

The only things being changed are:

  • Any columns you'd like to update. (In this instance, you're setting your Glide Table Boolean column to true)

  • And you update the Row ID value to the value produced by the lookup action that looks up, in our Google Sheet, the Row ID based on the ClickUp ID for that lead.

Updating the Row ID in our Zapier configuration.

You may see the ROW-ID-OR-INDEX displayed as ROW-ID or rowIndex: ROW-INDEX. ROW-INDEX should only be used for Google Sheets tables. It must be a zero-based number as the first row in the sheet has an index of 0.

Now, when you move a lead into “qualified”, you'll see the row gets updated with the values you've configured.

Delete Row

Just like when updating a row, the Zap configuration will mostly remain the same. Again, the only thing that has changed is the JSON object.

  • The action is now delete-row

  • You only need to define the Row ID so that Glide knows which row you want to delete

The Delete Row API information.

Inside your Zap

  1. Your trigger is whenever a lead in ClickUp is changed to a disqualified status,

  2. you have an action to Lookup the RowID based on the ClickUp ID for that lead, and

  3. then you send another custom request (or custom API call):

1 { 2 "kind": "delete-row", 3 "tableName": "TABLE-NAME", 4 ROW-ID-OR-INDEX 5 }

Passing through the row ID to be deleted.

Now, when you move a lead into “disqualified”, you'll see the row gets deleted from the Glide Table

Learn Glide Tables API

Want to see the API in action? Explore the resources below.

Article: Using Glide Tables API

Video: How to Use the Glide Tables API (Getting Started in 2022)

Have a question about Getting Started with the Glide API? Ask the Glide community.

Updated more than a week ago
Was this article helpful?