Users
A user is a unique user attached to an email address. These accounts can then be used to access Glide apps. You can design different user experiences in a variety of ways. Depending on your plan, your team will have different usage quotas for users, but these can be flexibly increased with unlimited usage. Users are counted per team, not per app, so the same user logging into multiple apps on the same team will only count once toward usage.
A personal user is a user that signs into a Glide app using a personal email domain, such as Gmail, or an education email domain, such as .edu. Personal users are not the same as private or public app users. Glide apps can be public or private.
Usage and Active Users
For billing purposes, only active users in a given billing period are counted. For example, your app may have 200 users who have accounts associated with their email address. If only 150 of those users interact with the app in a billing period, then only 150 users will be counted toward your usage for that period.
Access and Privacy
In your app’s Access Settings, you’ll be able to choose whether your app is private or public. Depending on which one you pick, you’ll see controls for which users can sign in.

There are quite a few different combinations you can create here. Below is a list of all the different types of access settings you can create.
Private vs. Public Apps
Private apps have users with assigned Roles, or users who sign into apps that limit access via the User Table, Team Member access, Allowed Domains, Emails in a Table, or SSO. Public apps are viewable by anyone who visits them, and no sign in or authentication is required.
To read more about the full range of privacy options for your apps, check out our App Settings guide.
Private apps
Private apps are not viewable to anyone without signing in. Further, only the people you allow to sign in through the Privacy Settings will be able to access your app. You can make private apps that are:
- Accessible only by users in the users table
- Accessible only by members of your Glide team
- Accessible only by people with an email matching your domain
- Accessible only by people in a specific table that you set
If your app contains any sensitive, private, or personal information, then you should use a private sign-in setting.
Public apps
Public apps are always accessible by anyone in the world who has the link. Using the combination of settings in the Privacy Settings area, you can create public apps that are:
- Publicly accessible with no sign-in (users won’t have profiles)
- Publicly accessible, but users must sign-in
- Publicly accessible, with optional sign-in
User table
A user table is where the data for each of your users is stored. Every Glide app has one. Each row represents a user, and each column a property connected to that user. This table is essential unless your app is entirely public with no sign-in.
When you create a new app, Glide automatically creates a Users table and assigns it as your User Profile Table. While the default user profiles table is a Glide Table, you can create a table in another data source such as Google Sheets to use as the user profiles table instead.
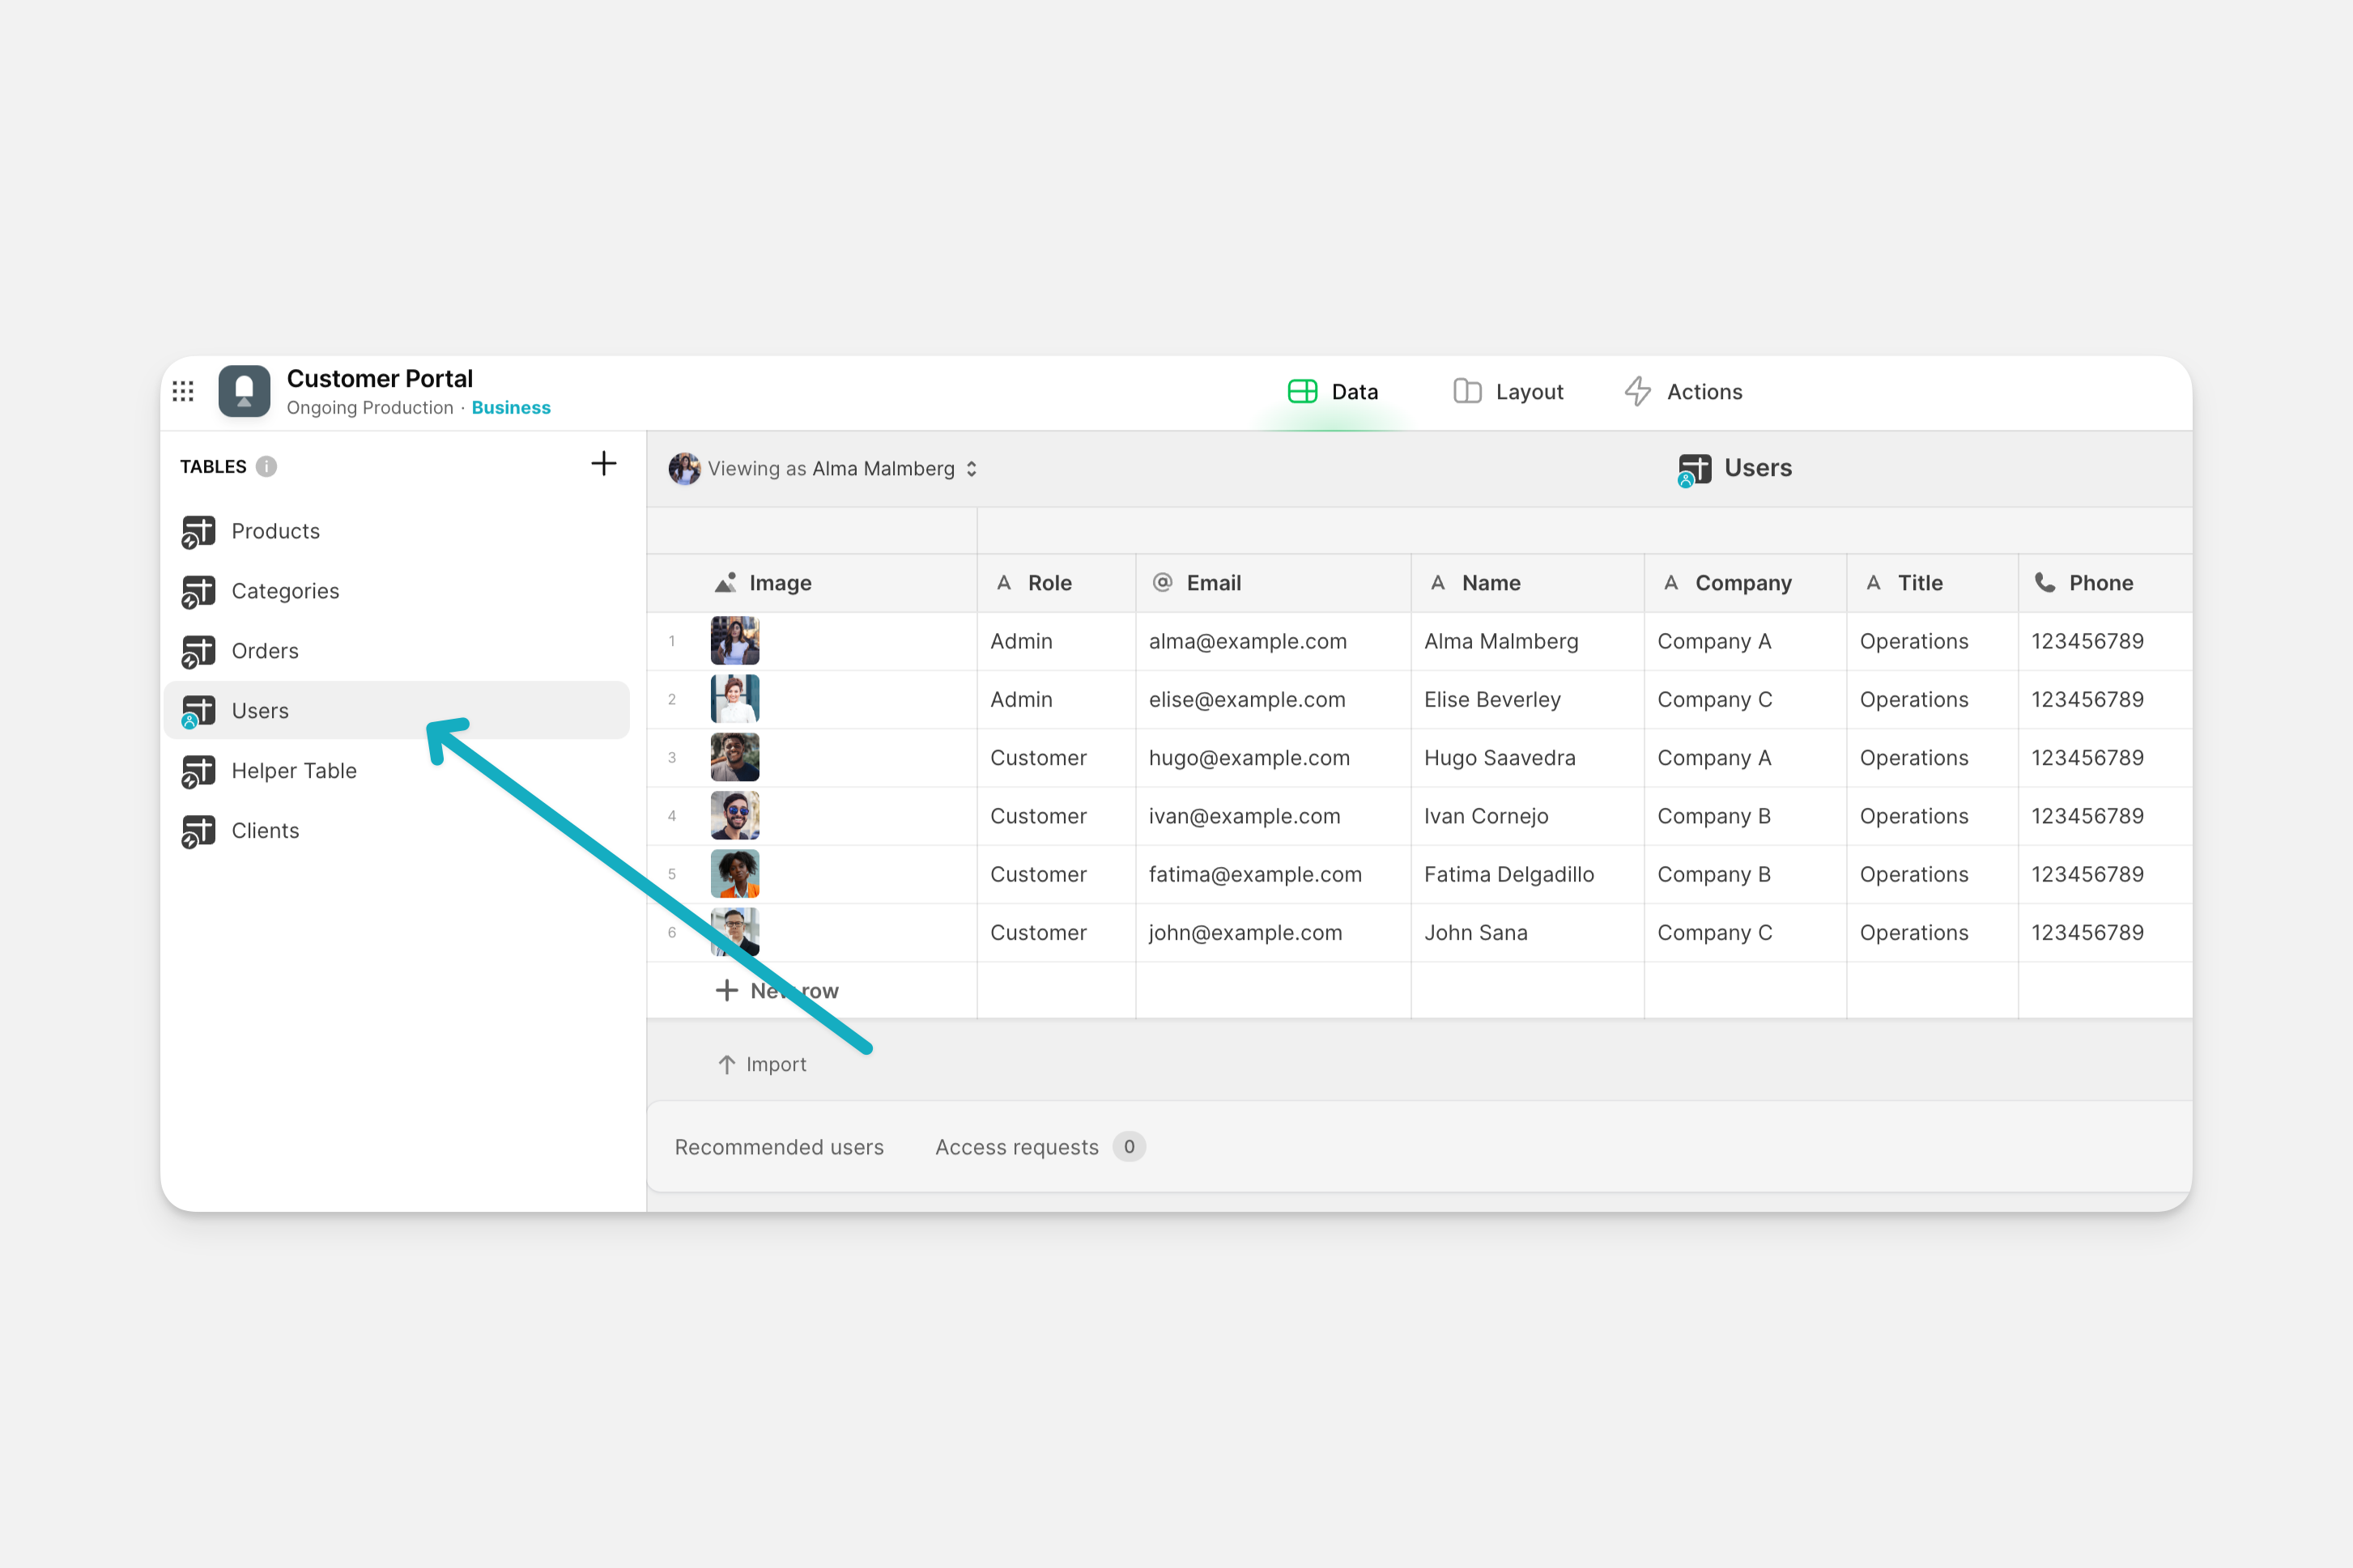
User Tables Require At Least 3 Basic Columns
All user tables must have at least 3 basic columns. They can be any type of basic column, but there must be at least 3.
Apps with sign-in enabled can use Role columns. You can add as many columns as you like and use these properties in many different ways. For example:
- Only show users a tab if their age is greater than 15
- Create a list of all the users who signed up more than five months ago
- Give editing rights only to Admins
- Create teams that people belong to
- Show and hide items depending on users’ interests
Row owners and user privacy
User data in a User Table is often private and needs to be kept secure. Row owners is enabled on user tables by default. Learn about Row Owners here.
User profile screen
When a user clicks on their profile image in the menu bar, they will be taken to their user profile screen, which is powered by the row in the users table that contains their information.
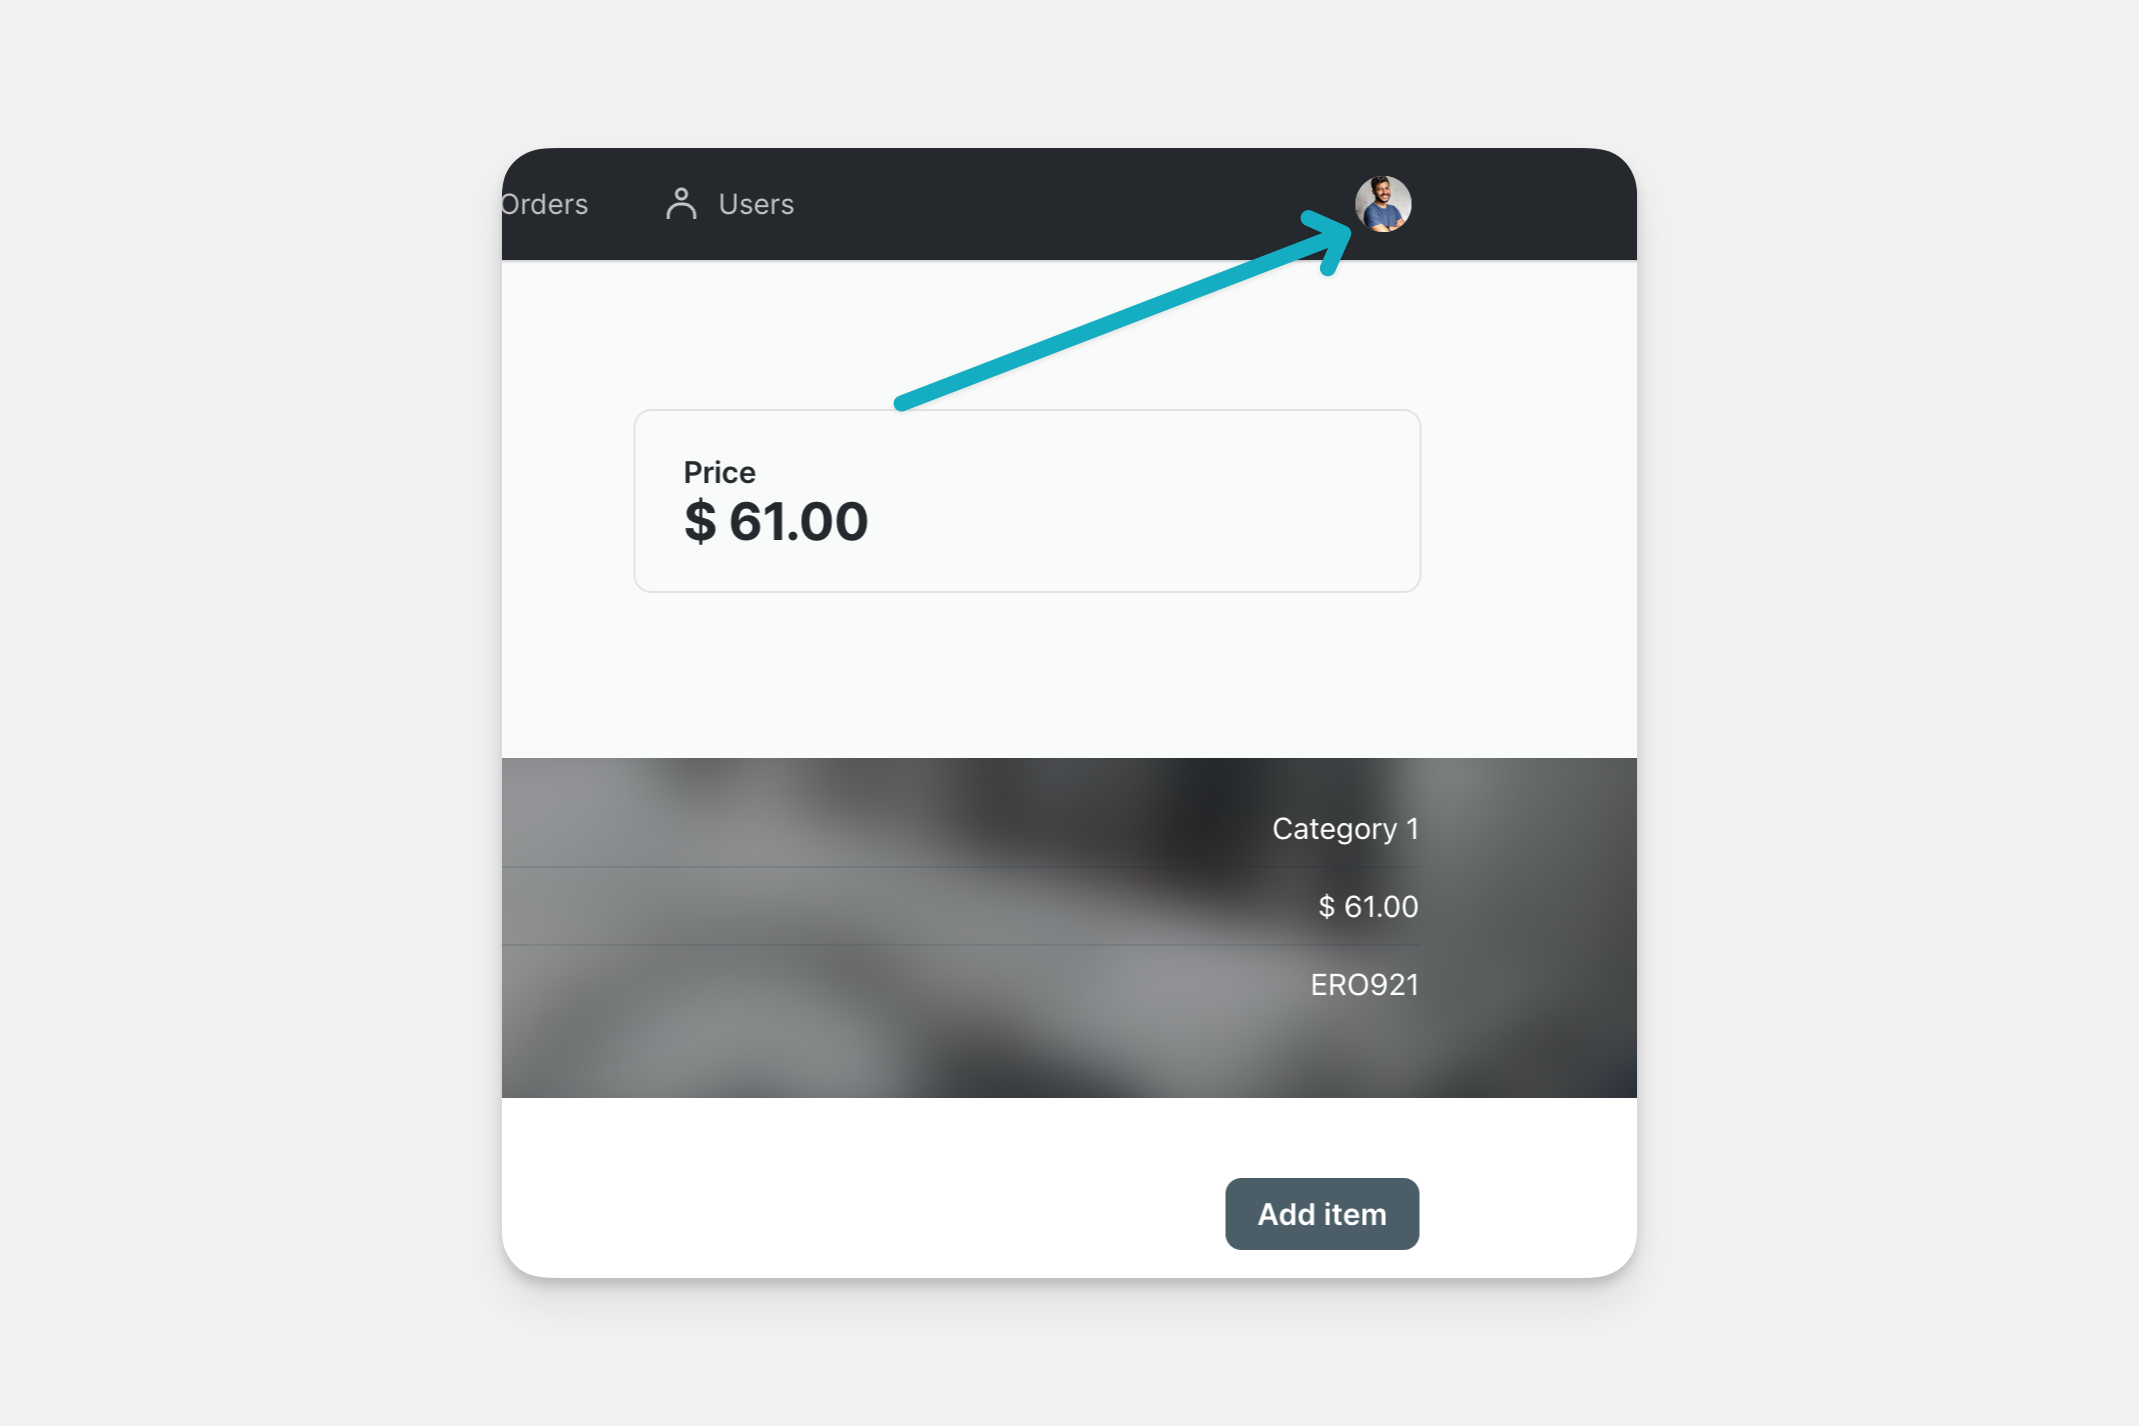
You can configure this screen with Components to show users their information and allow them to edit it.
On desktop devices this will be on the bottom left of the app and on mobile devices this will be in the flyout menu on the top left.
Roles
For greater control of your app’s data, you can assign Roles to the users in your user profiles table. You can then use these Roles with Row Owner columns to make certain records only accessible to certain users.
This allows you to, for example, give many people the role of Admin and then make Admin a Row Owner for certain rows. Now, only people with the role of Admin will be able to access the data in those rows.
Viewing as user
The Viewing as user menu in Glide shows you all the users who are in your Users Table. Depending on your settings, it defaults to either viewing as anyone or as the first user in the table. If you visit the User Profile Screen and switch users, you’ll see the screen change. Or, if you’re in the Users Table in the Data Editor, you’ll see the data change.
This is an incredibly useful tool if you are building an app with lots of different user data and need to see the experience that different users will have.
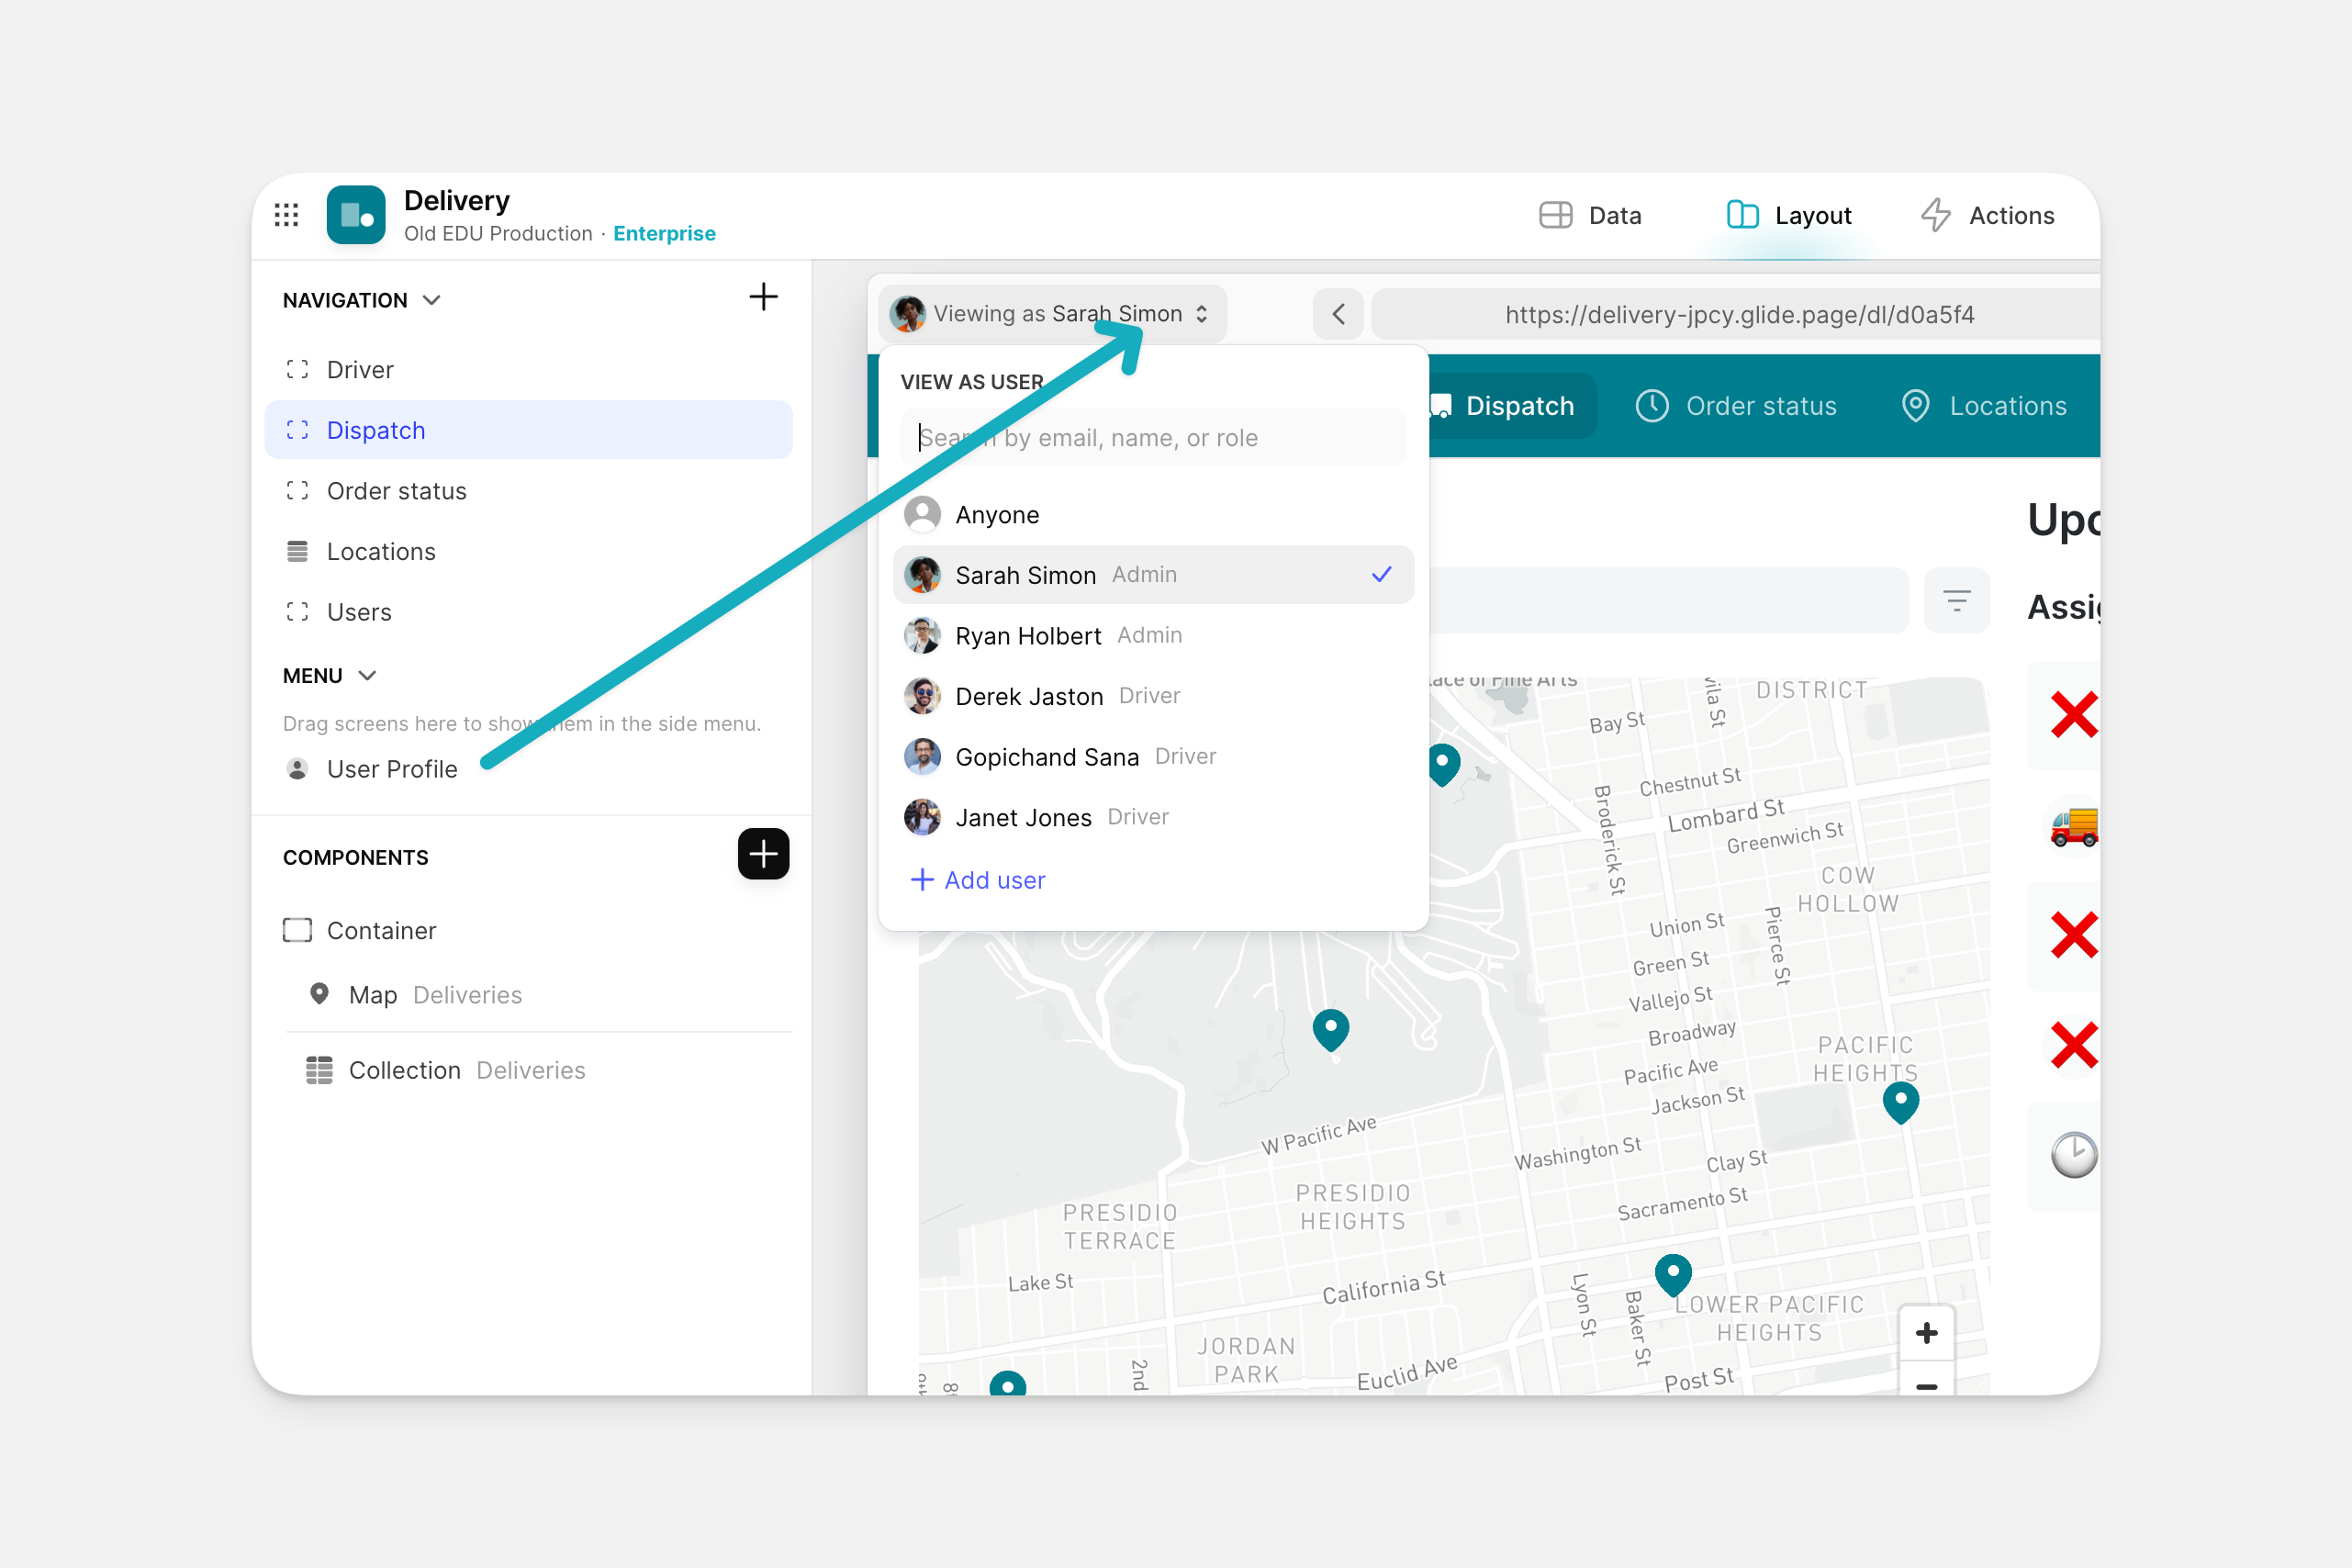
You can find the Viewing as menu in both the Data Editor and the Layout Editor. To switch between different users, click on the Viewing as menu and choose a user from the options or type in their name, email address, or role.
User-specific columns
User-specific Columns allow cells to hold unique data for each user. This means each user can experience their own data for a particular item.
For example, in the table below, there is a column for Notes. This allows users to write their own notes on each item in the app. In the Data Editor, you’ll see a slightly different color for this column indicating that it’s user-specific. If you switch between users with the viewing as menu, you’ll see the data in this column change and you’ll be able to edit it for different users.
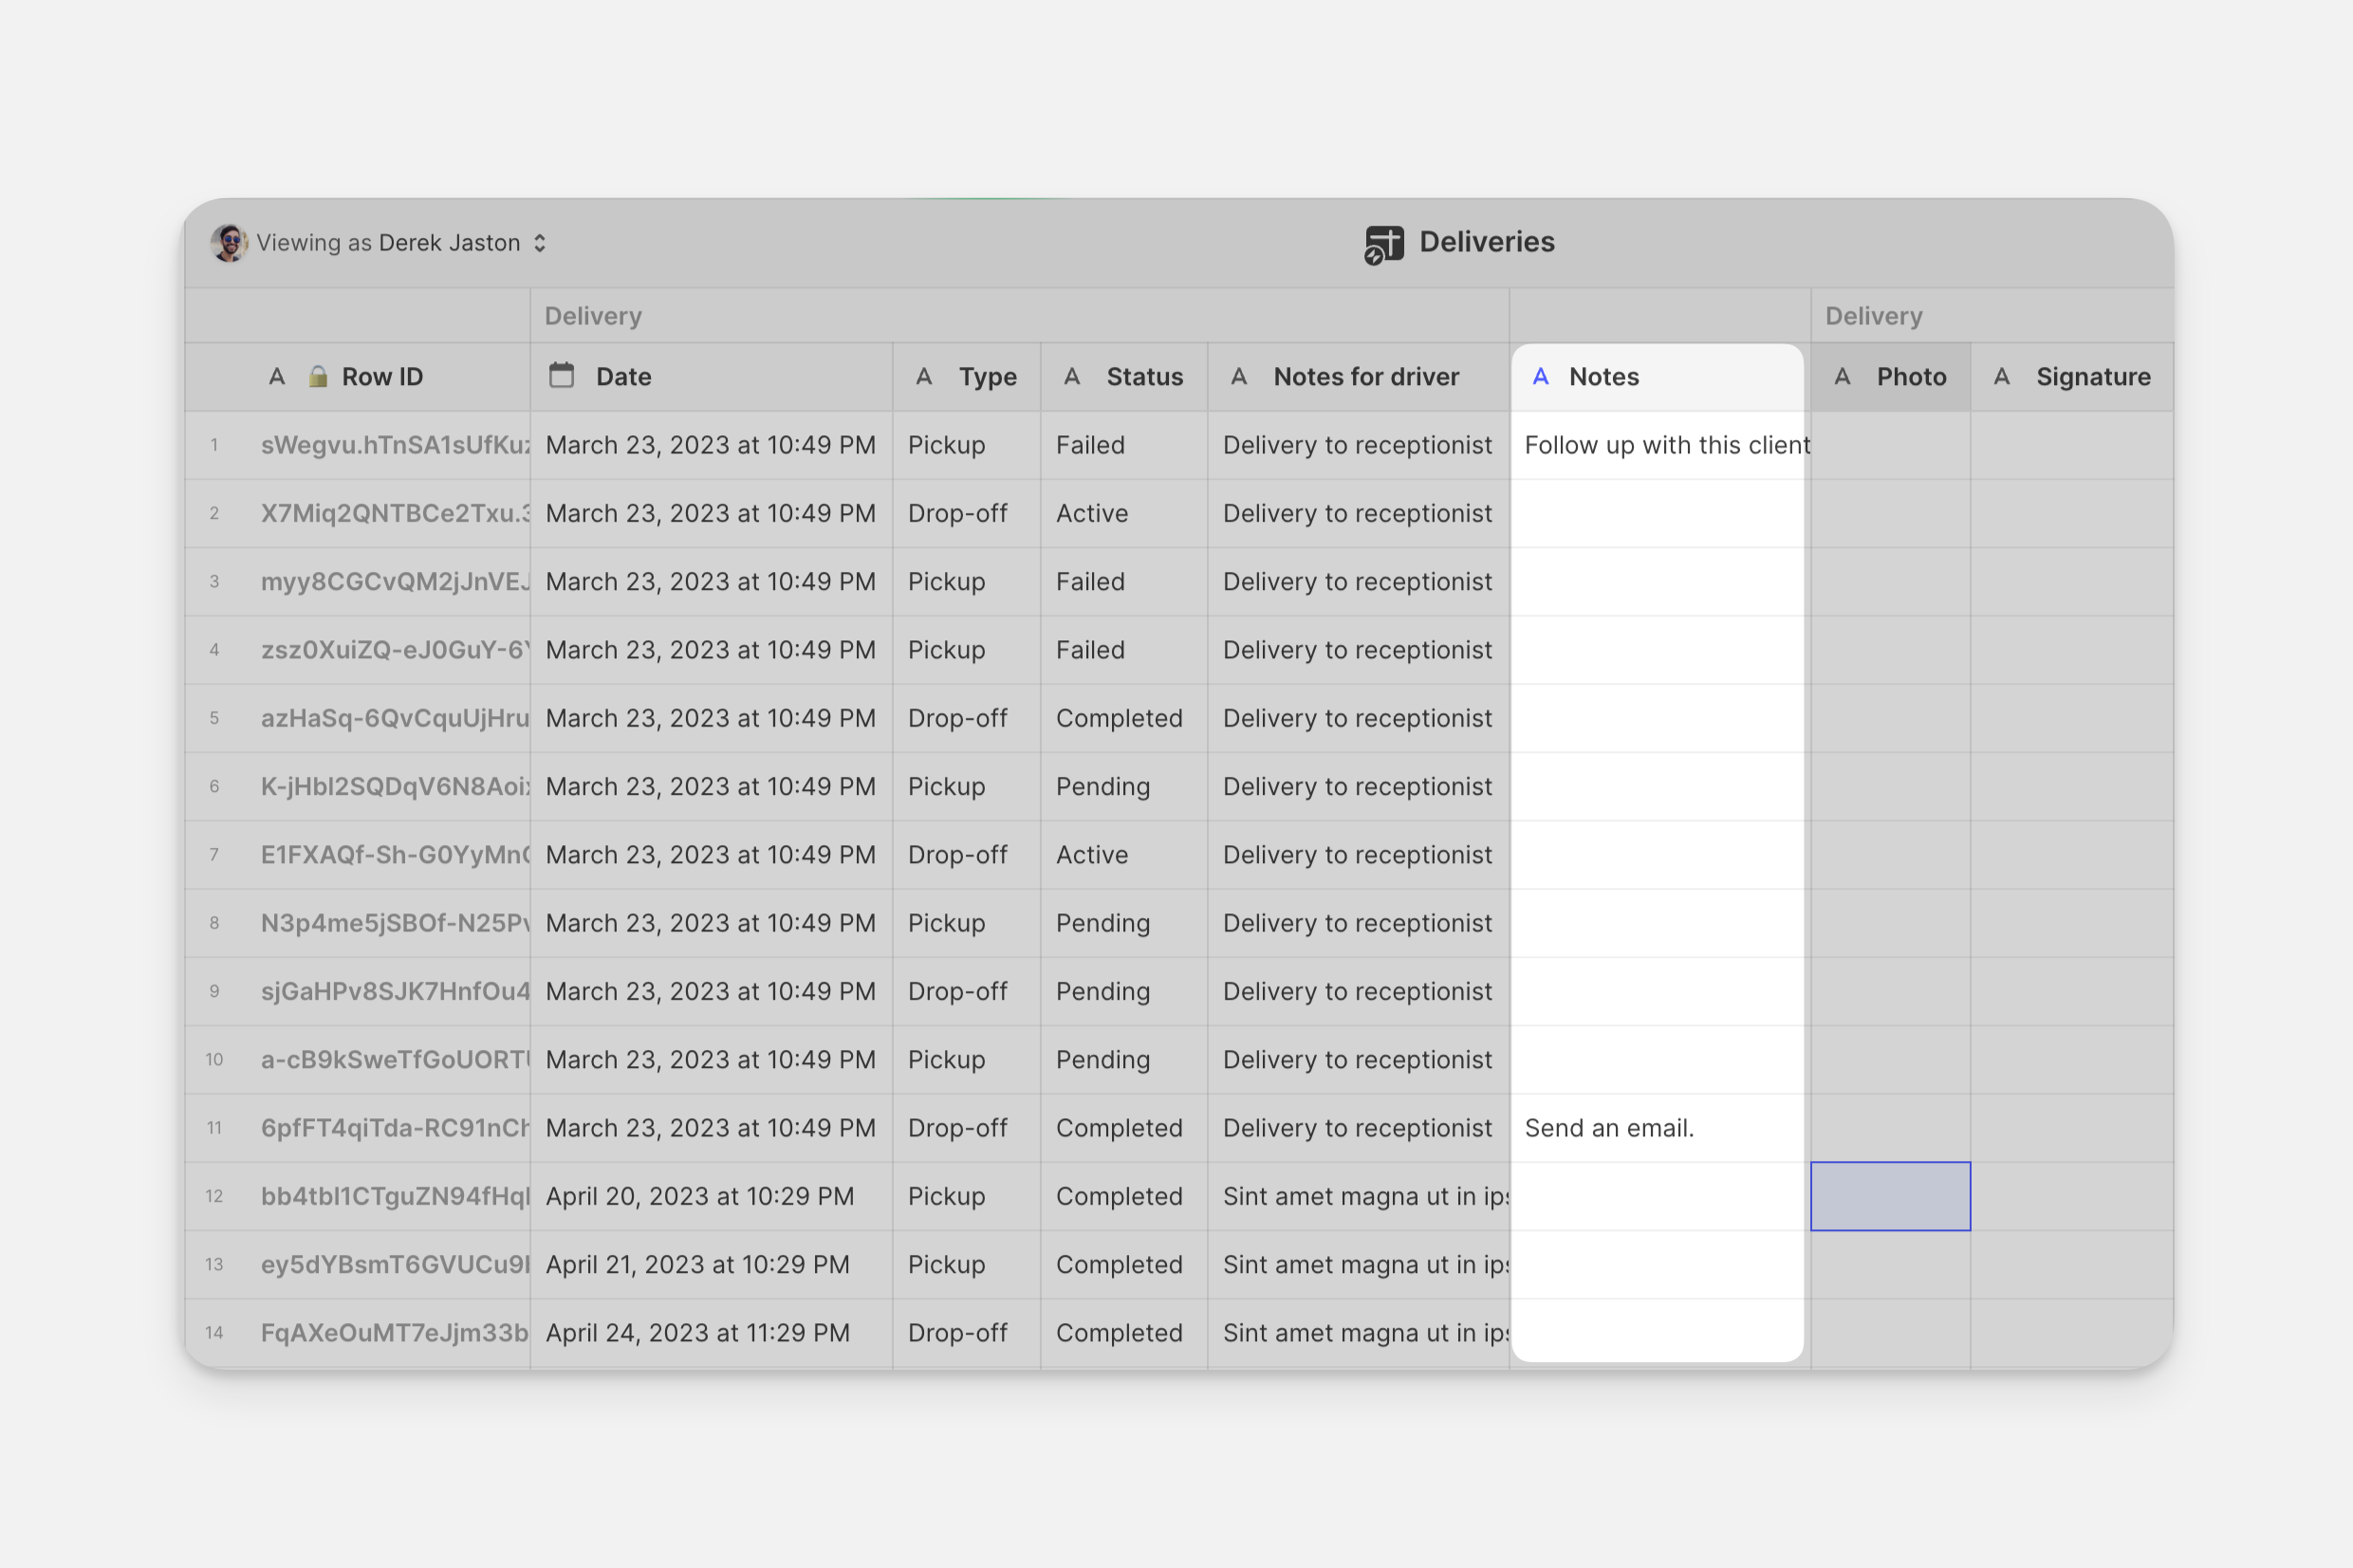
Without user-specific columns, this note would appear to everyone else who can see that row. And if someone else changed that note, it would change for everyone else. This is obviously not ideal!
Now, when users make notes in this section, those notes are specific to them. In other words, that single cell will contain a unique value for each user. If you have 1,000 users, there will be 1,000 different versions of that cell—one for every user.
Creating user-specific experiences
With Glide, you can make apps that are public and don’t have any focus on User-specific Data. But you may want to give each user a unique experience, and there are many different ways to create user-specific experiences. For example:
- Allow users to save favorites
- Show different tabs to different users
- Only allow admins to edit records
- Let everyone have an individual rating for a specific item
- Let everyone see their own private notes about a particular item/event
- Allow a user to do or see something when they have reached a certain level
Inviting Users
To learn about how to invite people to your app, check out our Publishing and Sharing guide here.
Frequently Asked Questions
What is the difference between the number of users shown on my app's badge and the number of users shown on the Usage page?
The number of users shown on an app’s badge in your dashboard is the number of unique users who have logged into the app in the last 30 days. This is a streamlined way to track engagement with your apps. On your Usage page, you can see your Private User and Public User quotas. These are the number of unique users who have logged into public apps or private apps during your billing period. Only unique users count toward your team’s quotas. For example, a user who logs into two private apps counts as one private user on the Usage page. However, on the team dashboard, the user will count as one user in each app.
How are private and public users counted for usage?
In our Legacy Plans, Private and Public users were categorized separately. This is no longer the case. Current pricing counts all users who are active in a billing period, regardless of whether they are public or private.